
Android中自定义一个View的方法详解

本文实例讲述了Android中自定义一个View的方法。分享给大家供大家参考,具体如下:
Android中自定义View的实现比较简单,无非就是继承父类,然后重载方法,即便如此,在实际编码中难免会遇到一些坑,我把自己遇到的一些问题和解决方法总结一下,希望对广大码友们有所帮助。
注意点① 用xml定义Layout时,Root element 最好使用merge
当我们需要继承一个布局比较复杂的ViewGroup(比较多的是LinearLayout、RelativeLayout)时,通常会用xml来写布局,然后在自定义的View类中inflate这个定义了layout的xml文件。
首先新建一个名为 MyLayout 的 class 文件,在 init 方法中解析稍后定义的xml文件。
/**
 * Created by liangfei on 4/14/15.
 */
public class MyLayout extends LinearLayout {
  public MyLayout(Context context) {
    super(context);
    init();
  }
  private void init() {
    setOrientation(VERTICAL);
    View rootView = inflate(getContext(), R.layout.my_layout, this);
    ((TextView) rootView.findViewById(R.id.title)).setText("MyLayout");
    ((TextView) rootView.findViewById(R.id.desc)).setText("A customized layout");
  }
}
然后新建一个取名为my_layout的布局文件, 并把 Root element 设置成merge。
<?xml version="1.0" encoding="utf-8"?>
<merge xmlns:android="http://schemas.android.com/apk/res/android">
  <TextView
    android:id="@+id/title"
    android:textSize="16sp"
    android:layout_width="wrap_content"
    android:layout_height="wrap_content" />
  <TextView
    android:id="@+id/desc"
    android:layout_width="wrap_content"
    android:layout_height="wrap_content" />
</merge>
用 Android SDK 附带的 Monitor 工具查看一下运行时的布局信息。
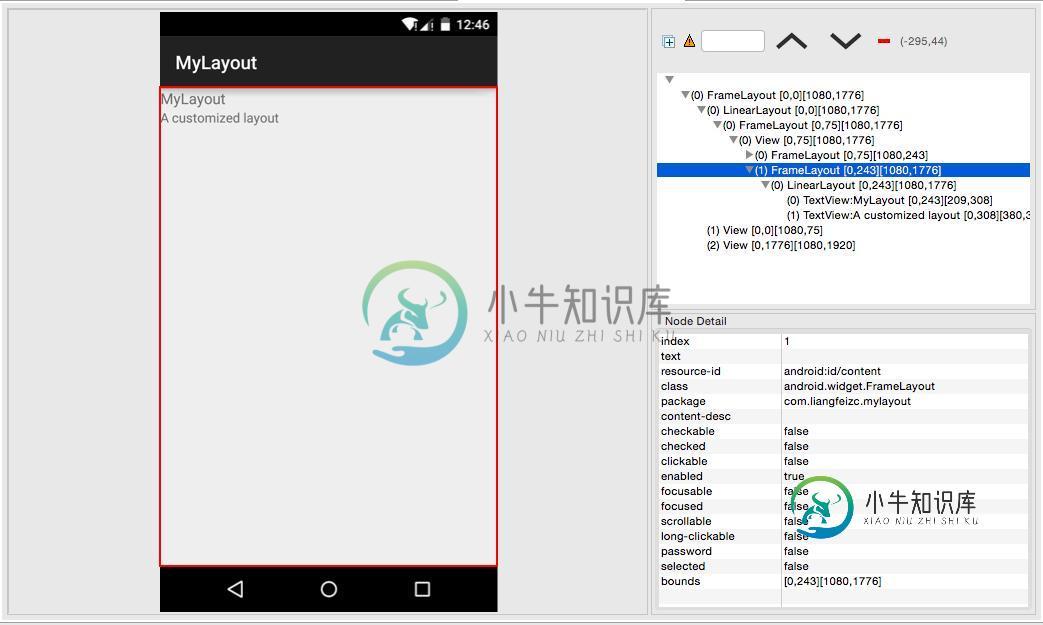
最顶层是一个FrameLayout,然后是一个LinearLayout,里面有两个TextView,可以看出布局没有冗余。
但是,如果把 Root element 换成 LinearLayout,效果会怎么样呢?
<?xml version="1.0" encoding="utf-8"?>
<LinearLayout xmlns:android="http://schemas.android.com/apk/res/android"
  android:orientation="vertical"
  android:layout_width="wrap_content"
  android:layout_height="wrap_content">
  <TextView
    android:id="@+id/title"
    android:textSize="16sp"
    android:layout_width="wrap_content"
    android:layout_height="wrap_content" />
  <TextView
    android:id="@+id/desc"
    android:layout_width="wrap_content"
    android:layout_height="wrap_content" />
</LinearLayout>

很明显,用 LinearLayout 做 Root element 后,布局多了一个层级,成了影响性能的一个因素。
注意点② 重载子类构造函数时要弄清楚父类做了哪些操作
先从我一个惨痛的教训开始,当时我这样自定义了一个Button:
/**
 * Created by liangfei on 4/14/15.
 */
public class MyButton extends Button {
  public MyButton(Context context) {
    this(context, null);
  }
  public MyButton(Context context, AttributeSet attrs) {
    this(context, attrs, 0);
  }
  public MyButton(Context context, AttributeSet attrs, int defStyleAttr) {
    super(context, attrs, defStyleAttr);
    init();
  }
}
乍一看貌似没什么问题,构造函数的调用方式都是正确的,但是无论我怎么修改 MyButton 的属性,显示方式就是不正确。
其实问题就出在Button类在构造函数中使用了一个defStyleAttr, 而我这种写法会忽略掉这个defStyleAttr - com.android.internal.R.attr.buttonStyle,稍读源码就知道了。
@RemoteView
public class Button extends TextView {
  public Button(Context context) {
    this(context, null);
  }
  public Button(Context context, AttributeSet attrs) {
    this(context, attrs, com.android.internal.R.attr.buttonStyle);
  }
  public Button(Context context, AttributeSet attrs, int defStyleAttr) {
    this(context, attrs, defStyleAttr, 0);
  }
  public Button(Context context, AttributeSet attrs, int defStyleAttr, int defStyleRes) {
    super(context, attrs, defStyleAttr, defStyleRes);
  }
}
后来写代码的时候,我都是看了父类的源码之后才敢这么写,如果不确定就老老实实地写成下面这种形式。
/**
 * Created by liangfei on 4/14/15.
 */
public class MyButton extends Button {
  public MyButton(Context context) {
    super(context);
    init();
  }
  public MyButton(Context context, AttributeSet attrs) {
    super(context, attrs);
    init();
  }
  public MyButton(Context context, AttributeSet attrs, int defStyleAttr) {
    super(context, attrs, defStyleAttr);
    init();
  }
}
其实,还有很多其他的坑,比如 Button 的高度,后面抽时间再总结一下
更多关于Android相关内容感兴趣的读者可查看本站专题:《Android视图View技巧总结》、《Android操作XML数据技巧总结》、《Android编程之activity操作技巧总结》、《Android资源操作技巧汇总》、《Android文件操作技巧汇总》、《Android操作SQLite数据库技巧总结》、《Android操作json格式数据技巧总结》、《Android数据库操作技巧总结》、《Android编程开发之SD卡操作方法汇总》、《Android开发入门与进阶教程》及《Android控件用法总结》
希望本文所述对大家Android程序设计有所帮助。
-
本文向大家介绍Android自定义View详解,包括了Android自定义View详解的使用技巧和注意事项,需要的朋友参考一下 转载请标明出处:http://blog.csdn.net/lmj623565791/article/details/24252901 很多的Android入门程序猿来说对于Android自定义View,可能都是比较恐惧的,但是这又是高手进阶的必经之路,所有准备在自定义Vi
-
本文向大家介绍详解Android自定义View--自定义柱状图,包括了详解Android自定义View--自定义柱状图的使用技巧和注意事项,需要的朋友参考一下 绪论 转眼间,2016伴随着互联网寒冬和帝都的雾霾马上就过去了,不知道大家今年一整年过得怎么样?最近票圈被各个城市的雾霾刷屏,内心难免会动荡,庆幸自己早出来一年,也担忧着自己的未来的职业规划。无所谓了,既然选择了这个行业,我觉得大家就应该坚
-
本文向大家介绍Android自定义View构造函数详解,包括了Android自定义View构造函数详解的使用技巧和注意事项,需要的朋友参考一下 初始Custom View的构造函数 之前写过一篇实现圆形进度条的博客(自定义圆形进度条),通常我们在实现Custom View的时候,都会先继承View并实现View的三个构造函数,例如: 网上有很多关于三个构造函数使用时机的说法,但是说法正确的却没有几
-
本文向大家介绍Android 使用Kotlin自定义View的方法教程,包括了Android 使用Kotlin自定义View的方法教程的使用技巧和注意事项,需要的朋友参考一下 前言 随着google宣布kotlin作为官方开发语言,在Android中使用kotlin的趋势也越来越明显,最近被kotlin的文章轰炸了,所以决定上手试一下,试过之后,感觉靠它灵简直有魔性。特别是一句话写出一个复杂的循环
-
本文向大家介绍详解Android XML中引用自定义内部类view的四个why,包括了详解Android XML中引用自定义内部类view的四个why的使用技巧和注意事项,需要的朋友参考一下 今天碰到了在XML中应用以内部类形式定义的自定义view,结果遇到了一些坑。虽然通过看了一些前辈写的文章解决了这个问题,但是我看到的几篇都没有完整说清楚why,于是决定做这个总结。 使用自定义内部类view的
-
本文向大家介绍Android 自定义View步骤,包括了Android 自定义View步骤的使用技巧和注意事项,需要的朋友参考一下 例子如下:Android 自定义View 密码框 例子 1 良好的自定义View 易用,标准,开放。 一个设计良好的自定义view和其他设计良好的类很像。封装了某个具有易用性接口的功能组合,这些功能能够有效地使用CPU和内存,并且十分开放的。但是,除了开始一个设计良好