element-ui tree结构实现增删改自定义功能代码
首先是页面部分
<template>
 <el-tree
  id="userMtree"
  ref="tree"
  :data="treeData"
  node-key="id"
  :render-content="renderContent"
  :expand-on-click-node="false"
  @node-click="nodeClick"
  :default-expanded-keys='expandedKey'
 ></el-tree>
</template>
下面是js部分
export default {
 props:['treeDataObj','isUserMgt'],//父级传值 与判断哪个tree
 data () {
  return {
   treeData:[],//tree数据
   expandedKey:[],//展开节点
   checkedID:''//选中节点
  }
 },
 mounted(){
  this.treeData=this.treeDataObj.treeData
  let userMtree=document.getElementById('userMtree')
  this.$nextTick(()=>{
   userMtree.firstElementChild.classList.add("is-current");//添加选中类名
  })
  this.checkedID=this.treeData[0].id//默认选中第一个
 },
 methods:{
//编辑
  nodeEdit(ev, store, data) {
   data.isEdit = true;
   this.$nextTick(() => {//得到input
    const $input =
     ev.target.parentNode.parentNode.querySelector("input") ||
     ev.target.parentElement.parentElement.querySelector("input");

    !$input ? "" : $input.focus();//获取焦点
   });
  },
//失焦事件
  edit_sure(ev, data) {
   const $input =
    ev.target.parentNode.parentNode.querySelector("input") ||
    ev.target.parentElement.parentElement.querySelector("input");
   if (!$input) {
    return false;
   } else if($input.value==''){
    this.$message({
     type: "info",
     message: "内容不能为空!"
    });
   }else{//赋值value
    data.label = $input.value;
    data.isEdit = false;
   }
  },
//react方法 插入代码
  renderContent(h, { node, data, store }) {
   return (
    <span class="custom-tree-node">
     <span class="tree_node_label">{this.showOrEdit(data)}</span>
     <div class="tree_node_op">
      <i class="el-icon-edit" on-click={ev => this.nodeEdit(ev, store, data)}/>
      <i class="el-icon-remove-outline"
      on-click={() => this.nodeDelete(node, data)}/>
      {
       this.isUserMgt?<i class="el-icon-circle-plus-outline"
        on-click={() => this.append( data)}></i>:''
      }
     </div>
    </span>
   );
  },
  showOrEdit(data) {
   if (data.isEdit) {
    return (
     <input type="text" class="node_labe" value={data.label}
      on-blur={ev => this.edit_sure(ev, data)} />
    );
   } else {
    return <span class="node_labe">{data.label}</span>;
   }
  },
//新增节点
  append(data) {
   const newChild = { id: new Date().getTime(), label: '', children: [],
      isEdit: true };
//判断是否有子节点
   if (!data.children) {
    this.$set(data, 'children', []);
   }
   data.children.push(newChild);
   this.expandedKey=[data]//展开点击节点
  },
//移除节点
  nodeDelete(node, data) {
   const parent = node.parent
   const children = parent.data.children || parent.data
   const index = children.findIndex(d => d.id === data.id)
   children.splice(index, 1)
  },
//点击节点 移除默认选中节点
  nodeClick(data){
   let userMtree=document.getElementById('userMtree')
   userMtree.firstElementChild.classList.remove("is-current");
   this.checkedID=data.id
   console.log(data)
   this.$emit('emitClickNode',data)
  }
 }
}
补充知识:vue前端基础之组件封装(树组件的封装附带增删改查方法)
组件封装的意义
组件封装的意义其实很好理解,对于一段复用性极高的代码,就需要进行组件封装以减少冗余代码。
树的封装
<template>
 <el-aside width="180px">
  <h3 class="el-icon-folder" style="margin: 0px">
   {{ name }}
  </h3>
  <el-tree
   ref="tree"
   :data="setTree"
   :props="defaultProps"
   node-key="id"
   style="margin-top:20px"
   accordion
   @node-contextmenu="rihgtClick"
  >
   <span slot-scope="{ node, data }" class="span-ellipsis">
    <span v-show="!node.isEdit">
     <span v-show="data.children && data.children.length >= 1">
      <span :title="node.label">{{ node.label }}</span>
     </span>
     <span v-show="!data.children || data.children.length == 0">
      <span :title="node.label"> {{ node.label }}</span>
     </span>
    </span>
   </span>
  </el-tree>
  <!--鼠标右键点击出现页面-->
  <div v-show="menuVisible">
   <el-menu
    id="rightClickMenu"
    class="el-menu-vertical"
    text-color="#000000"
    active-text-color="#000000"
    @select="handleRightSelect"
   >
    <el-menu-item index="1" :hidden="showQuery" class="menuItem">
     <span slot="title">查询</span>
    </el-menu-item>
    <el-menu-item index="2" :hidden="showSave" class="menuItem">
     <span slot="title">添加</span>
    </el-menu-item>
    <el-menu-item index="3" :hidden="showUpdate" class="menuItem">
     <span slot="title">修改</span>
    </el-menu-item>
    <el-menu-item index="4" :hidden="showDelete" class="menuItem">
     <span slot="title">删除</span>
    </el-menu-item>
   </el-menu>
  </div>
 </el-aside>
</template>
<script>
export default {
 name: 'Tree',
 props: {
  treeData: {
   type: Array,
   required: true
  },
  treeName: {
   type: String,
   required: true,
   default: '树'
  },
  isHiddenQuery: {
   type: Boolean,
   required: false,
   default: true
  },
  isHiddenSave: {
   type: Boolean,
   required: false,
   default: false
  },
  isHiddenUpdate: {
   type: Boolean,
   required: false,
   default: false
  },
  isHiddenDelete: {
   type: Boolean,
   required: false,
   default: false
  }
 },
 data() {
  return {
   setTree: this.treeData,
   showQuery: this.isHiddenQuery,
   showSave: this.isHiddenSave,
   showUpdate: this.isHiddenUpdate,
   showDelete: this.isHiddenDelete,
   name: this.treeName,
   TREEDATA: {
    DATA: null,
    NODE: null
   },
   isLoadingTree: true, // 是否加载节点树
   objectID: null,
   defaultProps: {
    children: 'children',
    label: 'name'
   },
   menuVisible: this.menuVisible
  }
 },
 watch: {
  treeData(val) {
   this.setTree = val
  },
  treeName(val) {
   this.name = val
  }
 },
 methods: {
  handleRightSelect(key) {
   if (key === '1') {
    this.$emit('NodeQuery', this.TREEDATA)
    this.menuVisible = false
   } else if (key === '2') {
    this.$emit('NodeAdd', this.TREEDATA)
    this.menuVisible = false
   } else if (key === '3') {
    this.$emit('NodeUpdate', this.TREEDATA)
    this.menuVisible = false
   } else if (key === '4') {
    this.$emit('NodeDel', this.TREEDATA)
    this.menuVisible = false
   }
  },
  rihgtClick(event, object, value, element) {
   if (this.objectID !== object.id) {
    this.objectID = object.id
    this.menuVisible = true
    this.TREEDATA.DATA = object
    this.TREEDATA.NODE = value
   } else {
    this.menuVisible = !this.menuVisible
   }
   document.addEventListener('click', e => {
    this.menuVisible = false
   })
   const menu = document.querySelector('#rightClickMenu')
   /* 菜单定位基于鼠标点击位置 */
   menu.style.left = event.clientX - 180 + 'px'
   menu.style.top = event.clientY - 100 + 'px'
   menu.style.position = 'absolute' // 为新创建的DIV指定绝对定位
   menu.style.width = 120 + 'px'
  }
 }
}

</script>

<style lang="scss" scoped>
.span-ellipsis {
 width: 100%;
 overflow: hidden;
 margin-left: 10px;
 white-space: nowrap;
 text-overflow: ellipsis;
}
</style>
对于组件的引用
import tree from '@/components/Tree/index'
export default {
 components: { tree },
 data() {}
 ......
组件的使用
<tree
 :tree-data="setTree"
 :tree-name="treeName"
 @NodeAdd="NodeAdd"
 @NodeUpdate="NodeUpdate"
 @NodeDel="NodeDel"
/>
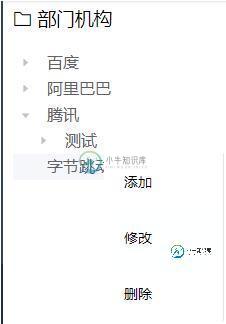
setTree是要给树赋予的值,treeName是树的标题(可不要),后面是需要的树的右键操作我启用了增删改
效果图

子组件向父组件传值
handleRightSelect(key) {
 if (key === '1') {
  this.$emit('NodeQuery', this.TREEDATA)
  this.menuVisible = false
 } else if (key === '2') {
  this.$emit('NodeAdd', this.TREEDATA)
  this.menuVisible = false
 } else if (key === '3') {
  this.$emit('NodeUpdate', this.TREEDATA)
  this.menuVisible = false
 } else if (key === '4') {
  this.$emit('NodeDel', this.TREEDATA)
  this.menuVisible = false
 }
}
以上这篇element-ui tree结构实现增删改自定义功能代码就是小编分享给大家的全部内容了,希望能给大家一个参考,也希望大家多多支持小牛知识库。
-
本文向大家介绍BootstrapTable与KnockoutJS相结合实现增删改查功能【一】,包括了BootstrapTable与KnockoutJS相结合实现增删改查功能【一】的使用技巧和注意事项,需要的朋友参考一下 Bootstrap是一个前端框架,解放Web开发者的好东东,展现出的UI非常高端大气上档次,理论上可以不用写一行css。只要在标签中加上合适的属性即可。 KnockoutJS是一个
-
本文向大家介绍BootstrapTable与KnockoutJS相结合实现增删改查功能【二】,包括了BootstrapTable与KnockoutJS相结合实现增删改查功能【二】的使用技巧和注意事项,需要的朋友参考一下 在上篇文章给大家介绍了BootstrapTable与KnockoutJS相结合实现增删改查功能【一】,介绍了下knockout.js的一些基础用法。接下来通过本文继续给大家介绍。如
-
本文向大家介绍vbs 定时删除功能实现代码,包括了vbs 定时删除功能实现代码的使用技巧和注意事项,需要的朋友参考一下 参考代码一: 参考代码二:
-
本文向大家介绍PHP实现数据库的增删查改功能及完整代码,包括了PHP实现数据库的增删查改功能及完整代码的使用技巧和注意事项,需要的朋友参考一下 本文用到:jquery、tp框架 TP_3.2.2/Application/Home/Controller/StuController.class.php TP_3.2.2/Application/Home/View/school/showdata.htm
-
本文向大家介绍自定义搜索功能Android实现,包括了自定义搜索功能Android实现的使用技巧和注意事项,需要的朋友参考一下 先看看效果图: 源码下载:自定义搜索功能 代码: SearchActivity.java SearchBean.java SearchAdapter.java CommonAdapter.java ViewHolder.java SearchView.java 布局文件:
-
本文向大家介绍使用Spring Data R2DBC +Postgres实现增删改查功能,包括了使用Spring Data R2DBC +Postgres实现增删改查功能的使用技巧和注意事项,需要的朋友参考一下 在本教程中,我想向您展示如何通过带有Spring WebFlux的Spring Data R2DBC 执行各种Postgres CRUD操作。 R2DBC代表反应式关系数据库连接。 像JP

