Unity3D Shader实现贴图切换效果
本文实例为大家分享了shader实现基于世界坐标的贴图置换效果。
效果如下:

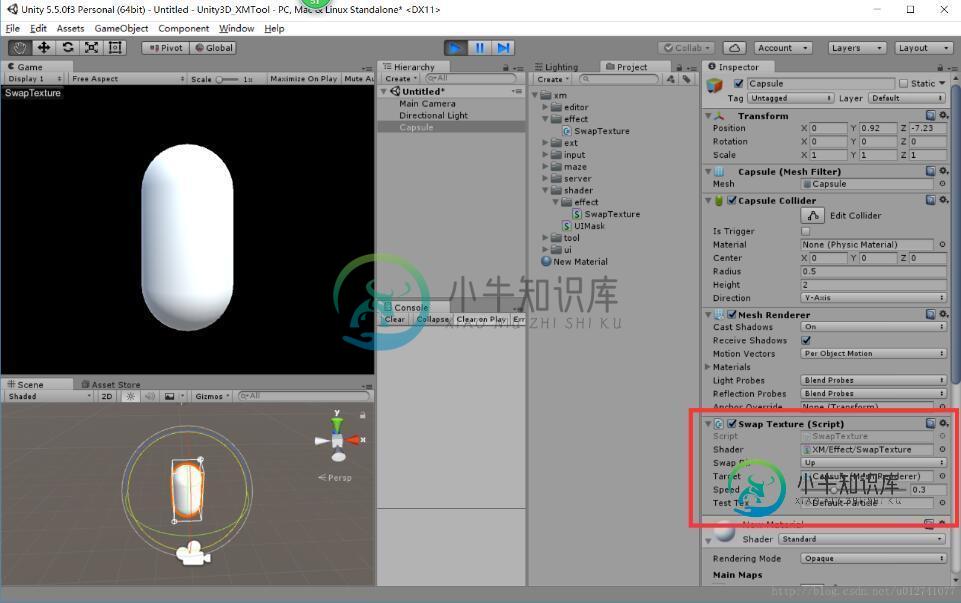
设置面板如下:

可在面板上设置切换方向,与切换对象,及其切换速度。
shader实现如下:
Shader "XM/Effect/SwapTexture" {
 Properties {
 _Color ("Color", Color) = (1,1,1,1)
 _MainTex ("Albedo (RGB)", 2D) = "white" {}
 _TargetTex ("Target Tex", 2D) = "white" {}//目标贴图
 [KeywordEnum(Up, Down, Left, Right, Forward, Back)] _mode ("Mode", Int) = 0//切换方向
 _SwapBlend ("Blend", Range(0,1)) = 0//0-1混合值
 _SwapMin("Min Value", Float) = 0//最小世界坐标
 _SwapMax("Max Value", Float) = 0//最大世界坐标
 _Glossiness ("Smoothness", Range(0,1)) = 0.5
 _Metallic ("Metallic", Range(0,1)) = 0.0
 }
 SubShader {
 Tags { "RenderType"="Opaque" }
 LOD 200

 CGPROGRAM
 // Physically based Standard lighting model, and enable shadows on all light types
 #pragma surface surf Standard fullforwardshadows vertex:vert

 // Use shader model 3.0 target, to get nicer looking lighting
 #pragma target 3.0

 sampler2D _MainTex;
 sampler2D _TargetTex;

 struct Input {
  float2 uv_MainTex;
  float3 worldPos;
 };

 half _mode;
 half _SwapBlend;
 float _SwapMin;
 float _SwapMax;
 half _Glossiness;
 half _Metallic;
 fixed4 _Color;

 void vert (inout appdata_full v, out Input o) {
  UNITY_INITIALIZE_OUTPUT(Input,o);
 }

 void surf (Input IN, inout SurfaceOutputStandard o) {
  half useTarget = 0;
  float targetValue = 0;
  switch(_mode)//模式选择
  {
  case 0://up
   targetValue = (_SwapMax - _SwapMin) * _SwapBlend + _SwapMin;
   useTarget = IN.worldPos.y > targetValue?0:1;
   break;
  case 1://down
   targetValue = (_SwapMax - _SwapMin) * (1 - _SwapBlend) + _SwapMin;
   useTarget = IN.worldPos.y < targetValue?0:1;
   break;
  case 2://left
   targetValue = (_SwapMax - _SwapMin) * (1 - _SwapBlend) + _SwapMin;
   useTarget = IN.worldPos.x < targetValue?0:1;
   break;
  case 3://right
   targetValue = (_SwapMax - _SwapMin) * _SwapBlend + _SwapMin;
   useTarget = IN.worldPos.x > targetValue?0:1;
   break;
  case 4://forward
   targetValue = (_SwapMax - _SwapMin) * _SwapBlend + _SwapMin;
   useTarget = IN.worldPos.z > targetValue?0:1;
   break;
  case 5://back
   targetValue = (_SwapMax - _SwapMin) * (1 - _SwapBlend) + _SwapMin;
   useTarget = IN.worldPos.z < targetValue?0:1;
   break;
  }

  // Albedo comes from a texture tinted by color
  fixed4 c;
  if(useTarget == 1)
  {
  c = tex2D (_TargetTex, IN.uv_MainTex);
  }
  else
  {
  c = tex2D (_MainTex, IN.uv_MainTex);
  }


  c *= _Color;
  o.Albedo = c.rgb;
  // Metallic and smoothness come from slider variables
  o.Metallic = _Metallic;
  o.Smoothness = _Glossiness;
  o.Alpha = c.a;
 }
 ENDCG
 }
 FallBack "Diffuse"
}
配合使用的脚本如下:
using System;
using System.Collections;
using UnityEngine;

namespace XM.Effect
{
 public class SwapTexture : MonoBehaviour
 {
  public enum SwapDirection
  {
   Up,
   Down,
   Left,
   Right,
   Forward,
   Back
  }

  public Shader _shader;//"XM/Effect/SwapTexture” shader
  public SwapDirection _swapDir;//切换方向
  public Renderer _target;//目标对象
  [Range(0, 1)]
  public float _speed;//速度

  private Material _matOld;
  private Material _matNew;

  public void Swap(Texture tex, Action<bool> onComplete)
  {
   if (_matOld != null)
   {
    StopAllCoroutines();
    if (null != onComplete)
    {
     onComplete(false);
    }

    _target.material = _matOld;
   }

   _matOld = _target.material;

   _matNew = new Material(_shader);
   _matNew.SetTexture("_MainTex", _target.material.GetTexture("_MainTex"));
   _matNew.SetTexture("_TargetTex", tex);
   _matNew.SetInt("_mode", (int)_swapDir);
   _matNew.SetFloat("_SwapBlend", 0);

   StartCoroutine("_StartChange", onComplete);
  }

  private IEnumerator _StartChange(Action<bool> onComplete)
  {
   float deltaVal = 0;

   _target.material = _matNew;

   Vector3 vtMin;
   Vector3 vtMax;
   float minVal = 0;
   float maxVal = 0;

   while (deltaVal != 1)
   {
    vtMin = _target.bounds.min;
    vtMax = _target.bounds.max;

    switch (_swapDir)
    {
     case SwapDirection.Up:
     case SwapDirection.Down:
      minVal = vtMin.y;
      maxVal = vtMax.y;
      break;
     case SwapDirection.Left:
     case SwapDirection.Right:
      minVal = vtMin.x;
      maxVal = vtMax.x;
      break;
     case SwapDirection.Forward:
     case SwapDirection.Back:
      minVal = vtMin.z;
      maxVal = vtMax.z;
      break;
    }

    minVal -= 0.01f;
    maxVal += 0.01f;

    _matNew.SetFloat("_SwapMin", minVal);
    _matNew.SetFloat("_SwapMax", maxVal);

    deltaVal = Mathf.Clamp01(deltaVal + _speed * Time.deltaTime);
    _matNew.SetFloat("_SwapBlend", deltaVal);
    yield return null;
   }

   _matOld.SetTexture("_MainTex", _matNew.GetTexture("_TargetTex"));
   _target.material = _matOld;

   _matNew = null;
   _matOld = null;

   if (null != onComplete)
   {
    onComplete(true);
   }
  }

  public void OnDrawGizmos()
  {
   if (_target != null)
   {
    Gizmos.DrawWireCube(_target.bounds.center, _target.bounds.size);
    Gizmos.DrawWireSphere(_target.bounds.min, 0.1f);
    Gizmos.DrawWireSphere(_target.bounds.max, 0.1f);
   }
  }

  //test
  public Texture testTex;
  private void OnGUI()
  {
   if (GUILayout.Button("SwapTexture"))
   {
    Swap(testTex, (t) =>
    {
     Debug.Log("Swap>" + t);
    });
   }
  }
  //
 }
}
以上就是本文的全部内容,希望对大家的学习有所帮助,也希望大家多多支持小牛知识库。
-
本文向大家介绍JS实现图片切换特效,包括了JS实现图片切换特效的使用技巧和注意事项,需要的朋友参考一下 本文实例为大家分享了JS实现图片切换的具体代码,供大家参考,具体内容如下 知识点: 1.window.onload网页全部加载完后再执行 2.获取元素 设置属性 3.临界情况判断 运行效果: 点击上一张下一章切换图片 代码: 以上就是本文的全部内容,希望对大家的学习有所帮助,也希望大家多多支持呐
-
本文向大家介绍基于javascript实现图片切换效果,包括了基于javascript实现图片切换效果的使用技巧和注意事项,需要的朋友参考一下 本文实例为大家分享了js实现图片切换效果,供大家参考,具体内容如下 用js实现点击按钮,图片切换的效果: 结构:用一个固定宽高的div来做最外层的容器,设置overflow为hidden, 然后内层img_box设置宽度为四倍box的宽度,高度相同,也就是
-
本文向大家介绍简单实现JavaScript图片切换效果,包括了简单实现JavaScript图片切换效果的使用技巧和注意事项,需要的朋友参考一下 JavaScript实现图片切换,主要用到setInterval()函数和clearInterval()函数,前者功能是开启动画,后者功能则为清除动画(可理解为使动画停止),为了使动画停止,则需要定义全局变量作为标志,标志返回setInterval()函数
-
本文向大家介绍JS实现可切换图片的幻灯切换效果示例,包括了JS实现可切换图片的幻灯切换效果示例的使用技巧和注意事项,需要的朋友参考一下 本文实例讲述了JS实现可切换图片的幻灯切换效果。分享给大家供大家参考,具体如下: 更多关于JavaScript相关内容感兴趣的读者可查看本站专题:《JavaScript切换特效与技巧总结》、《JavaScript查找算法技巧总结》、《JavaScript动画特效与
-
本文向大家介绍ES6实现图片切换特效代码,包括了ES6实现图片切换特效代码的使用技巧和注意事项,需要的朋友参考一下 效果图 demo.html style.css 总结 以上所述是小编给大家介绍的ES6实现图片切换特效代码,希望对大家有所帮助,如果大家有任何疑问请给我留言,小编会及时回复大家的。在此也非常感谢大家对呐喊教程网站的支持! 如果你觉得本文对你有帮助,欢迎转载,烦请注明出处,谢谢!
-
本文向大家介绍基于javascript实现图片左右切换效果,包括了基于javascript实现图片左右切换效果的使用技巧和注意事项,需要的朋友参考一下 本文实例介绍了javascript实现图片左右切换效果的详细代码,分享给大家供大家参考,具体内容如下 效果图: 具体代码: 以上就是本文的全部内容,希望对大家学习javascript程序设计有所帮助。

