利用HorizontalScrollView实现滑动页面时的缩放效果
在前面的文章中也有关于 HorizontalScrollView 的使用:Android使用HorizontalScrollView实现水平滚动 。
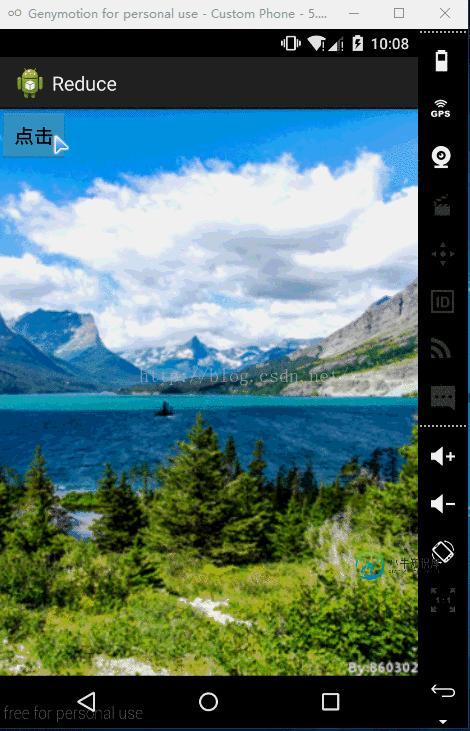
这里主要实现的是向右滑动时,左侧的视图有逐渐放大,也会越来越清晰;向左滑动时,左侧的视图逐渐减小,逐渐变的模糊,且不移出屏幕左边缘的效果。效果如下(可以在主页面上的右侧向右滑动都可以实现该效果):

这里需要用到自定义的 HorizontalScrollView ,让其作为布局文件的根标签。HorizontalScrollView 里面只能有一个子组件,所以要把左侧的视图布局文件包含在 HorizontalScrollView 的子组件里面。
activity_main.xml :
<com.crazy.reduce.ReduceSideslip xmlns:android="http://schemas.android.com/apk/res/android"
 xmlns:tools="http://schemas.android.com/tools"
 android:id="@+id/reduce_lay"
 android:layout_width="wrap_content"
 android:layout_height="match_parent"
 android:background="@drawable/bg"
 android:scrollbars="none"
 tools:context="com.crazy.reduce.MainActivity" >

 <LinearLayout
  android:layout_width="wrap_content"
  android:layout_height="match_parent"
  android:orientation="horizontal" >

  <include layout="@layout/item" />

  <LinearLayout
   android:layout_width="match_parent"
   android:layout_height="match_parent"
   android:background="@drawable/bg_01" >

   <Button
    android:layout_width="wrap_content"
    android:layout_height="wrap_content"
    android:onClick="toggleMenu"
    android:text="点击" />
  </LinearLayout>
 </LinearLayout>

</com.crazy.reduce.ReduceSideslip>
在 item.xml 布局文件的右边有个 button 按钮,这些都在 HorizontalScrollView 的子组件当中。而 item.xml 究竟是怎样的布局也都不会影响到整个的滑动。
item.xml :
<?xml version="1.0" encoding="utf-8"?>
<RelativeLayout xmlns:android="http://schemas.android.com/apk/res/android"
 android:layout_width="match_parent"
 android:layout_height="match_parent" >

 <LinearLayout
  android:layout_width="match_parent"
  android:layout_height="wrap_content"
  android:layout_centerHorizontal="true"
  android:orientation="vertical" >

  <Button
   android:id="@+id/bt_b"
   android:layout_width="wrap_content"
   android:layout_height="wrap_content"
   android:layout_marginTop="50dp"
   android:text="一个不同的按钮" />

  <ImageView
   android:id="@+id/img"
   android:layout_width="wrap_content"
   android:layout_height="match_parent"
   android:scaleType="centerCrop"
   android:src="@drawable/bg_03" />
 </LinearLayout>


</RelativeLayout>
MainActivity.java :
package com.crazy.reduce;

import android.app.Activity;
import android.os.Bundle;
import android.view.View;

public class MainActivity extends Activity {

 private ReduceSideslip rs;

 @Override
 protected void onCreate(Bundle savedInstanceState) {
 super.onCreate(savedInstanceState);
 setContentView(R.layout.activity_main);

 rs = (ReduceSideslip)findViewById(R.id.reduce_lay);
 }

 public void toggleMenu(View v) {
 rs.reduce();
 }
}
自定义的 ReduceSideslip.java : 需要 nineoldandroids-2.4.0.jar 包,其下载地址
package com.crazy.reduce;

import android.content.Context;
import android.util.AttributeSet;
import android.view.MotionEvent;
import android.view.ViewGroup;
import android.widget.FrameLayout;
import android.widget.HorizontalScrollView;
import android.widget.LinearLayout;

import com.nineoldandroids.view.ViewHelper;

public class ReduceSideslip extends HorizontalScrollView {

 private int mScreenWidth;  // 屏幕宽度
 private int mMnuRightPadding = 300;

 private int mMenuWidth; // 视图宽度(左边的视图)
 private int mHalfMenuWidth;

 private boolean isOpen; // 标记菜单是否打开
 private boolean once;  // 是否已经初始化回收菜单

 private ViewGroup mMenu; // 左边的视图
 private ViewGroup mContent; // 右边的视图

 public ReduceSideslip(Context context, AttributeSet attrs) {
  super(context, attrs);
  mScreenWidth = context.getResources().getDisplayMetrics().widthPixels;
 }

 @Override
 protected void onMeasure(int widthMeasureSpec, int heightMeasureSpec) {

  if (!once) {
   // 要与布局文件当中的一致
   LinearLayout temp = (LinearLayout)getChildAt(0);
   mMenu = (ViewGroup)temp.getChildAt(0);
   mContent = (ViewGroup)temp.getChildAt(1);

   mMenuWidth = mScreenWidth - mMnuRightPadding;
   mHalfMenuWidth = mMenuWidth/2;
   mMenu.getLayoutParams().width = mMenuWidth;
   mContent.getLayoutParams().width = mScreenWidth;
  }
  super.onMeasure(widthMeasureSpec, heightMeasureSpec);
 }

 // 在视图计算完自身及子视图的宽高后,重新排版
 @Override
 protected void onLayout(boolean changed, int l, int t, int r, int b) {
  super.onLayout(changed, l, t, r, b);

  if (changed) {
   // 隐藏菜单
   this.scrollTo(mMenuWidth, 0);
   once = true;
  }
 }

 public void reduce(){
  if (isOpen) {
   closeMenu();
  } else {
   openMenu();
  }
 }

 private void openMenu() {
  if (isOpen) {
   return;
  }
  // 和 scrollTo() 相似,但是要缓和些,
  // 不像 scrollTo() 直接移动过去
  this.smoothScrollTo(0, 0);
  isOpen = true;
 }

 private void closeMenu() {
  if (isOpen) {
   this.smoothScrollTo(mMenuWidth, 0);
   isOpen = false;
  }
 }

 @Override
 public boolean onTouchEvent(MotionEvent ev) {
  switch (ev.getAction()){
   case MotionEvent.ACTION_UP:  // 松开手
    int scrollX = getScrollX();   // 水平滑动的距离
    if (scrollX > mHalfMenuWidth) {
     this.smoothScrollTo(mMenuWidth, 0);
     isOpen = false;
    } else {
     this.smoothScrollTo(0, 0);
     isOpen = true;
    }
    return true;
  }
  return super.onTouchEvent(ev);
 }

 @Override
 protected void onScrollChanged(int l, int t, int oldl, int oldt) {
  super.onScrollChanged(l, t, oldl, oldt);

  // 左右视图切换时的渐变范围 (注意是 l 不是1(一))
  float scale = l*1.0f/mMenuWidth;  // 范围值 (0, 1)
  float leftScale = 1- 0.3f*scale;  // 范围值(0.7, 1)
  float rightScale = 0.8f + 0.2f*scale; // 范围值 (0.8, 1)

  ViewHelper.setScaleX(mMenu, leftScale);
  ViewHelper.setScaleY(mMenu, leftScale);

  // 往右滑动时,左边的视图逐渐变亮
  ViewHelper.setAlpha(mMenu, 0.6f + 0.4f * (1 - scale)); // (0.6, 1)
  // 往左滑动时,左边的视图不用移除屏幕左边界(可以不要)
  ViewHelper.setTranslationX(mMenu, mMenuWidth * scale * 0.7f);

  ViewHelper.setScaleX(mContent, rightScale);
  ViewHelper.setScaleY(mContent, rightScale);
 }
}
以上就是本文的全部内容,希望对大家的学习有所帮助,也希望大家多多支持小牛知识库。
-
本文向大家介绍Android应用中利用ViewPager实现多页面滑动切换效果示例,包括了Android应用中利用ViewPager实现多页面滑动切换效果示例的使用技巧和注意事项,需要的朋友参考一下 1、添加android support包 因为上面的几个类都是在android support包中才提供,我们先添加包。 在Eclipse->Window->Android SDK Manager,选
-
本文向大家介绍Android利用滑动菜单框架实现滑动菜单效果,包括了Android利用滑动菜单框架实现滑动菜单效果的使用技巧和注意事项,需要的朋友参考一下 之前我向大家介绍了史上最简单的滑动菜单的实现方式,相信大家都还记得。如果忘记了其中的实现原理或者还没看过的朋友,请先去看一遍之前的文章Android仿人人客户端滑动菜单的侧滑特效实现代码,史上最简单的侧滑实现 ,因为我们今天要实现的滑动菜单框架
-
本文向大家介绍使用jQueryMobile实现滑动翻页效果的方法,包括了使用jQueryMobile实现滑动翻页效果的方法的使用技巧和注意事项,需要的朋友参考一下 本文实例讲述了使用jQueryMobile实现滑动翻页效果的方法。分享给大家供大家参考。具体分析如下: 滑动手势在移动设备是很流行的,在移动设备中滑动翻页中很常见 虽然这个功能可以在jQueryMobile中实现,但是个人与之前一篇【j
-
本文向大家介绍Android实现手势滑动多点触摸缩放平移图片效果,包括了Android实现手势滑动多点触摸缩放平移图片效果的使用技巧和注意事项,需要的朋友参考一下 现在app中,图片预览功能肯定是少不了的,用户基本已经形成条件反射,看到小图,点击看大图,看到大图两个手指开始进行放大,放大后,开始移动到指定部位。 一、概述 想要做到图片支持多点触控,自由的进行缩放、平移,需要了解几个知识点:Matr
-
本文向大家介绍Android实现手势滑动多点触摸放大缩小图片效果,包括了Android实现手势滑动多点触摸放大缩小图片效果的使用技巧和注意事项,需要的朋友参考一下 网上文章虽多,但是这种效果少之又少,我真诚的献上以供大家参考 实现原理:自定义ImageView对此控件进行相应的layout(动态布局). 这里你要明白几个方法执行的流程: 首先ImageView是继承自View的子类. onLayo
-
本文向大家介绍Android ViewPager实现左右滑动翻页效果,包括了Android ViewPager实现左右滑动翻页效果的使用技巧和注意事项,需要的朋友参考一下 本文实例为大家分享了ViewPager实现左右滑动翻页效果展示的具体代码,供大家参考,具体内容如下 代码如下: 布局文件: 以上就是本文的全部内容,希望对大家的学习有所帮助,也希望大家多多支持呐喊教程。

