
Android中使用自定义ViewGroup的总结

分类
自定义Layout可以分为两种情况。
- 自定义ViewGroup,创造出一些不同于LinearLayout,RelativeLayout等之类的ViewGroup。比如:API 14以后增加的GridLayout、design support library中的CoordinatorLayout等等。
- 自定义一些已经有的Layout然后加一些特殊的功能。比如:TableLayout以及percent support library中的PercentFrameLayout等等。
流程
自定义View的流程是:onMeasure()->onLayout()->onDraw()。自定义ViewGroup的时候一般是不要去实现onDraw的,当然也可能有特殊的需求,比如:CoordinatorLayout。
所以onMeasure和onLayout基本能做大部分我们接触的ViewGroup。但是仅仅的知道在onMeasure中测量ViewGroup的大小以及在onLayout中计算Child View的位置还是不够。
比如:怎么可以给ViewGroup的Child View设置属性?
一个例子。
写一个自定义的ViewGroup,增加一个属性控制Child View的大小(长宽)占ViewGroup的比例。
假设是一个LinearLayout,那么就先定义一个CustomLinearLayout。
public class CustomLinearLayout extends LinearLayout {
  public CustomLinearLayout(Context context) {
    super(context);
  }

  public CustomLinearLayout(Context context, AttributeSet attrs) {
    super(context, attrs);
  }

  public CustomLinearLayout(Context context, AttributeSet attrs, int defStyleAttr) {
    super(context, attrs, defStyleAttr);
  }

  @TargetApi(Build.VERSION_CODES.LOLLIPOP)
  public CustomLinearLayout(Context context, AttributeSet attrs, int defStyleAttr, int defStyleRes) {
    super(context, attrs, defStyleAttr, defStyleRes);
  }
}
其它抛开不说,我们是需要增加属性用来控制Child View的大小。那么就先在value/attr.xml中定义那个属性(使用CustomLinearLayout_Layout来与CustomLinearLayout区分下,当然这个名字是随意的)。
<declare-styleable name="CustomLinearLayout_Layout">
  <!-- 定义比例 -->
  <attr name="inner_percent" format="float"/>
</declare-styleable>
ViewGroup调用addView()的时候最终都会调用到这个方法。
public void addView(View child, int index, LayoutParams params)
这个params代表的就是View的配置,ViewGroup.LayoutParams中就包含了width、height,LinearLayout.LayoutParams增加了weight属性等等。那么我们就应该实现一个LayoutParams。那么现在就是这样了。
public class CustomLinearLayout extends LinearLayout {
  public CustomLinearLayout(Context context) {
    super(context);
  }

  public CustomLinearLayout(Context context, AttributeSet attrs) {
    super(context, attrs);
  }

  public CustomLinearLayout(Context context, AttributeSet attrs, int defStyleAttr) {
    super(context, attrs, defStyleAttr);
  }

  @TargetApi(Build.VERSION_CODES.LOLLIPOP)
  public CustomLinearLayout(Context context, AttributeSet attrs, int defStyleAttr, int defStyleRes) {
    super(context, attrs, defStyleAttr, defStyleRes);
  }
  public static class LayoutParams extends LinearLayout.LayoutParams {

    private float innerPercent;

    private static final int DEFAULT_WIDTH = WRAP_CONTENT;
    private static final int DEFAULT_HEIGHT = WRAP_CONTENT;

    public LayoutParams() {
      super(DEFAULT_WIDTH, DEFAULT_HEIGHT);
      innerPercent = -1.0f;
    }

    public LayoutParams(float innerPercent) {
      super(DEFAULT_WIDTH, DEFAULT_HEIGHT);
      this.innerPercent = innerPercent;
    }

    public LayoutParams(ViewGroup.LayoutParams p) {
      super(p);
    }

    @TargetApi(Build.VERSION_CODES.KITKAT)
    public LayoutParams(LinearLayout.LayoutParams source) {
      super(source);
    }

    @TargetApi(Build.VERSION_CODES.KITKAT)
    public LayoutParams(LayoutParams source) {
      super(source);
      this.innerPercent = source.innerPercent;
    }

    public LayoutParams(Context c, AttributeSet attrs) {
      super(c, attrs);
      init(c, attrs);
    }

    private void init(Context context, AttributeSet attrs) {
      TypedArray a = context.obtainStyledAttributes(attrs, R.styleable.CustomLinearLayout_Layout);
      innerPercent = a.getFloat(R.styleable.CustomLinearLayout_Layout_inner_percent, -1.0f);
      a.recycle();
    }
  }
}
现在就可以在xml使用我们的属性了。
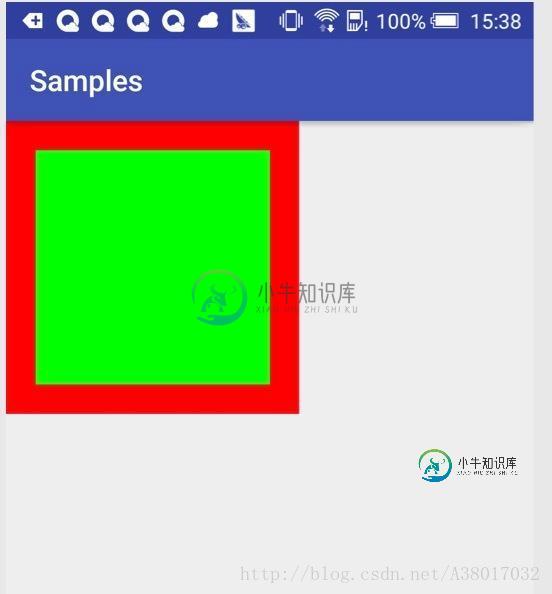
<?xml version="1.0" encoding="utf-8"?>
<com.egos.samples.custom_layout.CustomLinearLayout
  xmlns:android="http://schemas.android.com/apk/res/android"
  xmlns:app="http://schemas.android.com/apk/res-auto"
  android:layout_width="200dp"
  android:layout_height="200dp"
  android:id="@+id/test_layout"
  android:background="#ffff0000"
  android:gravity="center"
  android:orientation="vertical">
  <ImageView
    android:text="Egos"
    android:layout_width="match_parent"
    android:layout_height="match_parent"
    android:onClick="add"
    android:background="#ff00ff00"
    app:inner_percent="0.8"/>
</com.egos.samples.custom_layout.CustomLinearLayout>
只是然并软,并没有作用。
那么到底是怎么去控制Child View的大小呢?当然是在onMeasure控制的。addView会执行下面的代码。
requestLayout();
invalidate(true);
这样的话就会重新的走一遍onMeasure(),onLayout()了。实现onMeasure()的方法以后直接去处理Child View的大小,因为我继承的是LinearLayout,所以其实是会处理到measureChildBeforeLayout()。最终是在measureChildBeforeLayout的时候来处理Child View的大小。
@Override
protected void measureChildWithMargins(View child, int parentWidthMeasureSpec,
                    int widthUsed, int parentHeightMeasureSpec, int heightUsed) {
  // 在xml强制写成match_parent,然后在这里强制设置成
  if (child != null && child.getLayoutParams() instanceof LayoutParams &&
      ((LayoutParams) child.getLayoutParams()).innerPercent != -1.0f) {
    parentWidthMeasureSpec = MeasureSpec.makeMeasureSpec((int) (MeasureSpec.getSize(parentWidthMeasureSpec) *
        ((LayoutParams) child.getLayoutParams()).innerPercent), MeasureSpec.getMode(parentWidthMeasureSpec));
    parentHeightMeasureSpec = MeasureSpec.makeMeasureSpec((int) (MeasureSpec.getSize(parentHeightMeasureSpec) *
        ((LayoutParams) child.getLayoutParams()).innerPercent), MeasureSpec.getMode(parentHeightMeasureSpec));
    super.measureChildWithMargins(child, parentWidthMeasureSpec, widthUsed,
      parentHeightMeasureSpec, heightUsed);
  } else {
    super.measureChildWithMargins(child, parentWidthMeasureSpec, widthUsed,
        parentHeightMeasureSpec, heightUsed);
  }
}
这样就可以实现最开始的需求了。
其实还有一些细节是需要处理的,下面的代码就是。
/**
 * 当checkLayoutParams返回false的时候就会执行到这里的generateLayoutParams
 */
 @Override
protected LinearLayout.LayoutParams generateLayoutParams(ViewGroup.LayoutParams lp) {
  return super.generateLayoutParams(lp);
}

/**
 * 当addView的时候没有设置LayoutParams的话就会默认执行这里的generateDefaultLayoutParams
 */
@Override
protected LayoutParams generateDefaultLayoutParams() {
  return new LayoutParams();
}

/**
 * 写在xml中属性的时候就会执行这里的generateLayoutParams
 */
@Override
public LayoutParams generateLayoutParams(AttributeSet attrs) {
  return new LayoutParams(getContext(), attrs);
}
总结一下
- 自定义View和ViewGroup需要多多注意的都是onMeasure、onLayout、onDraw。
- 把ViewGroup自身的属性和Child View的属性区分开。
- 可以多多的参考support包中的代码,调试也非常的方便。
做Android开发,自身需要自定义View的地方确实是比较的多,只是大部分都会有相应的开源库。但是我们还是应该需要熟练的知道该如何自定义一个ViewGroup。
自己是一个比较健忘的人,所以写的详细点。
完整的代码戳这里。
以上就是本文的全部内容,希望对大家的学习有所帮助,也希望大家多多支持小牛知识库。
-
本文向大家介绍Android自定义ViewGroup之FlowLayout(三),包括了Android自定义ViewGroup之FlowLayout(三)的使用技巧和注意事项,需要的朋友参考一下 本篇继续来讲自定义ViewGroup,给大家带来一个实例:FlowLayout。何为FlowLayout,就是控件根据ViewGroup的宽,自动的往右添加,如果当前行剩余空间不足,则自动添加到下一行,所
-
本文向大家介绍Android自定义ViewGroup之第一次接触ViewGroup,包括了Android自定义ViewGroup之第一次接触ViewGroup的使用技巧和注意事项,需要的朋友参考一下 整理总结自鸿洋的博客:http://blog.csdn.net/lmj623565791/article/details/38339817/ 一、com.cctvjiatao.customviewg
-
本文向大家介绍Android自定义ViewGroup横向布局(1),包括了Android自定义ViewGroup横向布局(1)的使用技巧和注意事项,需要的朋友参考一下 最近学习自定义viewgroup,我的目标是做一个可以很想滚动的listview,使用adapter填充数据,并且使用adapter.notifyDataSetChanged()更新数据。 不过一口吃不成一个胖子(我吃成这样可是好几
-
本文向大家介绍Android自定义ViewGroup实现流式布局,包括了Android自定义ViewGroup实现流式布局的使用技巧和注意事项,需要的朋友参考一下 本文实例为大家分享了Android自定义ViewGroup实现流式布局的具体代码,供大家参考,具体内容如下 1.概述 本篇给大家带来一个实例,FlowLayout,什么是FlowLayout,我们常在App 的搜索界面看到热门搜索词,就
-
本文向大家介绍Android进阶教程之ViewGroup自定义布局,包括了Android进阶教程之ViewGroup自定义布局的使用技巧和注意事项,需要的朋友参考一下 前言 在我们的实际应用中, 经常需要用到自定义控件,比如自定义圆形头像,自定义计步器等等。但有时我们不仅需要自定义控件,举个例子,FloatingActionButton 大家都很常用,所以大家也很经常会有一种需求,点击某个 Flo