使用python写的opencv实时监测和解析二维码和条形码
今天,我实现了一个很有趣的demo,它可以在视频里找到并解析二维码,然后把解析的内容实时在屏幕上显示出来。
然后我们直入主题,首先你得确保你装了opencv,python,zbar等环境。然后这个教程对于学过opencv的人可能更好理解,但是没学过也无妨,到时候也可以直接用。
比如我的电脑上的环境是opencv2.4.x,python2.7,和最新的zbar,在Ubuntu 12.12的系统下运行的
假设你的opencv已经安装好了,那么我们就可以安装zbar
你可以先更新一下
sudo apt-get update
然后在输入
sudo apt-get install python-zbar
如果环境装好了,我们就可以接着下一步操作了。
首先让我们来实现找到在图片里面找到二维码的功能
先新建一个python文件叫做;simple_barcode_detection.py
代码如下,这定义了一个函数,实现从一副图片里面找出二维码的位置
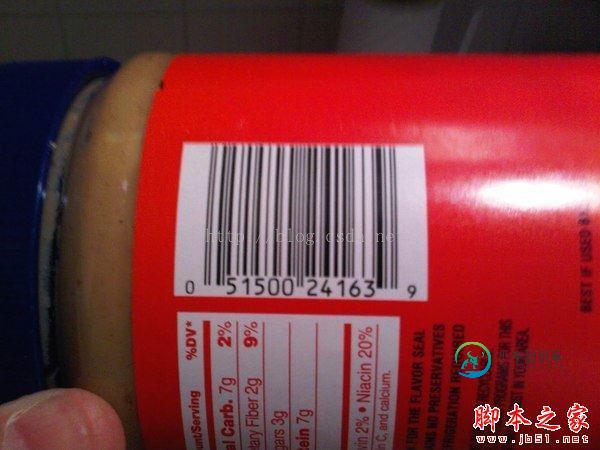
我们要检测的二维码的图片
import numpy as np
 import cv2
 def detect(image):
# 把图像从RGB装换成灰度图
gray = cv2.cvtColor(image, cv2.COLOR_BGR2GRAY)
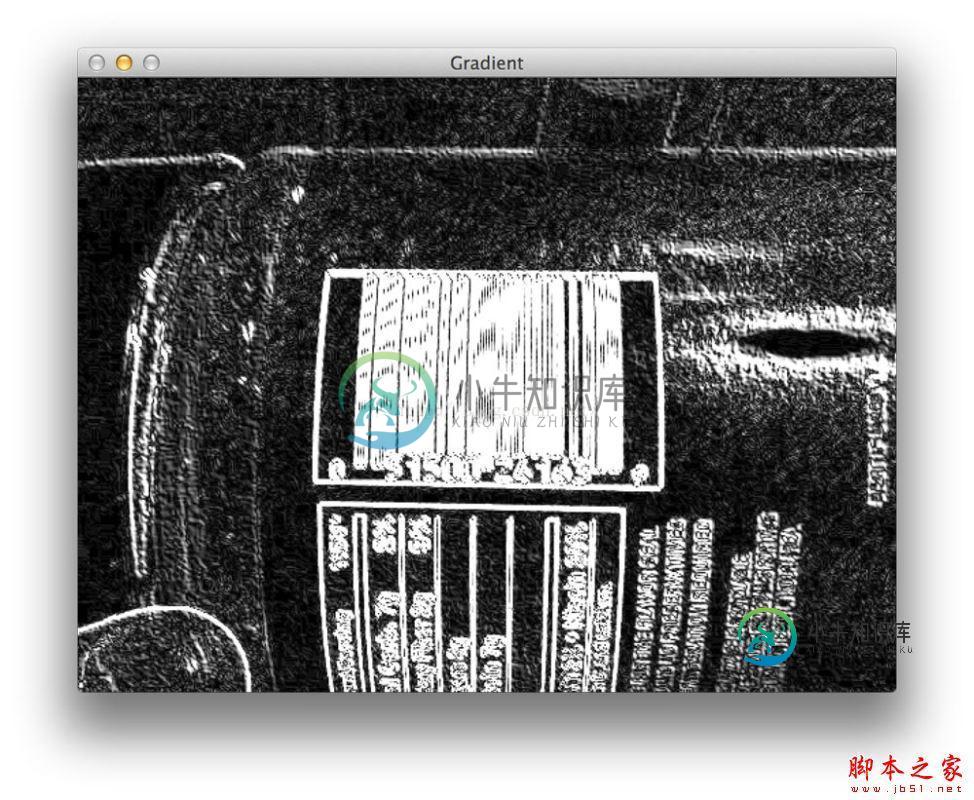
# 使用Scharr操作(指定使用ksize = -1)构造灰度图在水平和竖直方向上的梯度幅值表示。
gradX = cv2.Sobel(gray, ddepth = cv2.cv.CV_32F, dx = 1, dy = 0, ksize = -1)
gradY = cv2.Sobel(gray, ddepth = cv2.cv.CV_32F, dx = 0, dy = 1, ksize = -1)
#Scharr操作后,从x的梯度减去y的梯度
gradient = cv2.subtract(gradX, gradY)
gradient = cv2.convertScaleAbs(gradient)
#经过上面的操作后看起来是这样
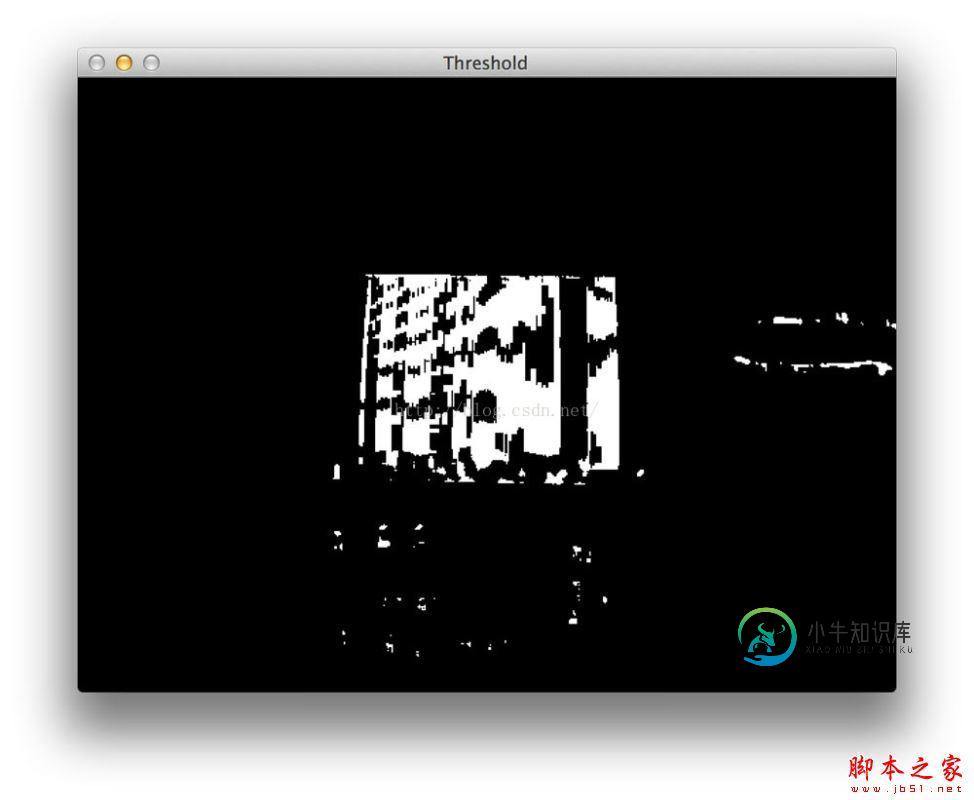
# 对上述的梯度图采用用9x9的核进行平均模糊,这是有利于降噪的
#然后进行二值化处理,要么是255(白)要么是0(黑)
blurred = cv2.blur(gradient, (9, 9))
(_, thresh) = cv2.threshold(blurred, 225, 255, cv2.THRESH_BINARY)
#模糊与二值化处理后,看起来是这个样子,
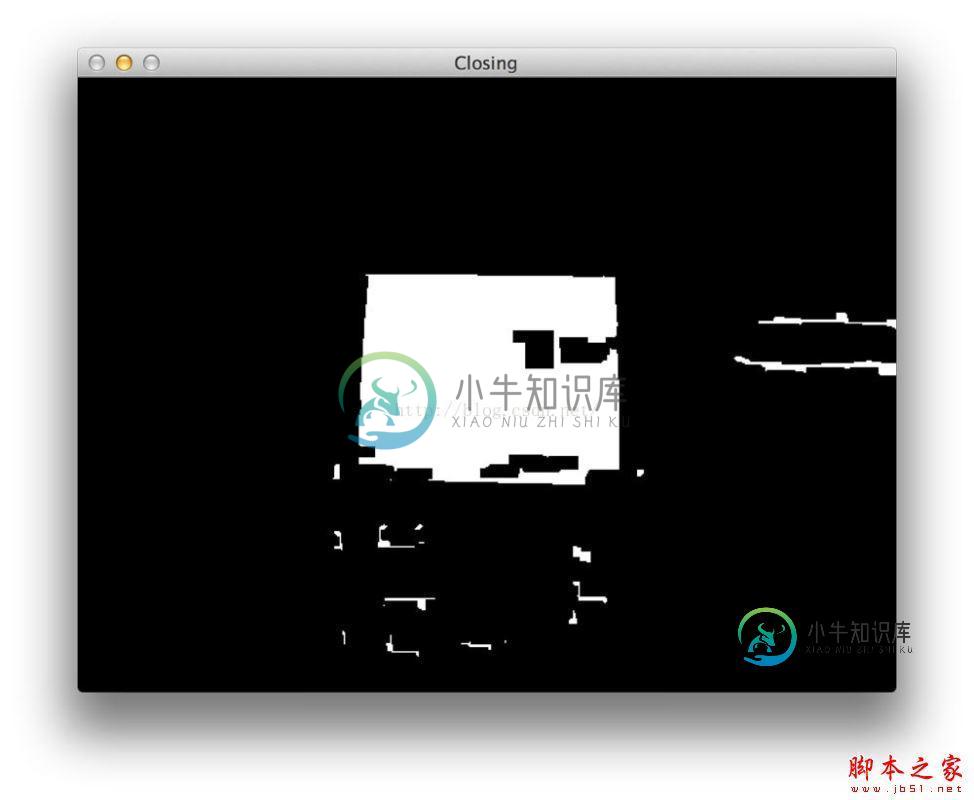
#上面的操作后发现有一些条形码的竖杠之间存在一些缝隙,并使我们的算法能检测到斑点区域,我们进行一些基本的形态学操作
#我们首先使用cv2.getStructuringElement构造一个长方形内核。这个内核的宽度大于长度,因此我们可以消除条形码中垂直条之间的缝隙。
# 这里进行形态学操作,将上一步得到的内核应用到我们的二值图中,以此来消除竖杠间的缝隙。
kernel = cv2.getStructuringElement(cv2.MORPH_RECT, (21, 7))
closed = cv2.morphologyEx(thresh, cv2.MORPH_CLOSE, kernel)
#上述操作后看起来是这个样子
#我们发现还是存在一些小斑点,这时我们可以使用opencv里面的腐蚀和膨胀来处理他们,来去除白色的斑点
closed = cv2.erode(closed, None, iterations = 4)
closed = cv2.dilate(closed, None, iterations = 4)
#这时候的效果看起来是这样的
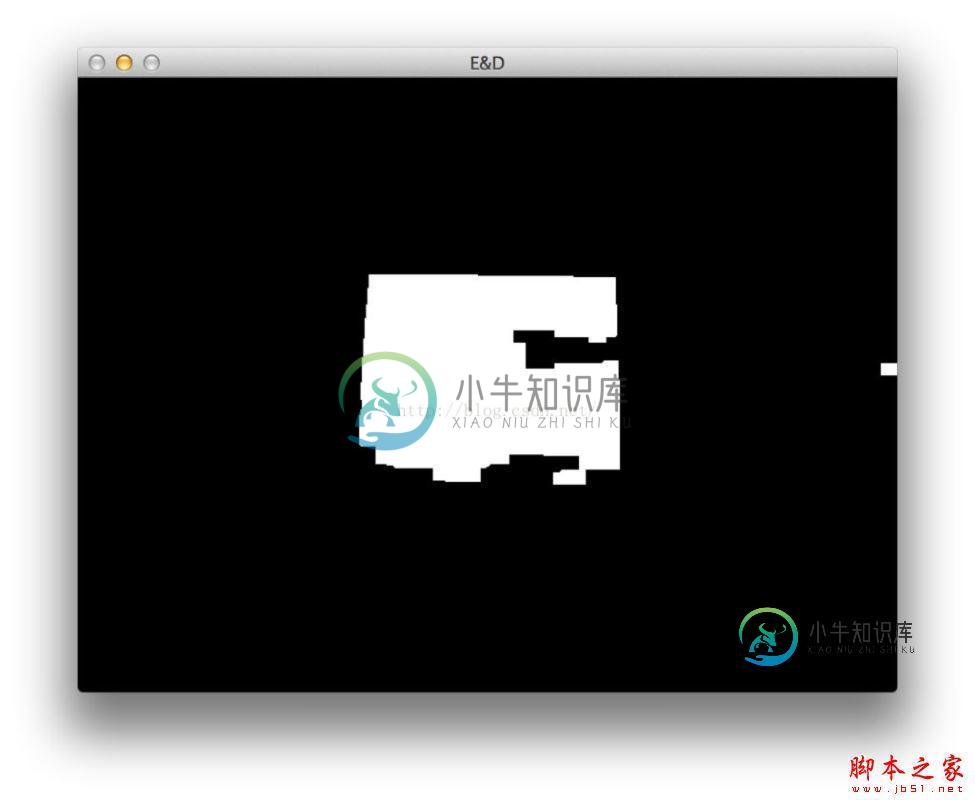
# 接下来我们来找轮廓
(cnts, _) = cv2.findContours(closed.copy(), cv2.RETR_EXTERNAL,
cv2.CHAIN_APPROX_SIMPLE)
#如果没找到则返回为空
if len(cnts) == 0:
return None
#找到了就通过面积来排序,并计算旋转角
# 给最大的轮廓找到边框
c = sorted(cnts, key = cv2.contourArea, reverse = True)[0]
rect = cv2.minAreaRect(c)
#box(里面是ndarry数组,包含了4个顶点的位置)
box = np.int0(cv2.cv.BoxPoints(rect))
# 返回box
return box
最终结果
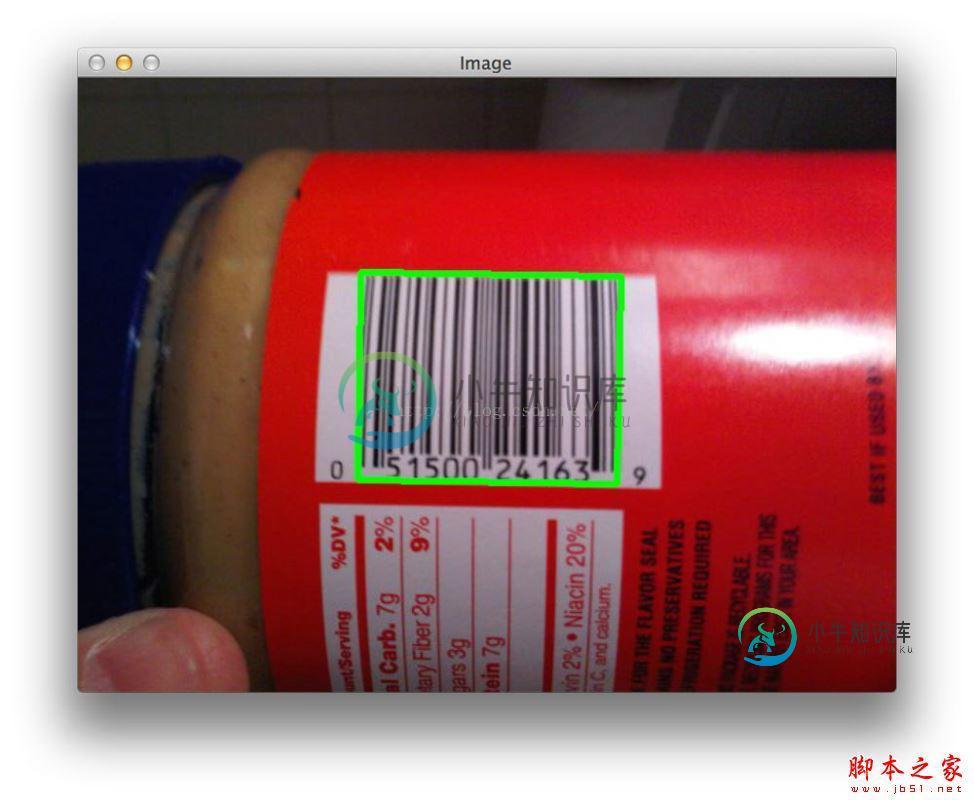
好了,上面的解释里面有中文,可能python解释的时候会通不过,我下面直接给出代码
import numpy as np
import cv2
def detect(image):
	# convert the image to grayscale
	gray = cv2.cvtColor(image, cv2.COLOR_BGR2GRAY)
	# compute the Scharr gradient magnitude representation of the images
	# in both the x and y direction
	gradX = cv2.Sobel(gray, ddepth = cv2.cv.CV_32F, dx = 1, dy = 0, ksize = -1)
	gradY = cv2.Sobel(gray, ddepth = cv2.cv.CV_32F, dx = 0, dy = 1, ksize = -1)
	# subtract the y-gradient from the x-gradient
	gradient = cv2.subtract(gradX, gradY)
	gradient = cv2.convertScaleAbs(gradient)
	# blur and threshold the image
	blurred = cv2.blur(gradient, (9, 9))
	(_, thresh) = cv2.threshold(blurred, 225, 255, cv2.THRESH_BINARY)
	# construct a closing kernel and apply it to the thresholded image
	kernel = cv2.getStructuringElement(cv2.MORPH_RECT, (21, 7))
	closed = cv2.morphologyEx(thresh, cv2.MORPH_CLOSE, kernel)
	# perform a series of erosions and dilations
	closed = cv2.erode(closed, None, iterations = 4)
	closed = cv2.dilate(closed, None, iterations = 4)
	# find the contours in the thresholded image
	(cnts, _) = cv2.findContours(closed.copy(), cv2.RETR_EXTERNAL,
		cv2.CHAIN_APPROX_SIMPLE)
	# if no contours were found, return None
	if len(cnts) == 0:
		return None
	# otherwise, sort the contours by area and compute the rotated
	# bounding box of the largest contour
	c = sorted(cnts, key = cv2.contourArea, reverse = True)[0]
	rect = cv2.minAreaRect(c)
	box = np.int0(cv2.cv.BoxPoints(rect))
	# return the bounding box of the barcode
	return box
完成了上述的工作,我们就完成了二维码和条形码的定位,接下去实现视频里面二维码的解析
你可以新建一个python文件,barcode_vid.py
解析二维码我们需要用zbar这个模块和PIL,PIL在python里面装好了
我们先导入模块
# import the necessary packages
import simple_barcode_detection
import cv2
import numpy as np
import zbar
from PIL import Image
#接下去是创建一个扫描器,他可以解析二维码的内容
# create a reader
scanner = zbar.ImageScanner()
# configure the reader
scanner.parse_config('enable')
#设置屏幕显示字体
font=cv2.FONT_HERSHEY_SIMPLEX
#启用摄像头
camera=cv2.VideoCapture(0)
#接下去是一个大的while循环
while True:
#得到当前的帧
# grab the current frame
(grabbed, frame) = camera.read()
#检测视频是否到底了,如果检测视频文件里面的二维码或条形码用这个,如果开启摄像头就无所谓了
# check to see if we have reached the end of the
# video
if not grabbed:
break
调用刚才我们建的那个函数来查找二维码返回二维码的位置
# detect the barcode in the image
box = simple_barcode_detection.detect(frame)
if box != None:
#这下面的3步得到扫描区域,扫描区域要比检测出来的位置要大
min=np.min(box,axis=0)
max=np.max(box,axis=0)
roi=frame[min[1]-10:max[1]+10,min[0]-10:max[0]+10]
#把区域里的二维码传换成RGB,并把它转换成pil里面的图像,因为zbar得调用pil里面的图像,而不能用opencv的图像
roi=cv2.cvtColor(roi,cv2.COLOR_BGR2RGB)
pil= Image.fromarray(frame).convert('L')
width, height = pil.size
raw = pil.tostring()
#把图像装换成数据
zarimage = zbar.Image(width, height, 'Y800', raw)
#扫描器进行扫描
scanner.scan(zarimage)
#得到结果
for symbol in zarimage:
  # 对结果进行一些有用的处理
print 'decoded', symbol.type, 'symbol', '"%s"' %symbol.data
cv2.drawContours(frame, [box], -1, (0, 255, 0), 2)
#把解析的内容放到视频上
cv2.putText(frame,symbol.data,(20,100),font,1,(0,255,0),4)
# show the frame and record if the user presses a key
cv2.imshow("Frame", frame)
key = cv2.waitKey(1) & 0xFF
# if the 'q' key is pressed, stop the loop
if key == ord("q"):
break
# cleanup the camera and close any open windows
camera.release()
cv2.destroyAllWindows()
CSDN不能上传视频,我下面传一下图片
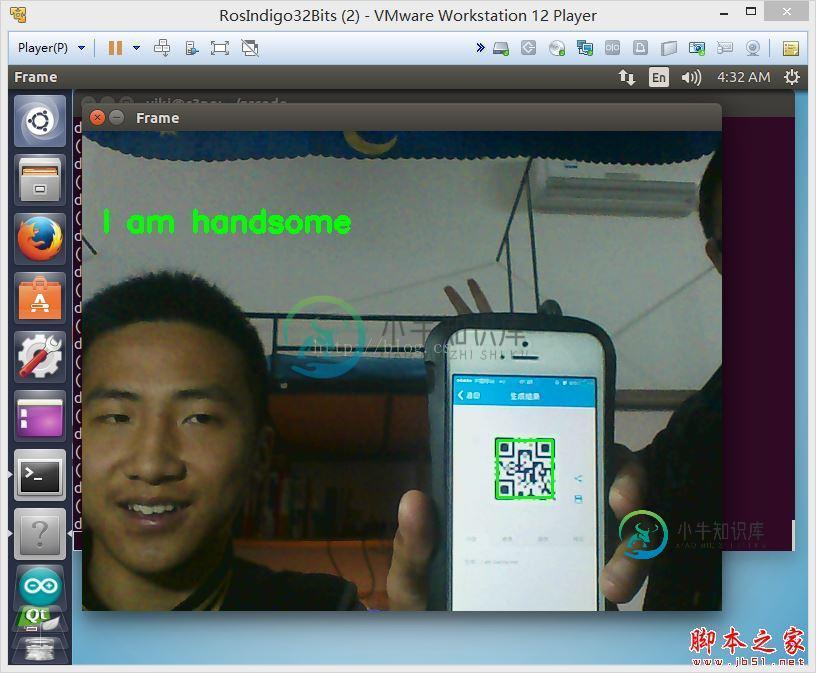
下面还是上源码
# import the necessary packages
import simple_barcode_detection
import cv2
import numpy as np
import zbar
from PIL import Image
# create a reader
scanner = zbar.ImageScanner()
# configure the reader
scanner.parse_config('enable')
font=cv2.FONT_HERSHEY_SIMPLEX
camera=cv2.VideoCapture(0)
while True:
# grab the current frame
(grabbed, frame) = camera.read()
# check to see if we have reached the end of the
# video
if not grabbed:
break
# detect the barcode in the image
box = simple_barcode_detection.detect(frame)
if box != None:
min=np.min(box,axis=0)
max=np.max(box,axis=0)
roi=frame[min[1]-10:max[1]+10,min[0]-10:max[0]+10]
print roi.shape
roi=cv2.cvtColor(roi,cv2.COLOR_BGR2RGB)
pil= Image.fromarray(frame).convert('L')
width, height = pil.size
raw = pil.tostring()
# wrap image data
zarimage = zbar.Image(width, height, 'Y800', raw)
# scan the image for barcodes
scanner.scan(zarimage)
# extract results
for symbol in zarimage:
  # do something useful with results
print 'decoded', symbol.type, 'symbol', '"%s"' %symbol.data
cv2.drawContours(frame, [box], -1, (0, 255, 0), 2)
cv2.putText(frame,symbol.data,(20,100),font,1,(0,255,0),4)
# if a barcode was found, draw a bounding box on the frame
# show the frame and record if the user presses a key
cv2.imshow("Frame", frame)
key = cv2.waitKey(1) & 0xFF
# if the 'q' key is pressed, stop the loop
if key == ord("q"):
break
# cleanup the camera and close any open windows
camera.release()
cv2.destroyAllWindows()
总结
以上所述是小编给大家介绍的使用python写的opencv实时监测和解析二维码和条形码,希望对大家有所帮助,如果大家有任何疑问请给我留言,小编会及时回复大家的。在此也非常感谢大家对小牛知识库网站的支持!
如果你觉得本文对你有帮助,欢迎转载,烦请注明出处,谢谢!
-
本文向大家介绍Python之ReportLab绘制条形码和二维码的实例,包括了Python之ReportLab绘制条形码和二维码的实例的使用技巧和注意事项,需要的朋友参考一下 条形码和二维码 运行结果: 以上这篇Python之ReportLab绘制条形码和二维码的实例就是小编分享给大家的全部内容了,希望能给大家一个参考,也希望大家多多支持呐喊教程。
-
本文向大家介绍Android仿微信二维码和条形码,包括了Android仿微信二维码和条形码的使用技巧和注意事项,需要的朋友参考一下 本文实例为大家分享了Android仿微信二维码和条形码的具体代码,供大家参考,具体内容如下 图片美工做下处理。貌似需要做一个描边。png透明背景 在加两个方法 以上就是本文的全部内容,希望对大家的学习有所帮助,也希望大家多多支持呐喊教程。
-
本文向大家介绍Android生成条形码和二维码功能,包括了Android生成条形码和二维码功能的使用技巧和注意事项,需要的朋友参考一下 背景: 随着移动互联网的普及以及智能终端设备的广泛应用,移动支付变得越来越便捷,通过扫描二维码代替传统的刷卡行为。那么作为开发者而言生成二维码成为了一项必备技能。 准备: 使用zxing包 implementatio
-
本文向大家介绍Java实现二维码QRCode的编码和解码与示例解析,包括了Java实现二维码QRCode的编码和解码与示例解析的使用技巧和注意事项,需要的朋友参考一下 Java实现二维码QRCode的编码和解码 涉及到的一些主要类库,方便大家下载: 编码lib:Qrcode_swetake.jar (官网介绍-- http://www.swetake.com/qr/index-e.html)
-
本文向大家介绍python OpenCV GrabCut使用实例解析,包括了python OpenCV GrabCut使用实例解析的使用技巧和注意事项,需要的朋友参考一下 这篇文章主要介绍了python OpenCV GrabCut使用实例解析,文中通过示例代码介绍的非常详细,对大家的学习或者工作具有一定的参考学习价值,需要的朋友可以参考下 先上一个效果图: 使用Python3.7+OpenCV
-
本文向大家介绍Android中google Zxing实现二维码与条形码扫描,包括了Android中google Zxing实现二维码与条形码扫描的使用技巧和注意事项,需要的朋友参考一下 Android中google Zxing实现二维码与条形码扫描 了解二维码这个东西还是从微信中,当时微信推出二维码扫描功能,自己感觉挺新颖的,从一张图片中扫一下竟然能直接加好友,不可思议啊,那时候还不了解二维码,

