
hibernate5.2的基本配置方法(详解)

目标:将Student实体对象加入数据库
1、首先需要下载三个东西:hibernate,slf4j,mysql。
2、分别取他们的包导入新建的项目中,我这里的版本是:hibernate-release-5.2.10里面lib目录下的required中的全部文件 slf4j-1.7.25下的受slf4j-nop-1.7.25.jar mysql的mysql-connector-java-5.1.42-bin.jar
3、在src下配置hibernate.cfg.xml(建议直接去文档复制然后改)
<?xml version='1.0' encoding='utf-8'?>
<!DOCTYPE hibernate-configuration PUBLIC
"-//Hibernate/Hibernate Configuration DTD 3.0//EN"
"http://www.hibernate.org/dtd/hibernate-configuration-3.0.dtd">
<hibernate-configuration>
<session-factory>
<!-- Database connection settings -->
<property name="connection.driver_class">com.mysql.jdbc.Driver</property>
<property name="connection.url">jdbc:mysql://localhost/text02</property>
<property name="connection.username">root</property>
<property name="connection.password">6530033197</property>
<!-- JDBC connection pool (use the built-in) -->
<!--
<property name="connection.pool_size">1</property>
-->
<!-- SQL dialect -->
<property name="dialect">org.hibernate.dialect.MySQLDialect</property>
<!-- Enable Hibernate's automatic session context management -->
<!-- <property name="current_session_context_class">thread</property> -->
<!-- Disable the second-level cache -->
<property name="cache.provider_class">org.hibernate.cache.internal.NoCacheProvider</property>
<!-- Echo all executed SQL to stdout -->
<property name="show_sql">true</property>
<!-- Drop and re-create the database schema on startup -->
<!--
<property name="hbm2ddl.auto">update</property>
-->
<mapping resource="student/Student.hbm.xml"/>
</session-factory>
</hibernate-configuration>
4、在mysql中创建student表,字段:id age name
5、创建自己的实体类在src下建包student,然后建Class:Student.java
package student;

public class Student {
private int id;
private int age;
private String name;

public int getId() {
return id;
}
public void setId(int id) {
this.id = id;
}
public int getAge() {
return age;
}
public void setAge(int age) {
this.age = age;
}
public String getName() {
return name;
}
public void setName(String name) {
this.name = name;
}
public Student(int id, int age, String name) {
super();
this.id = id;
this.age = age;
this.name = name;
}

public Student() {
// TODO Auto-generated constructor stub
}

}
6、在对应package即student下配置文件:Student.hbm.xml
<?xml version="1.0"?>
<!DOCTYPE hibernate-mapping PUBLIC
"-//Hibernate/Hibernate Mapping DTD 3.0//EN"
"http://www.hibernate.org/dtd/hibernate-mapping-3.0.dtd">

<hibernate-mapping package="student">
<class name="Student" table="student">
<id name="id" column="id">
</id>
<property name="name" type="string" column="name"/>
<property name="age" type="int" column="age"/>
</class>
</hibernate-mapping>
7、创建测试类:StudentText.java
package student;

import org.hibernate.Session;
import org.hibernate.SessionFactory;
import org.hibernate.cfg.Configuration;

public class StudentText {

public static void main(String[] args) {
Student stu = new Student();
stu.setId(4);
stu.setName("小明");
stu.setAge(12);

Configuration con = new Configuration();
SessionFactory sf = con.configure().buildSessionFactory();
Session s = sf.openSession();
s.beginTransaction();
s.save(stu);
s.getTransaction().commit();
s.close();
sf.close();

}

}
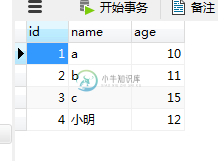
输出结果,完成:
以上这篇hibernate5.2的基本配置方法(详解)就是小编分享给大家的全部内容了,希望能给大家一个参考,也希望大家多多支持小牛知识库。
-
本文向大家介绍详解centos7配置本地yum源的方法,包括了详解centos7配置本地yum源的方法的使用技巧和注意事项,需要的朋友参考一下 最近在使用虚拟机时遇到一些麻烦,因为公司内部有网络管理,所以vm连接不上外网,yum无法安装软件,怎么解决呢?–使用iso做本地yum源,可以解决大部份的包安装。 vm安装的是centos7。 1、挂载iso到vm 2、修改yum源配置 yum源配置目录为
-
本文向大家介绍详解CLion配置openMP的方法,包括了详解CLion配置openMP的方法的使用技巧和注意事项,需要的朋友参考一下 使用MinGW64在Clion中配置openMP的开发 安装MinGW64和CLion配置CMakeList.txtCLion 2020.2.3 Build #CL-202.7319.72, built on September 18, 2020 对openMP编
-
本文向大家介绍详解git的基本使用方法,包括了详解git的基本使用方法的使用技巧和注意事项,需要的朋友参考一下 什么是git? git是目前世界上最先进的分布式版本控制系统。 git与SVN的最主要区别? SVN是集中式版本控制系统,版本库是集中放在中央服务器的,而工作的时候用的都是自己的电脑,所以开始工作之前需要从中央服务器那里获取最新的版本,然后开始工作,工作完后,需要把自己所做的工作推送到中
-
本文向大家介绍Linux基本网络配置方法介绍,包括了Linux基本网络配置方法介绍的使用技巧和注意事项,需要的朋友参考一下 1、常用配置网络指令 (1) 配置eth0的IP地址, 同时激活该设备 (2) 添加默认网关 (3) 配置DNS 查看DNS (4)其它命令 2、确定网口位置---工具ethtool (1)ethtool DEVNAME 查看相应设备名称对应的设备信息 example
-
本文向大家介绍Maven deploy配置方法详解,包括了Maven deploy配置方法详解的使用技巧和注意事项,需要的朋友参考一下 作用 在本地的pom文件配置好之后,执行deploy命令,可以将maven所打的jar包上传到远程的repository,便于其他开发者和工程共享。 pom.xml配置 首选,在pom文件中project标签下添加如下代码: 此时,执行deploy命令,会返回40
-
您已经知道了,Emacs 的配置文件为 ~/.emacs 。配置文件中,以 ; 起始到行末的部分为注释。 让我们些简单配置一下: 例 25.1. emacs 配置 ~/.emacs ;;======================================== ;;添加 Emacs 搜索目录 可以将自定的扩展放该目录 ;;==================================