SpringBoot整合liquibase的实现方法
LiquiBase 是一个用于数据库重构和迁移的开源工具,通过日志文件的形式记录数据库的变更,然后执行日志文件中的修改,将数据库更新或回滚到一致的状态。它的目标是提供一种数据库类型无关的解决方案,通过执行schema类型的文件来达到迁移。其有点主要有以下:
- 支持几乎所有主流的数据库,如MySQL, PostgreSQL, Oracle, Sql Server, DB2等;
- 支持多开发者的协作维护;
- 日志文件支持多种格式,如XML, YAML, JSON, SQL等;
- 支持多种运行方式,如命令行、Spring集成、Maven插件、Gradle插件等。
liquibase 官方文档地址: http://www.liquibase.org/documentation/index.html
一、引入依赖
先在 pom 文件里引入依赖
<dependency>
 <groupId>org.liquibase</groupId>
 <artifactId>liquibase-core</artifactId>
</dependency>
二、指定配置文件位置
在代码中新建一个 LiquibaseConfig 类,用于配置 Liquibase ,指定配置文件的位置。
import javax.sql.DataSource;
import liquibase.integration.spring.SpringLiquibase;
import org.springframework.context.annotation.Bean;
import org.springframework.context.annotation.Configuration;

@Configuration
public class LiquibaseConfig {

 @Bean
 public SpringLiquibase liquibase(DataSource dataSource) {
 SpringLiquibase liquibase = new SpringLiquibase();
 liquibase.setDataSource(dataSource);
 //指定changelog的位置,这里使用的一个master文件引用其他文件的方式
 liquibase.setChangeLog("classpath:liquibase/master.xml");
 liquibase.setContexts("development,test,production");
 liquibase.setShouldRun(true);
 return liquibase;
 }

}
三、编写配置文件
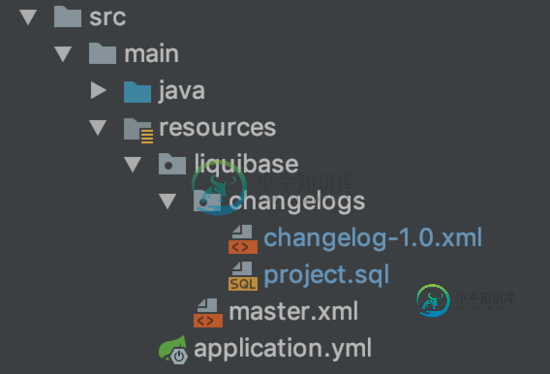
目录结构:

src/main/resources 下新建一个文件夹: liquibase ,用来存放跟 liquibase 相关的文件。
master.xml
然后在 liquibase 文件夹下新建 master.xml 作为主文件。
<databaseChangeLog
  xmlns="http://www.liquibase.org/xml/ns/dbchangelog"
  xmlns:xsi="http://www.w3.org/2001/XMLSchema-instance"
  xsi:schemaLocation="http://www.liquibase.org/xml/ns/dbchangelog
   http://www.liquibase.org/xml/ns/dbchangelog/dbchangelog-3.1.xsd">

 <includeAll path="liquibase/changelogs/" relativeToChangelogFile="false"/>

</databaseChangeLog>
includeAll 标签可以把一个文件夹下的所有 changelog 都加载进来。如果单个加载可以用 include 。
includeAll 标签里有两个属性: path 和 relativeToChangelogFile 。
| Attribute | Description |
|---|---|
| file | Name of the file to import required |
| relativeToChangelogFile | Is the file path relative to the root changelog file rather than to the classpath. Defaults to "false" since 1.9 |
path (在 include 标签里是 file):指定要加载的文件或文件夹位置
relativeToChangelogFile :文件位置的路径是否相对于 root changelog 是相对路径,默认 false,即相对于 classpath 是相对路径。
changelog
另在 liquibase 文件夹下新建 changelogs 文件夹用来存放 changelog。
这里新建一个 changelog-1.0.xml
<databaseChangeLog
  xmlns="http://www.liquibase.org/xml/ns/dbchangelog"
  xmlns:xsi="http://www.w3.org/2001/XMLSchema-instance"
  xsi:schemaLocation="http://www.liquibase.org/xml/ns/dbchangelog
   http://www.liquibase.org/xml/ns/dbchangelog/dbchangelog-3.1.xsd">

 <changeSet id="20190713-01" author="solo">
  <createTable tableName="project_info">
   <column name="project_id" type="varchar(64)" encoding="utf8" remarks="项目id">
    <constraints primaryKey="true" nullable="false"/>
   </column>
   <column name="project_name" type="varchar(255)" encoding="utf8" remarks="项目名字"/>
   <column name="project_difficulty" type="float" encoding="utf8" remarks="项目难度"/>
   <column name="category_id" type="varchar(64)" encoding="utf8" remarks="项目类型类目编号"/>
   <column name="project_status" type="int(11)" encoding="utf8" remarks="项目状态, 0招募中,1 进行中,2已完成,3失败,4延期,5删除"/>
   <column name="project_desc" type="varchar(512)" encoding="utf8" remarks="项目简介"/>
   <column name="project_creater_id" type="varchar(64)" encoding="utf8" remarks="项目创建者id"/>
   <column name="team_id" type="varchar(64)" encoding="utf8" remarks="项目所属团队id"/>
   <column name="create_time" type="bigint(64)" encoding="utf8" remarks="创建时间"/>
   <column name="update_time" type="bigint(64)" encoding="utf8" remarks="更新时间"/>
  </createTable>
 </changeSet>

 <changeSet id="20190713-02" author="solo">
  <createTable tableName="project_category" remarks="项目类型表">
   <column name="id" type="varchar(64)" remarks="项目类型id">
    <constraints primaryKey="true" nullable="false"/>
   </column>
   <column name="name" type="varchar(255)" remarks="类目类型名称"/>
   <column name="status" type="int(11)" remarks="状态。1正常,2删除"/>
   <column name="remark" type="varchar(255)" remarks="备注"/>
  </createTable>
 </changeSet>

 <changeSet id="20190713-03" author="solo">
  <createTable tableName="project_like_user" remarks="项目点赞表">
   <column name="id" type="varchar(64)" remarks="主键id">
    <constraints primaryKey="true" nullable="false"/>
   </column>
   <column name="project_id" type="varchar(64)" remarks="项目id"/>
   <column name="user_id" type="varchar(64)" remarks="点赞的用户id"/>
   <column name="status" type="int(11)" remarks="点赞状态,0 取消点赞,1点赞"/>
   <column name="type" type="int(11)" remarks="类型 1点赞"/>
   <column name="create_time" type="bigint(64)" remarks="创建时间"/>
   <column name="update_time" type="bigint(64)" remarks="更新时间"/>
  </createTable>
 </changeSet>

 <changeSet id="20190713-04" author="solo">
  <createTable tableName="project_picture" remarks="项目图片表">
   <column name="id" type="varchar(64)" remarks="图片id">
    <constraints primaryKey="true" nullable="false"/>
   </column>
   <column name="project_id" type="varchar(64)" remarks="项目id"/>
   <column name="picture_url" type="varchar(64)" remarks="图片地址"/>
   <column name="picture_url_32" type="varchar(64)" remarks="图片地址32位"/>
   <column name="picture_url_64" type="varchar(64)" remarks="图片地址64位"/>
  </createTable>
 </changeSet>

</databaseChangeLog>
如果你的项目一开始就用了 liquibase,那可以像上面这样写,把建表语句都写在 changelog 里。
如果一开始没用,后期想引入 liquibase,可以把以前的数据库导出成 sql,然后引入 sql 文件。方式如下:
<databaseChangeLog
  xmlns="http://www.liquibase.org/xml/ns/dbchangelog"
  xmlns:xsi="http://www.w3.org/2001/XMLSchema-instance"
  xsi:schemaLocation="http://www.liquibase.org/xml/ns/dbchangelog
   http://www.liquibase.org/xml/ns/dbchangelog/dbchangelog-3.1.xsd">

 <include file="liquibase/changelogs/project.sql" relativeToChangelogFile="false"/>

</databaseChangeLog>
直接把项目导出的数据库文件 project.sql 通过 include 标签引进来。
以上就是 SpringBoot 整合 Liquibase 的全部内容。希望对大家的学习有所帮助,也希望大家多多支持小牛知识库。
-
本文向大家介绍SpringBoot整合Shiro实现登录认证的方法,包括了SpringBoot整合Shiro实现登录认证的方法的使用技巧和注意事项,需要的朋友参考一下 安全无处不在,趁着放假读了一下 Shiro 文档,并记录一下 Shiro 整合 Spring Boot 在数据库中根据角色控制访问权限 简介 Apache Shiro是一个功能强大、灵活的,开源的安全框架。它可以干净利落地处理身份验
-
本文向大家介绍Springboot 整合shiro实现权限控制的方法,包括了Springboot 整合shiro实现权限控制的方法的使用技巧和注意事项,需要的朋友参考一下 Author:jeffrey Date:2019-04-08 一、开发环境: 1、mysql - 5.7 2、navicat(mysql客户端管理工具) 3、idea 2017.2 4、jdk8 5、tomcat 8.5 6、s
-
本文向大家介绍springboot整合EHCache的实践方案,包括了springboot整合EHCache的实践方案的使用技巧和注意事项,需要的朋友参考一下 EhCache 是一个纯Java的进程内缓存框架,具有快速、精干等特点,是Hibernate中默认的CacheProvider。 ehcache提供了多种缓存策略,主要分为内存和磁盘两级,所以无需担心容量问题。 spring-bo
-
本文向大家介绍Springboot整合MybatisPlus的实现过程解析,包括了Springboot整合MybatisPlus的实现过程解析的使用技巧和注意事项,需要的朋友参考一下 这篇文章主要介绍了Springboot整合MybatisPlus的实现过程解析,文中通过示例代码介绍的非常详细,对大家的学习或者工作具有一定的参考学习价值,需要的朋友可以参考下 1、pom文件 2、创建CodeGen
-
主要内容:1.Micrometer简介,2.SpringBoot Actuator,3.Prometheus,4.自定义Metric,5.总结1.Micrometer简介 Micrometer 为 Java 平台上的性能数据收集提供了一个通用的 API,应用程序只需要使用 Micrometer 的通用 API 来收集性能指标即可。Micrometer 会负责完成与不同监控系统的适配工作。这就使得切换监控系统变得很容易。Micrometer 还支持推送数据到多个不同的监控系统。Micrometer
-
本文向大家介绍Springboot整合activemq的方法步骤,包括了Springboot整合activemq的方法步骤的使用技巧和注意事项,需要的朋友参考一下 今天呢心血来潮,也有很多以前的学弟问到我关于消息队列的一些问题,有个刚入门,有的有问题都来问我,那么今天来说说如何快速入门mq。 一、首先说下什么是消息队列? 1.消息队列是在消息的传输过程中保存消息的容器。 二、为什么要用到消息队列?

