
谈谈Android里的Context的使用实例

大家好,今天给大家分享一下Android里的Context的一些用法,以前经常有人在群里问我比如我在一个工具类里的某个方法,或者View里需要调用Context.但是工具类还有View里没有这个上下文怎么办?为了解决大家的疑问,为了解决大家的疑问,我今天写一个简单的Demo.让大家如何学好自如的用Context.想什么时候有Context,什么时候就有Context.
这里大致可以分为两种:一是传递Context参数,二是调用全局的Context.
其实我们应用启动的时候会启动Application这个类,这个类是在AndroidManifest.xml文件里其实是默认的
<application
    android:icon="@drawable/ic_launcher"
    android:label="@string/app_name"
    >
    <activity
      android:name="ApplicationDemoActivity"
      android:label="@string/app_name" >
      <intent-filter>
        <action android:name="androidintentactionMAIN" />
        <category android:name="androidintentcategoryLAUNCHER" />
      </intent-filter>
    </activity>
  </application>
这个Application类是单例的,也就是说我们可以自己写个Application(比如名为:MainApplication)类,来代替默认的Applicaiton,这个类可以保存应用的全局变量,我们可以定义一个全局的Context.供外部调用.用法如下:
package com.tutor.application;

import androidappApplication;
import androidcontentContext;

public class MainApplication extends Application {

  /**
   * 全局的上下文
   */
  private static Context mContext;

  @Override
  public void onCreate() {
    superonCreate();

    mContext = getApplicationContext();

  }

  /**获取Context
   * @return
   */
  public static Context getContext(){
    return mContext;
  }


  @Override
  public void onLowMemory() {
    superonLowMemory();
  }


}
我们需要在AndroidMainifest.xml把MainApplication注册进去(第10行代码):
<?xml version="1.0" encoding="utf-8"?>
<manifest xmlns:android="http://schemasandroidcom/apk/res/android"
  package="comtutorapplication"
  android:versionCode="1"
  android:versionName="0" >

  <application
    android:icon="@drawable/ic_launcher"
    android:label="@string/app_name"
    android:name="MainApplication" >
    <activity
      android:name="ApplicationDemoActivity"
      android:label="@string/app_name" >
      <intent-filter>
        <action android:name="androidintentactionMAIN" />
        <category android:name="androidintentcategoryLAUNCHER" />
      </intent-filter>
    </activity>
  </application>

</manifest>
为了让大家更容易理解,写了一个简单的Demo.步骤如下:
第一步:新建一个Android工程ApplicationDemo,目录结构如下:
第二步:新建MainApplication.Java,代码和上面一样我就不贴了.
第三步:新建一个工具类ToolsUtil.java,代码如下
package com.tutor.application;
import androidcontentContext;
import androidwidgetToast;

/**
 * @author frankiewei
 * 应用的一些工具类
 */
public class ToolUtils {

  /**
   * 参数带Context
   * @param context
   * @param msg
   */
  public static void showToast(Context context,String msg){
    ToastmakeText(context, msg, ToastLENGTH_SHORT)show();
  }

  /**
   * 调用全局的Context
   * @param msg
   */
  public static void showToast(String msg){
    ToastmakeText(MainApplicationgetContext(), msg, ToastLENGTH_SHORT)show();
  }
}
第四步:新建一个View命名为MainView.java就是我们Activity现实的View.代码如下:
package com.tutor.application;

import androidappActivity;
import androidcontentContext;
import androidutilAttributeSet;
import androidviewLayoutInflater;
import androidviewView;
import androidwidgetButton;
import androidwidgetFrameLayout;

/**
 * @author frankiewei
 * 自定义的MainView
 */
public class MainView extends FrameLayout implements ViewOnClickListener{

  private Context mContext;

  private Activity mActivity;

  /**
   * 参数Button
   */
  private Button mArgButton;

  /**
   * 全局Button
   */
  private Button mGlobleButton;

  /**
   * 退出Button
   */
  private Button mExitButton;

  public MainView(Context context){
    super(context);
    setupViews();
  }

  html" target="_blank">public MainView(Context context, AttributeSet attrs) {
    super(context, attrs);
    setupViews();
  }


  private void setupViews(){
    //获取View的上下文
    mContext = getContext();
    //这里将Context转换为Activity
    mActivity = (Activity)mContext;
    LayoutInflater inflater = LayoutInflaterfrom(mContext);
    View v = inflaterinflate(Rlayoutmain, null);
    addView(v);

    mArgButton = (Button)vfindViewById(Ridarg_button);
    mGlobleButton = (Button)vfindViewById(Ridglo_button);
    mExitButton = (Button)vfindViewById(Ridexit_button);

    mArgButtonsetOnClickListener(this);
    mGlobleButtonsetOnClickListener(this);
    mExitButtonsetOnClickListener(this);
  }

  public void onClick(View v) {
    if(v == mArgButton){
      ToolUtilsshowToast(mContext, "我是通过传递Context参数显示的!");
    }else if(v == mGlobleButton){
      ToolUtilsshowToast("我是通过全局Context显示的!");
    }else{
      mActivityfinish();
    }
  }

}
这里MainView.java使用的布局main.xml代码如下:
<?xml version="1.0" encoding="utf-8"?>
<LinearLayout xmlns:android="http://schemasandroidcom/apk/res/android"
  android:layout_width="fill_parent"
  android:layout_height="fill_parent"
  android:orientation="vertical" >

  <TextView
    android:layout_width="fill_parent"
    android:layout_height="wrap_content"
    android:text="Welcome to frankie wei's blog"
    />

  <Button
    android:id="@+id/arg_button"
    android:layout_width="fill_parent"
    android:layout_height="wrap_content"
    android:text="传递Context参数"
    />

  <Button
    android:id="@+id/glo_button"
    android:layout_width="fill_parent"
    android:layout_height="wrap_content"
    android:text="全局的Context"
    />

  <Button
    android:id="@+id/exit_button"
    android:layout_width="fill_parent"
    android:layout_height="wrap_content"
    android:text="退出App"
    />

</LinearLayout>
第五步:修改ApplicationDemoActivity.java,代码如下:
package com.tutor.application;
import androidappActivity;
import androidosBundle;

public class ApplicationDemoActivity extends Activity {
  @Override
  public void onCreate(Bundle savedInstanceState) {
    superonCreate(savedInstanceState);

    MainView mMainView = new MainView(this);
    setContentView(mMainView);

  }

}
第六步:运行上述工程效果如下:
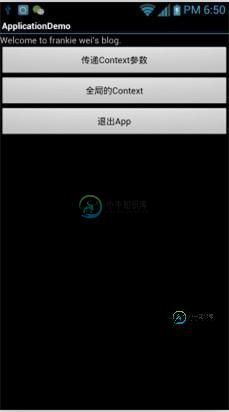
运行效果1
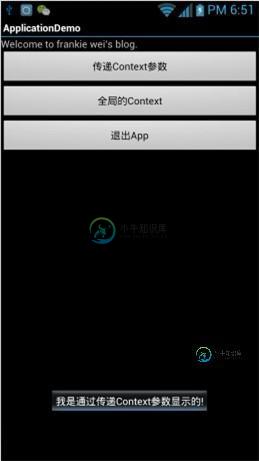
运行效果2---- 点击第一个按钮

运行效果3---- 点击第二个按钮
以上就是本文的全部内容,希望对大家的学习有所帮助,也希望大家多多支持小牛知识库。
-
本文向大家介绍谈谈java的concurrent用法,包括了谈谈java的concurrent用法的使用技巧和注意事项,需要的朋友参考一下 我们都知道,在JDK1.5之前,Java中要进行业务并发时,通常需要有程序员独立完成代码实现,当然也有一些开源的框架提供了这些功能,但是这些依然没有JDK自带的功能使用起来方便。而当针对高质量Java多线程并发程序设计时,为防止死蹦等现象的出现,比如使用jav
-
本文向大家介绍浅谈Spring Context加载方式,包括了浅谈Spring Context加载方式的使用技巧和注意事项,需要的朋友参考一下 Spring 加载方式 对于可执行文件方式,我们一般的加载Spring 配置的方式是 ClassPathXmlApplicationContext 从spring 3.0开始,开始使用注解的方式来进行spring 配置的注册 demoService是定义的
-
本文向大家介绍谈谈C++学习之Pair的使用方法,包括了谈谈C++学习之Pair的使用方法的使用技巧和注意事项,需要的朋友参考一下 一、Pair类型概述 pair是一种模板类型,其中包含两个数据值,两个数据的类型可以不同,基本的定义如下: 表示a中有两个类型,第一个元素是int型的,第二个元素是string类型的,如果创建pair的时候没有对其进行初始化,则调用默认构造函数对其初始化。 也可以像上
-
本文向大家介绍简单谈谈Android中SP与DP的区别,包括了简单谈谈Android中SP与DP的区别的使用技巧和注意事项,需要的朋友参考一下 从一开始写Android程序,就被告知这些常识 一、dp(或者dip device independent pixels) 一种基于屏幕密度的抽象单位。在每英寸160点的显示器上,1dp=1px。不同设备有不同的显示效果,这个和设备硬件有关。 二、sp(S
-
本文向大家介绍深入谈谈C#9新特性的实际运用,包括了深入谈谈C#9新特性的实际运用的使用技巧和注意事项,需要的朋友参考一下 前言 你一定会好奇:“老周,你去哪开飞机了?这么久没写博客了。” 老周:“我买不起飞机,开了个铁矿,挖了一年半的石头。谁知铁矿垮了,压死了几条蜈蚣,什么也没挖着。” 所以,这么丢死人的事,还是不要提了,爷爷从小教导我做人要低调…… 一转眼,.NET 5 要来了,同时也带来了
-
本文向大家介绍谈谈对html5的了解相关面试题,主要包含被问及谈谈对html5的了解时的应答技巧和注意事项,需要的朋友参考一下 1.良好的移动性,以移动设备为主。 2.响应式设计,以适应自动变化的屏幕尺寸 3.支持离线缓存技术,webStorage本地缓存 4.新增canvas,video,audio等新标签元素。新增特殊内容元素:article,footer,header,nav,section