
Android自定义时间轴的实现过程

本文讲述Android自定义时间轴的实现过程,供大家参考,具体内容如下
相关视频链接:
Android自定义控件系列
http://edu.csdn.net/course/detail/3719/65396
Android视频全系列
http://edu.csdn.net/course/detail/2741/43163
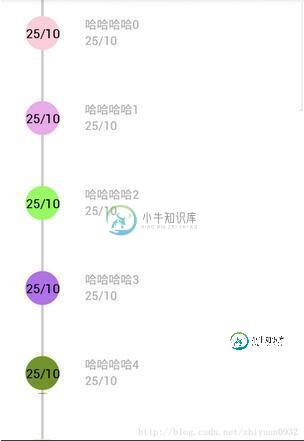
时间轴效果,实际上非常简单,就是listView中一个又一个的条目而已….大家可以只关注一个条目。
首先展示一个条目的布局效果
<?xml version="1.0" encoding="utf-8"?>
<LinearLayout xmlns:android="http://schemas.android.com/apk/res/android"
 android:layout_width="match_parent"
 android:layout_height="75dp"
 android:orientation="horizontal" >

 <!-- 线条部分 -->

 <LinearLayout
 android:layout_width="wrap_content"
 android:layout_height="match_parent"
 android:gravity="center_horizontal"
 android:orientation="vertical"
 android:paddingLeft="30dp" >

 <View
 android:layout_width="3dp"
 android:layout_height="20dp"
 android:background="#88000000" />

 <com.example.time.TimeView
 android:src="@drawable/ic_launcher"
 android:id="@+id/timeView"
 android:layout_width="40dp"
 android:layout_height="40dp" />
 <View
 android:layout_width="3dp"
 android:layout_height="40dp"
 android:background="#88000000" />
 </LinearLayout>
 <!-- 文字部分 -->

 <LinearLayout
 android:layout_width="match_parent"
 android:layout_height="match_parent"
 android:orientation="vertical"
 android:paddingLeft="30dp"
 android:paddingRight="30dp"
 android:paddingTop="20dp" >

 <TextView
 android:id="@+id/tv_content"
 android:layout_width="wrap_content"
 android:layout_height="wrap_content"
 android:text="哈哈哈"
 android:textColor="#ABABAB" />

 <TextView
 android:id="@+id/tv_time"
 android:layout_width="wrap_content"
 android:layout_height="wrap_content"
 android:layout_below="@id/tv_content"
 android:text="时间"
 android:textColor="#ABABAB" />
 </LinearLayout>

</LinearLayout>
接下来看一下自定义的TimeView如何书写
package com.example.time;

import java.util.Random;

import android.content.Context;
import android.graphics.Canvas;
import android.graphics.Color;
import android.graphics.Paint;
import android.graphics.Paint.Style;
import android.graphics.Rect;
import android.util.AttributeSet;
import android.view.View;

public class TimeView extends View {

 private Random random;
 private String time;
 private Rect mBounds = new Rect();
 private int rgb;
 public TimeView(Context context, AttributeSet attrs, int defStyleAttr) {
 super(context, attrs, defStyleAttr);
 initView();
 }

 public TimeView(Context context, AttributeSet attrs) {
 super(context, attrs);
 initView();
 }

 public TimeView(Context context) {
 super(context);
 initView();
 }

 private void initView() {

 random = new Random();
 //定义颜色---这里纯粹为了好玩--大家定义的时候可以在自定义控件外边定义,将颜色传递进来
 rgb = Color.rgb(100+random.nextInt(155), 100+random.nextInt(155),
 random.nextInt(100+155));

 }

 public void setTime(String time) {
 this.time = time;
 invalidate();

 }

 @Override
 protected void onDraw(Canvas canvas) {
 super.onDraw(canvas);
 Paint paint = new Paint();
 paint.setColor(rgb);
 paint.setAntiAlias(true);
 paint.setStyle(Style.FILL_AND_STROKE);
 //先绘制圆
 canvas.drawCircle(getWidth() / 2, getHeight() / 2, getWidth() / 2,
 paint);
 paint = new Paint();
 paint.setColor(Color.BLACK);
 paint.setTextSize(30);
 paint.getTextBounds(time, 0, time.length(), mBounds);
 float textWidth = mBounds.width();
 float textHeight = mBounds.height();
 //再绘制文字
 canvas.drawText(time, getWidth() / 2 - textWidth / 2, getHeight() / 2
 + textHeight / 2, paint);
 }

}
看一下Activity中的代码–就是一个ListView的效果展示
public class MainActivity extends Activity {

 private ListView listView;

 @Override
 protected void onCreate(Bundle savedInstanceState) {
 super.onCreate(savedInstanceState);
 setContentView(R.layout.activity_main);
 listView = (ListView) findViewById(R.id.listView);
 initData();
 listView.setAdapter(new MyBaseAdapter());
 }

 class MyBaseAdapter extends BaseAdapter {

 @Override
 public int getCount() {
 return dataList.size();
 }

 @Override
 public Object getItem(int arg0) {
 return dataList.get(arg0);
 }

 @Override
 public long getItemId(int arg0) {
 return arg0;
 }

 @Override
 public View getView(int arg0, View arg1, ViewGroup arg2) {

 View view = View.inflate(MainActivity.this, R.layout.item, null);
 TextView tv_content = (TextView) view.findViewById(R.id.tv_content);
 TextView tv_time = (TextView) view.findViewById(R.id.tv_time);
 TimeView timeView = (TimeView) view.findViewById(R.id.timeView);
 timeView.setTime(dataList.get(arg0).getTime());
 tv_content.setText(dataList.get(arg0).getContent());
 tv_time.setText(dataList.get(arg0).getTime());

 return view;
 }

 }

 ArrayList<DataBean> dataList = new ArrayList<DataBean>();

 private void initData() {
 for (int i = 0; i < 20; i++) {
 dataList.add(new DataBean("哈哈哈哈" + i, "25/10"));
 }

 }

}
好了,这样的一个自定义时间轴效果就搞定了。
以上就是本文的全部内容,希望对大家的学习有所帮助,也希望大家多多支持小牛知识库。
-
本文向大家介绍Android实现列表时间轴,包括了Android实现列表时间轴的使用技巧和注意事项,需要的朋友参考一下 本文实例为大家分享了Android列表时间轴展示的具体代码,供大家参考,具体内容如下 实现的效果图如下: 实现的方式是利用recycleview的ItemDecoration这个抽象类,就是我们经常用来画分割线的的这个类, 具体如下 使用比较简单: 以上就是本文的全部内容,希望对
-
本文向大家介绍Android实现自定义倒计时,包括了Android实现自定义倒计时的使用技巧和注意事项,需要的朋友参考一下 最近工作中遇到个要做倒计时60秒的进度条,经过参考别人的资料做出来需求的效果。废话少说先来个效果: 一定想知道是怎么实现的吧!下面是代码 然后新建一个attr.xml; 这样一个自定义的view就写完了;那怎么用呢;布局就不说了; 这样就轻轻松松的跑起来了,希望能帮助到需要的
-
本文向大家介绍Android自定义view仿淘宝快递物流信息时间轴,包括了Android自定义view仿淘宝快递物流信息时间轴的使用技巧和注意事项,需要的朋友参考一下 学了Android有一段时间了,一直没有时间写博客,趁着周末有点空,就把自己做的一些东西写下来. 一方面锻炼一下自己的写文档的能力,另一方面分享代码的同时也希望能与大家交流一下技术,共同学习,共同进步. 废话不多少说,我们先来看看我
-
本文向大家介绍django 自定义过滤器的实现,包括了django 自定义过滤器的实现的使用技巧和注意事项,需要的朋友参考一下 自定义模版过滤器 虽然DTL给我们内置了许多好用的过滤器。但是有些时候还是不能满足我们的需求。因此Django给我们提供了一个接口,可以让我们自定义过滤器,实现自己的需求。 模版过滤器必须要放在app中,并且这个app必须要在INSTALLED_APPS中进行安装。然后再
-
我想在我的表中为过期的“竞赛”设置一个未来的时间戳。我可以毫无问题地输入时间,除了当我检索输入时,它似乎不会返回一个碳实例,而只是一个带时间的字符串? 这就是我用来创建新竞赛的内容,表中的时间格式与创建的和更新的字段完全相同。当我尝试以下方法时,它们似乎返回了一个碳实例: 为什么我没有得到一个碳实例返回? 我的迁移文件如下所示:
-
本文向大家介绍Android实现快递物流时间轴效果,包括了Android实现快递物流时间轴效果的使用技巧和注意事项,需要的朋友参考一下 本文实例为大家分享了Android实现快递物流时间轴效果展示的具体代码,供大家参考,具体内容如下 首先,这篇参考了别人的代码。根据自己的项目需求简单改造了一下,效果图如下 xml:代码 接下来是Activity,准备数据就好了 Adapter: 每一个item的布