
Vue实现图片轮播组件思路及实例解析
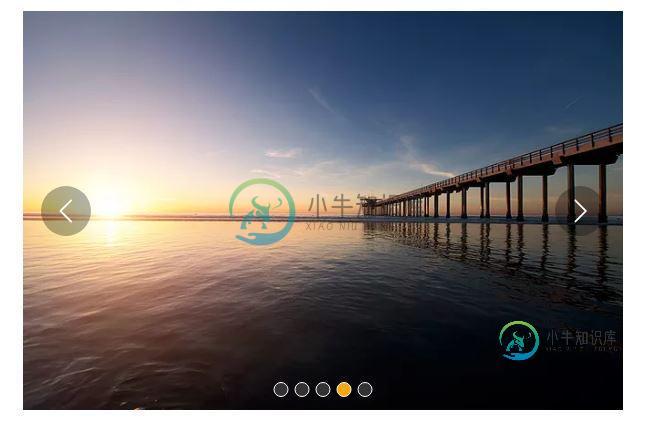
1、先看效果:
熟悉的图片轮播,只要是个网站,百分之90以上会有个图片轮播。我认为使用图片轮播。
第一可以给人以一种美观的感受,而不会显得网站那么呆板,
第二可以增加显示内容,同样的区域可以显示更多内容。
2、每学一个新东西 ,图片轮播都是很好的练手案例,而且,也很实用。
3、基本要求:页面加载,自动播放。鼠标悬停,停止播放。鼠标离开,继续播放
点击左右箭头切换上一张,下一张图片。
下方小圆点显示当前位第几张图片。
4、使用Vue实现
5、示例代码
结构html:
<template>
 <div id="slider">
  <div class="window" @mouseover="stop" @mouseleave="play">
   <ul class="container" :style="containerStyle">
    <li>
     <img :style="{width:imgWidth+'px'}" :src="sliders[sliders.length - 1].img" alt="">
    </li>
    <li v-for="(item, index) in sliders" :key="index">
     <img :style="{width:imgWidth+'px'}" :src="item.img" alt="">
    </li>
    <li>
     <img :style="{width:imgWidth+'px'}" :src="sliders[0].img" alt="">
    </li>
   </ul>
   <ul class="direction">
    <li class="left" @click="move(600, 1, speed)">
     <svg class="icon" width="30px" height="30.00px" viewBox="0 0 1024 1024" version="1.1" xmlns="http://www.w3.org/2000/svg"><path fill="#ffffff" d="M481.233 904c8.189 0 16.379-3.124 22.628-9.372 12.496-12.497 12.496-32.759 0-45.256L166.488 512l337.373-337.373c12.496-12.497 12.496-32.758 0-45.255-12.498-12.497-32.758-12.497-45.256 0l-360 360c-12.496 12.497-12.496 32.758 0 45.255l360 360c6.249 6.249 14.439 9.373 22.628 9.373z" /></svg>
    </li>
    <li class="right" @click="move(600, -1, speed)">
     <svg class="icon" width="30px" height="30.00px" viewBox="0 0 1024 1024" version="1.1" xmlns="http://www.w3.org/2000/svg"><path fill="#ffffff" d="M557.179 904c-8.189 0-16.379-3.124-22.628-9.372-12.496-12.497-12.496-32.759 0-45.256L871.924 512 534.551 174.627c-12.496-12.497-12.496-32.758 0-45.255 12.498-12.497 32.758-12.497 45.256 0l360 360c12.496 12.497 12.496 32.758 0 45.255l-360 360c-6.249 6.249-14.439 9.373-22.628 9.373z" /></svg>
    </li>
   </ul>
   <ul class="dots">
    <li v-for="(dot, i) in sliders" :key="i"
    :class="{dotted: i === (currentIndex-1)}"
    @click = jump(i+1)
    >
    </li>
   </ul>
  </div>
 </div>
</template>
CSS部分:
*{
    box-sizing: border-box;
    margin:0;
    padding:0;
   }
   ol,ul{
    list-style: none;
   }
   #slider{
    text-align: center;
   }
   .window{
    position:relative;
    width:600px;
    height:400px;
    margin:0 auto;
    overflow:hidden;
   }
   .container{
    display:flex;
    position:absolute;
   }
   .left, .right{
    position:absolute;
    top:50%;
    transform:translateY(-50%);
    width:50px;
    height:50px;
    background-color:rgba(0,0,0,.3);
    border-radius:50%;
    cursor:pointer;
   }
   .left{
    left:3%;
    padding-left:12px;
    padding-top:10px;
   }
   .right{
    right:3%;
    padding-right:12px;
    padding-top:10px;
   }
   img{
    user-select: none;
   }
   .dots{
     position:absolute;
     bottom:10px;
     left:50%;
     transform:translateX(-50%);
    }
   .dots li{
    display:inline-block;
    width:15px;
    height:15px;
    margin:0 3px;
    border:1px solid white;
    border-radius:50%;
    background-color:#333;
    cursor:pointer;
   }
   .dots .dotted{
    background-color:orange;
   }
JavaScript部分:
script>
export default {
 name: 'slider',
 props: {
  initialSpeed: {
   type: Number,
   default: 30
  },
  initialInterval: {
   type: Number,
   default: 3
  }
 },
 data () {
  return {
   sliders:[
    {
     img:'http://img.hb.aicdn.com/adbde61e4343dedd21e97ea7f22666825a8db7d077ffe-qn8Pjn_fw658'
    },
    {
     img:'http://img.hb.aicdn.com/adeed7d28df6e776c2fa6032579c697381d1a82b7fe00-fwRqgn_fw658'
    },
    {
     img:'http://img.hb.aicdn.com/ab7f48509b3c0353017d9a85ef1d12400c9b2724540d4-p3zouo_fw658'
    },
    {
     img:'http://img.hb.aicdn.com/60f788fc2a846192f224b9e6d4904b30e54926211d3d67-ACFJ9G_fw658'
    },
    {
     img:'http://img.hb.aicdn.com/22ded455284aab361b8d2056e82f74a891a019704296a-PSraEB_fw658'
    },
   ],
   imgWidth:600,
   currentIndex:1,
   distance:-600,
   transitionEnd: true,
   speed: this.initialSpeed
  }
 },
 computed:{
  containerStyle() {
   return {
    transform:`translate3d(${this.distance}px, 0, 0)`
   }
  },
  interval() {
   return this.initialInterval * 1000
  }
 },
 mounted() {
  this.init()
 },
 methods:{
  init() {
   this.play()
   window.onblur = function() { this.stop() }.bind(this)
   window.onfocus = function() { this.play() }.bind(this)
  },
  move(offset, direction, speed) {
   console.log(speed)
   if (!this.transitionEnd) return
   this.transitionEnd = false
   direction === -1 ? this.currentIndex += offset/600 : this.currentIndex -= offset/600
   if (this.currentIndex > 5) this.currentIndex = 1
   if (this.currentIndex < 1) this.currentIndex = 5

   const destination = this.distance + offset * direction
   this.animate(destination, direction, speed)
  },
  animate(des, direc, speed) {
   if (this.temp) {
    window.clearInterval(this.temp);
    this.temp = null ;
   }
   this.temp = window.setInterval(() => {
    if ((direc === -1 && des < this.distance) || (direc === 1 && des > this.distance)) {
     this.distance += speed * direc
    } else {
     this.transitionEnd = true
     window.clearInterval(this.temp)
     this.distance = des
     if (des < -3000) this.distance = -600
     if (des > -600) this.distance = -3000
    }
   }, 20)
  },
  jump(index) {
   const direction = index - this.currentIndex >= 0 ? -1 : 1;
   const offset = Math.abs(index - this.currentIndex) * 600;
   const jumpSpeed = Math.abs(index - this.currentIndex) === 0 ? this.speed : Math.abs(index - this.currentIndex) * this.speed ;
   this.move(offset, direction, jumpSpeed)
  },
  play() {
   if (this.timer) {
    window.clearInterval(this.timer)
    this.timer = null
   }
   this.timer = window.setInterval(() => {
    this.move(600, -1, this.speed)
   }, this.interval)
  },
  stop() {
   window.clearInterval(this.timer)
   this.timer = null
  }
 }
}
</script>
以上就是本文的全部内容,希望对大家的学习有所帮助,也希望大家多多支持小牛知识库。
-
本文向大家介绍Bootstrap图片轮播组件使用实例解析,包括了Bootstrap图片轮播组件使用实例解析的使用技巧和注意事项,需要的朋友参考一下 使用Bootstrap来编写图片轮播组件Carousel,则能够节约很多时间,图片轮播组件是一个在网页中很常见的技术,但是如果直接编写的话,需要很长的JavaScript编码,同时也不好控制大小。 同时说一下,Carousel这个词的本义是回旋木马。
-
本文向大家介绍JS组件库AlloyTouch实现图片轮播过程解析,包括了JS组件库AlloyTouch实现图片轮播过程解析的使用技巧和注意事项,需要的朋友参考一下 轮播图也涉及到触摸和触摸反馈,同时,AlloyTouch可以把惯性运动打开或者关闭,并且设置min和max为运动区域,超出会自动回弹。 除了一般的竖向滚动,AlloyTouch也可以支持横向滚动,甚至任何属性的运动,因为它的设计的本质就
-
本文向大家介绍基于vue实现swipe轮播组件实例代码,包括了基于vue实现swipe轮播组件实例代码的使用技巧和注意事项,需要的朋友参考一下 项目背景 图片轮播是前端项目必有项,当前有很多效果很酷炫的轮播插件,例如Swiper。 但是当项目中的图片轮播只需要一个很简单的轮播样式,比如这样的 我们引用这样一个110k的大插件,就大材小用了。再安利一下,swiper2.x和swiper3.x对移动和
-
本文向大家介绍Vue封装Swiper实现图片轮播效果,包括了Vue封装Swiper实现图片轮播效果的使用技巧和注意事项,需要的朋友参考一下 图片轮播是前端中经常需要实现的一个功能。最近学习Vue.js,就针对Swiper进行封装,实现一个简单的图片轮播组件。 一、Swiper 在实现封装之前,先介绍一下Swiper。 Swiper是纯Javascript打造的滑动特效插件,面向手机、平板电脑等移动
-
本文向大家介绍微信小程序 swiper组件轮播图详解及实例,包括了微信小程序 swiper组件轮播图详解及实例的使用技巧和注意事项,需要的朋友参考一下 微信小程序 swiper组件轮播图 照着开发文档尝试,总是能有所收获.之前做Android开发,做个轮播图并不简单,用上viewpage再设置圆点,折腾一通之后还一堆bug.今天尝试微信小程序开发做轮播图,真是感动的泪流满面.废话说完了,上图.
-
本文向大家介绍基于javascript数组实现图片轮播,包括了基于javascript数组实现图片轮播的使用技巧和注意事项,需要的朋友参考一下 图片轮播的办法有多种,在这里介绍一种简单的:js数组实现。 首先将图片路径存储在数组中,然后再调用setInterval函数来依次轮播图片 完整实例如下 精彩专题分享:jQuery图片轮播 JavaScript图片轮播 Bootstrap图片轮播 以上就是