spring boot实现profiles动态切换的示例
具体做法:
1、首先在pom中添加profiles:
<profiles>
  <profile>
   <id>dev</id>
   <activation>
     <activeByDefault>true</activeByDefault>
   </activation>
   <properties>
     <spring.profiles.active>dev</spring.profiles.active>
   </properties>
   <dependencies>
     <dependency>
      <groupId>org.springframework.boot</groupId>
      <artifactId>spring-boot-devtools</artifactId>
      <optional>true</optional>
     </dependency>
     <dependency>
      <groupId>org.springframework.boot</groupId>
      <artifactId>spring-boot-starter-undertow</artifactId>
     </dependency>
   </dependencies>
  </profile>

  <profile>
   <id>prod</id>
   <dependencies>
     <dependency>
      <groupId>org.springframework.boot</groupId>
      <artifactId>spring-boot-starter-undertow</artifactId>
     </dependency>
   </dependencies>
   <properties>
     <spring.profiles.active>prod</spring.profiles.active>
   </properties>
  </profile>
</profiles>
dev指开发模式,prod指生产模式,如需其他模式,只需要添加profile即可.
2、在pom.xml的build中添加plugin:
<plugin>
  <groupId>org.apache.maven.plugins</groupId>
  <artifactId>maven-resources-plugin</artifactId>
  <version>${maven-resources-plugin.version}</version>
  <executions>
   <execution>
     <id>default-resources</id>
     <phase>validate</phase>
     <goals>
      <goal>copy-resources</goal>
     </goals>
     <configuration>
      <outputDirectory>target/classes</outputDirectory>
      <useDefaultDelimiters>false</useDefaultDelimiters>
      <delimiters>
        <delimiter>#</delimiter>
      </delimiters>
      <resources>
        <resource>
         <directory>src/main/resources/</directory>
         <filtering>true</filtering>
         <includes>
           <include>**/*.xml</include>
           <include>**/*.yml</include>
         </includes>
        </resource>
        <resource>
         <directory>src/main/resources/</directory>
         <filtering>false</filtering>
         <excludes>
           <exclude>**/*.xml</exclude>
           <exclude>**/*.yml</exclude>
         </excludes>
        </resource>
      </resources>
     </configuration>
   </execution>
  </executions>
</plugin>
该配置用来在打包的时候修改配置文件。
3、编写DefaultProfileUtil工具类来添加默认启动配置文件:
import org.springframework.boot.SpringApplication;
import org.springframework.core.env.Environment;

import java.util.HashMap;
import java.util.Map;

/**
 * Utility class to load a Spring profile to be used as default
 * when there is no <code>spring.profiles.active</code> set in the environment or as command line argument.
 * If the value is not available in <code>application.yml</code> then <code>dev</code> profile will be used as default.
 */
public final class DefaultProfileUtil {

  private static final String SPRING_PROFILE_DEFAULT = "spring.profiles.default";

  private DefaultProfileUtil(){
  }

  /**
   * Set a default to use when no profile is configured.
   *
   * @param app the spring application
   */
  public static void addDefaultProfile(SpringApplication app) {
    Map<String, Object> defProperties = new HashMap<>();
    /*
    * The default profile to use when no other profiles are defined
    * This cannot be set in the <code>application.yml</code> file.
    * See https://github.com/spring-projects/spring-boot/issues/1219
    */
    defProperties.put(SPRING_PROFILE_DEFAULT, Constants.SPRING_PROFILE_DEVELOPMENT);
    app.setDefaultProperties(defProperties);
    System.out.println(app);
  }

  /**
   * Get the profiles that are applied else get default profiles.
   */
  public static String[] getActiveProfiles(Environment env) {
    String[] profiles = env.getActiveProfiles();
    if (profiles.length == 0) {
      return env.getDefaultProfiles();
    }
    return profiles;
  }
}
public class Constants {

  public static final String SPRING_PROFILE_DEVELOPMENT = "dev";
  public static final String SPRING_PROFILE_PRODUCTION = "prod";
  private Constants() {
  }
}
4、修改application.yml配置文件,添加(采用application.properties文件):
spring:
  profiles:
   active: #spring.profiles.active#
maven的构建的时候会替换#spring.profiles.active#
5、修改项目的启动类:
@SpringBootApplication
public class Demo1Application {

  private static final Logger log = LoggerFactory.getLogger(Demo1Application.class);

  public static void main(String[] args) {
   SpringApplication app = new SpringApplication(Demo1Application.class);
   DefaultProfileUtil.addDefaultProfile(app);
   Environment env = app.run(args).getEnvironment();
   log.info("\n----------------------------------------------------------\n\t" +
         "Application '{}' is running! Access URLs:\n\t" +
         "Local: \t\thttp://localhost:{}\n\t" +
         "----------------------------------------------------------",
      env.getProperty("spring.application.name"),
      env.getProperty("server.port"));
  }
}
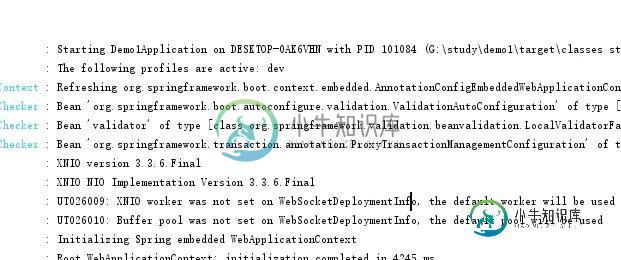
以上修改完成之后,在启动的时候会显示:The following profiles are active: dev 默认dev模式切换成功。

6、构建项目:
采用mvn clean package -Pprod命令构建,最后的配置文件会被改成:

以上就是spring boot实现profiles动态切换的示例的详细内容,更多关于spring boot实现profiles动态切换的资料请关注小牛知识库其它相关文章!
-
本文向大家介绍Jquery实现动态切换图片的方法,包括了Jquery实现动态切换图片的方法的使用技巧和注意事项,需要的朋友参考一下 本文实例讲述了Jquery实现动态切换图片的方法。分享给大家供大家参考。具体实现方法如下: 希望本文所述对大家的jQuery程序设计有所帮助。
-
本文向大家介绍springboot动态定时任务的实现方法示例,包括了springboot动态定时任务的实现方法示例的使用技巧和注意事项,需要的朋友参考一下 1、maven引入quartz包 2、创建定时任务工厂类 3、创建定时任务抽象类 4、创建定时任务业务实现类 这里可以写你的业务代码,实现具体的业务逻辑。 5、创建定时任务管理器 包括项目启动时添加定时任务,手动添加定时任务,更新定时任务,删除
-
本文向大家介绍AngularJS实现动态切换样式的方法分析,包括了AngularJS实现动态切换样式的方法分析的使用技巧和注意事项,需要的朋友参考一下 本文实例讲述了AngularJS实现动态切换样式的方法。分享给大家供大家参考,具体如下: AngularJS相比原生的js或者jquery有着很大不同,对于一个简单的鼠标点击不同选项,动态切换样式该怎么实现呢。 本文实现的是点击某个标题,标题字体加
-
本文向大家介绍JS实现可切换图片的幻灯切换效果示例,包括了JS实现可切换图片的幻灯切换效果示例的使用技巧和注意事项,需要的朋友参考一下 本文实例讲述了JS实现可切换图片的幻灯切换效果。分享给大家供大家参考,具体如下: 更多关于JavaScript相关内容感兴趣的读者可查看本站专题:《JavaScript切换特效与技巧总结》、《JavaScript查找算法技巧总结》、《JavaScript动画特效与
-
本文向大家介绍Spring整合多数据源实现动态切换的实例讲解,包括了Spring整合多数据源实现动态切换的实例讲解的使用技巧和注意事项,需要的朋友参考一下 在实际项目中时常需要连接多个数据库,而且不同的业务需求在实现过程当中往往需要访问不同的数据库。 jdbc.properties配置文件,配置多个dataSource spring-config.xml配置文件如下,将DynamicDataSou
-
本文向大家介绍jQuery实现的中英文切换功能示例,包括了jQuery实现的中英文切换功能示例的使用技巧和注意事项,需要的朋友参考一下 本文实例讲述了jQuery实现的中英文切换功能。分享给大家供大家参考,具体如下: 1.html 2.language.js 3.translate.js是将http://www.microsoftTranslator.com/ajax/v3/WidgetV3.as

