Android中NavigationView的使用与相关问题解决
一、基本使用
1. NavigationView 在 design 库中,添加依赖(最新的是 23.2.0);
compile 'com.android.support:design:23.1.1'
2. 然后在 DrawerLayout 布局中添加 NavigationView ;
<?xml version="1.0" encoding="utf-8"?>

<android.support.v4.widget.DrawerLayout
 android:id="@+id/drawer_layout"
 xmlns:android="http://schemas.android.com/apk/res/android"
 xmlns:app="http://schemas.android.com/apk/res-auto"
 android:layout_width="match_parent"
 android:layout_height="match_parent">

 <FrameLayout
  android:layout_width="match_parent"
  android:layout_height="match_parent">

  <LinearLayout
   android:id="@+id/main"
   android:layout_width="match_parent"
   android:layout_height="match_parent"
   android:orientation="vertical">

   <android.support.v7.widget.Toolbar
    android:id="@+id/toolbar"
    android:layout_width="match_parent"
    android:layout_height="?attr/actionBarSize"
    android:background="@color/colorPrimary"
    app:popupTheme="@style/ThemeOverlay.AppCompat.Light"
    app:theme="@style/ThemeOverlay.AppCompat.Dark.ActionBar"/>

   ......

  </LinearLayout>
 </FrameLayout>

 <android.support.design.widget.NavigationView
  android:id="@+id/navigation"
  android:layout_width="wrap_content"
  android:layout_height="match_parent"
  android:layout_gravity="start"
  app:headerLayout="@layout/nav_header"
  app:menu="@menu/activity_main_drawer"/>

</android.support.v4.widget.DrawerLayout>
其中需要注意给 NavigationView 设置 android:layout_gravity="start" 属性。
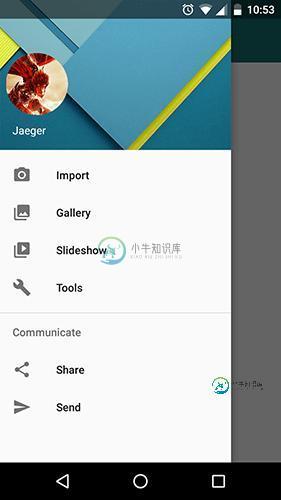
3.然后注意到 NavigationView 其实是分两个部分的,一个是头部,一个是下面的菜单列表部分
如下图所示:

其中头部通过 app:headerLayout="@layout/nav_header" 属性添加,nav_header 的布局如下:
<?xml version="1.0" encoding="utf-8"?>
<FrameLayout xmlns:android="http://schemas.android.com/apk/res/android"
    android:layout_width="match_parent"
    android:layout_height="192dp"
    android:theme="@style/ThemeOverlay.AppCompat.Dark">

 <ImageView
  android:layout_width="match_parent"
  android:layout_height="match_parent"
  android:background="@drawable/nav_header_bg"
  android:scaleType="centerCrop"/>

 <ImageView
  android:layout_width="96dp"
  android:layout_height="96dp"
  android:layout_gravity="bottom"
  android:layout_marginBottom="36dp"
  android:padding="8dp"
  android:src="@drawable/ic_avatar"/>

 <TextView
  android:layout_width="match_parent"
  android:layout_height="wrap_content"
  android:layout_gravity="bottom"
  android:padding="16dp"
  android:text="Jaeger"
  android:textAppearance="@style/TextAppearance.AppCompat.Body1"/>

</FrameLayout>
下面的菜单列表部分是一个 menu 文件,通过 app:menu="@menu/activity_main_drawer"属性添加。
activity_main_drawer.xml 文件在 menu 文件夹下,内容为:
<?xml version="1.0" encoding="utf-8"?>
<menu xmlns:android="http://schemas.android.com/apk/res/android">

 <group android:checkableBehavior="single">
  <item
   android:id="@+id/nav_camera"
   android:icon="@drawable/ic_menu_camera"
   android:title="Import"/>
  <item
   android:id="@+id/nav_gallery"
   android:icon="@drawable/ic_menu_gallery"
   android:title="Gallery"/>
  <item
   android:id="@+id/nav_slideshow"
   android:icon="@drawable/ic_menu_slideshow"
   android:title="Slideshow"/>
  <item
   android:id="@+id/nav_manage"
   android:icon="@drawable/ic_menu_manage"
   android:title="Tools"/>
 </group>

 <item android:title="Communicate">
  <menu>
   <item
    android:id="@+id/nav_share"
    android:icon="@drawable/ic_menu_share"
    android:title="Share"/>
   <item
    android:id="@+id/nav_send"
    android:icon="@drawable/ic_menu_send"
    android:title="Send"/>
  </menu>
 </item>

</menu>
4. 菜单列表的点击事件
菜单列表的点击事件设置代码如下:
navigationView.setNavigationItemSelectedListener(new NavigationView.OnNavigationItemSelectedListener() {
   @Override
   public boolean onNavigationItemSelected(MenuItem item) {
    switch (item.getItemId()){
     case R.id.nav_personal_info:
      // do something
      break;
     ...
    }
    return false;
   }
  });
至此,NavigationView 的基本使用就差不多搞定了,效果就是前面图片显示的效果。
以下是使用过程中遇到的问题及解决方式。
一、菜单图标颜色被渲染成其他颜色
NavigationView默认会按照 Android 设计规范,将菜单里的图标渲染成itemIconTint所设置的颜色。如果你没有设置这个属性,则会渲染成它默认的深灰色。如果不想图标颜色被渲染,可通过以下代码解决:
navigationView.setItemIconTintList(null);
二、菜单图标与文字的间距过大
NavigationView的菜单中,图标与文字的间距为32dp,但是通常与我们的设计师出的效果不同,这时可以通过重写以下属性来进行设置:
<dimen name="design_navigation_icon_padding" tools:override="true">16dp</dimen>
总结
以上就是这篇文章的全部内容了,希望本文的内容对各位Android开发者们能有所帮助,如果有疑问大家可以留言交流。
-
本页列出注解相关常见问题,欢迎大家补充。 如何忽略一些我不想被扫描到的类? 在项目配置文件中配置: return [ // 忽略扫描的命名空间 'ignoreNamespace' => [ 'Imi\Test\Component\Annotation\A\*', // 忽略扫描该命名空间下所有类 'Imi\Test\Component\A
-
我正面临一个问题,比如我使用apache POI生成pptx powerpoint演示文稿,所以生成的ppt可以用libra office打开,但当我试图在ms powerpoint中打开时,它产生了一些问题,比如我在演示文稿中插入的图像无法显示。我将json数组中的字节编码字符串传递给我的服务。有人能帮我吗?有什么问题吗?谢谢
-
主要内容:1.缓存穿透,2.缓存击穿,3.缓存雪崩缓存穿透 缓存击穿 缓存雪崩 1.缓存穿透 缓存穿透指的是一个缓存系统无法缓存某个查询的数据,从而导致这个查询每一次都要访问数据库。 常见的Redis缓存穿透场景包括: 查询一个不存在的数据:攻击者可能会发送一些无效的查询来触发缓存穿透。 查询一些非常热门的数据:如果一个数据被访问的非常频繁,那么可能会导致缓存系统无法处理这些请求,从而造成缓存穿透。 查询一些异常数据:这种情况通常发生在数据服务出
-
但是,当我使用命令行中的ndk-build命令编译它时,会出现以下错误: Android NDK:APP_PLATFORM未设置。默认为最小支持版本Android-16。[arm64-v8a]编译:com_celik_abdullah_imageprocessingpart_processors_NativeImageProcessor<=com_celik_Abdullah_ImageProce
-
我想验证我写的多线程应用程序的设计,并在几点上得到澄清/再保证。我提前为这么长的帖子道歉——我想把它分成几个问题,但是我必须引用相同的代码,它们似乎都是相互关联的,所以我选择把所有的东西放在一个帖子里。如果这是不合适的-请让我知道,我会打破这成多个职位。 这是我所拥有的: BatchService(Spring Singleton bean):接受上传指定目录或zip存档的请求。为此,它拥有Exe
-
本文向大家介绍分析Android多主题颜色的相关问题,包括了分析Android多主题颜色的相关问题的使用技巧和注意事项,需要的朋友参考一下 如果您通过以下的代码来获取定义的颜色值 在 Android Studio 中会有一个 lint 警告,提示您 Resources#getColor(int) 在 Marshmallow 中被废弃了,建议使用主题可知的 Resources#getColor(in

