一步一步实现iOS主题皮肤切换效果
本文实例为大家分享了iOS主题皮肤切换代码,供大家参考,具体内容如下
1. 主题皮肤功能切换介绍
主题切换就是根据用户设置不同的主题,来动态改变用户的界面,通常会改变navigationBar背景图片、tabBar背景图片、tabBar中的按钮的图片和选中的背景图片、navigationItem.title 标题的字体颜色、UI中其他元素控件
下载源代码地址: http://xiazai.jb51.net/201609/yuanma/ThemeSkinSetup(jb51.net).rar
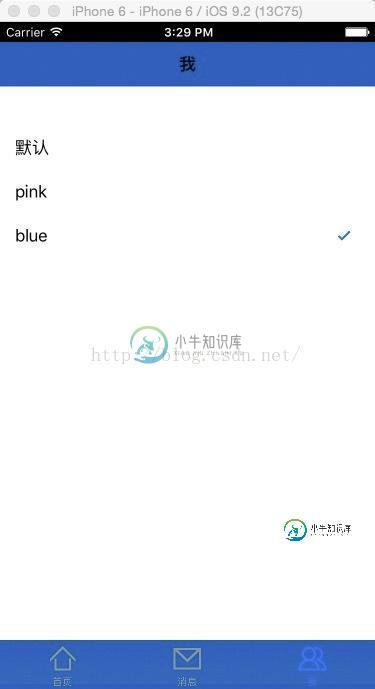
2.项目目录结构及实现效果截图
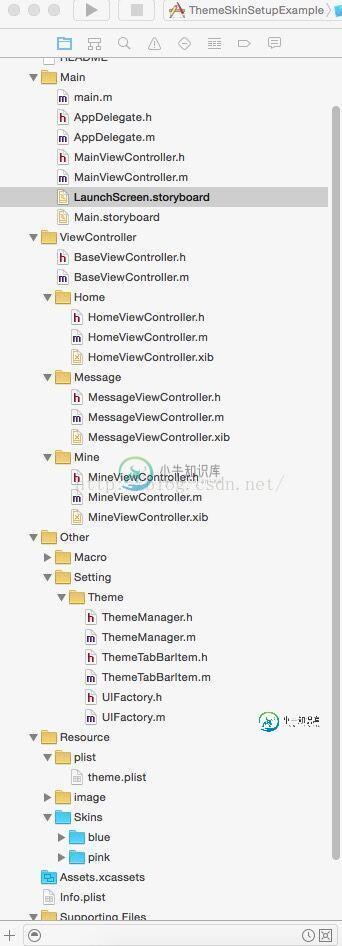
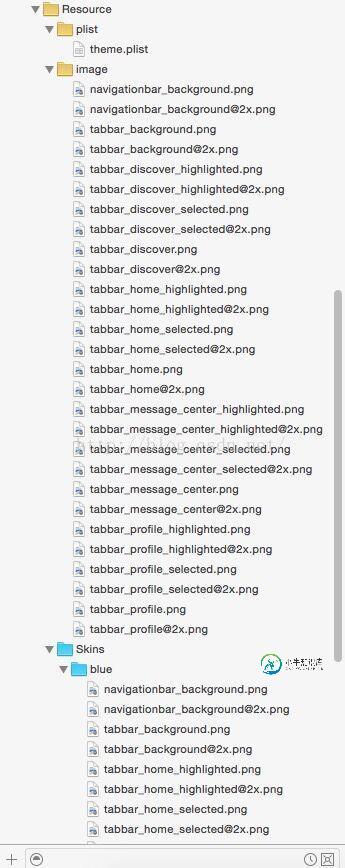

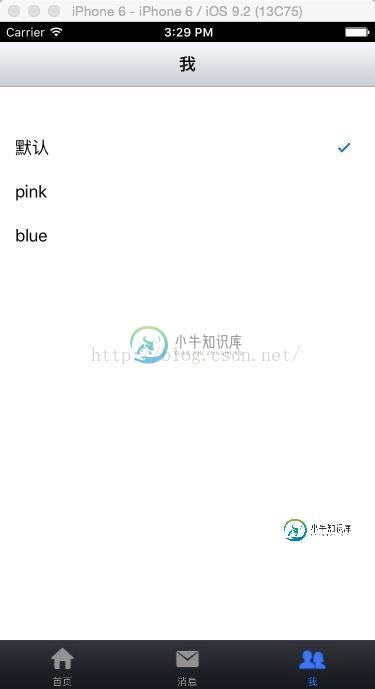
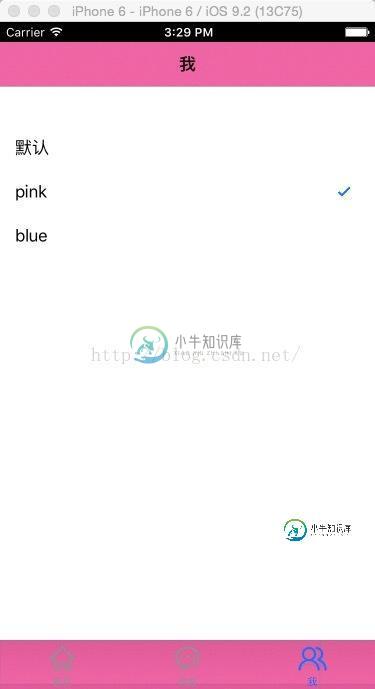
3. 具体实现步骤
1.将image文件夹(group)和 Skins拖入到项目工程中的资源文件夹中
2.创建BaseViewController
3.配置theme.plist
4.事项项目所需的基本框架供能,并实现主题的tableView功能
5.创建主题管理器:ThemeManager
6.自定义ThemeTabBarItem 控件
7.创建UI工厂: UIFactory
8. 实现tableView中的didSelected事件完成主题切换
9.记录用户选择的主题,以便用户下次启动时是上次设置的主题
1.创建BaseViewController
#import <UIKit/UIKit.h>
@interface BaseViewController : UIViewController

- (void) reloadThemeImage;
@end
#import "BaseViewController.h"

#import "ThemeManager.h"
#import "NotificationMacro.h"

@interface BaseViewController ()

@end

@implementation BaseViewController
- (id) init {
 if (self == [super init]) {
  [[NSNotificationCenter defaultCenter] addObserver:self selector:@selector(themeChangedNotfication:) name:kThemeChangedNotification object:nil];
 }

 [self reloadThemeImage];
 return self;
}

- (void)viewDidLoad {
 [super viewDidLoad];
 [self reloadThemeImage];
}

- (void)didReceiveMemoryWarning {
 [super didReceiveMemoryWarning];
 // Dispose of any resources that can be recreated.
}

- (void) themeChangedNotfication:(NSNotification *)notification {
 [self reloadThemeImage];
}

- (void) reloadThemeImage {
 ThemeManager * themeManager = [ThemeManager sharedThemeManager];

 UIImage * navigationBackgroundImage = [themeManager themeImageWithName:@"navigationbar_background.png"];
 [self.navigationController.navigationBar setBackgroundImage:navigationBackgroundImage forBarMetrics:UIBarMetricsDefault];

 UIImage * tabBarBackgroundImage = [themeManager themeImageWithName:@"tabbar_background.png"];
 [self.tabBarController.tabBar setBackgroundImage:tabBarBackgroundImage];
}
@end
2. 实现AppDelegate
#import "AppDelegate.h"

#import "MainViewController.h"
#import "ThemeManager.h"
#import "NotificationMacro.h"

@interface AppDelegate ()

@end

@implementation AppDelegate


- (BOOL)application:(UIApplication *)application didFinishLaunchingWithOptions:(NSDictionary *)launchOptions {
 [self initUserDefaultConfig];

 MainViewController * rootViewController = [[MainViewController alloc] init];
 self.window.rootViewController = rootViewController;

 return YES;
}


- (void) initUserDefaultConfig {
 NSString * themeName = [[NSUserDefaults standardUserDefaults] objectForKey:kThemeNameKey];
 ThemeManager * themeManager = [ThemeManager sharedThemeManager];
 themeManager.themeName = themeName;
}</span></span>
<span style="font-weight: normal;"><span style="font-weight: normal;">#import "MainViewController.h"

#import "HomeViewController.h"
#import "MessageViewController.h"
#import "MineViewController.h"

#import "UIFactory.h"


@interface MainViewController ()

@end

@implementation MainViewController

- (id) init {
 if (self = [super init]) {
  [self initTabBarUI];
 }

 return self;
}

- (void)viewDidLoad {
 [super viewDidLoad];

}

- (void)didReceiveMemoryWarning {
 [super didReceiveMemoryWarning];
}


- (void) initTabBarUI {
 // 主页
 HomeViewController * homeViewController = [[HomeViewController alloc] init];
 UINavigationController * homeNavigationController = [[UINavigationController alloc] initWithRootViewController:homeViewController];
// UITabBarItem * homeTabBarItem = [[UITabBarItem alloc] initWithTitle:@"主页" image:[UIImage imageNamed:@"tabbar_home"] selectedImage:[UIImage imageNamed:@"tabbar_home_selected"]];
 UITabBarItem * homeTabBarItem = [UIFactory createTabBarItemWithTitle:@"主页" imageName:@"tabbar_home" selectedImage:@"tabbar_home_selected"];
 homeNavigationController.tabBarItem = homeTabBarItem;

 // 消息(中心)
 MessageViewController * messageViewController = [[MessageViewController alloc] init];
 UINavigationController * messageNavigationController = [[UINavigationController alloc] initWithRootViewController:messageViewController];
// UITabBarItem * messageTabBarItem = [[UITabBarItem alloc] initWithTitle:@"消息" image:[UIImage imageNamed:@"tabbar_message_center"] selectedImage:[UIImage imageNamed:@"tabbar_message_center_selected"]];
 UITabBarItem * messageTabBarItem = [UIFactory createTabBarItemWithTitle:@"消息" imageName:@"tabbar_message_center" selectedImage:@"tabbar_message_center_selected"];
 messageNavigationController.tabBarItem = messageTabBarItem;

 // 我
 MineViewController * mineViewController = [[MineViewController alloc] init];
 UINavigationController * mineNavigationController = [[UINavigationController alloc] initWithRootViewController:mineViewController];
// UITabBarItem * mineTabBarItem = [[UITabBarItem alloc] initWithTitle:@"我" image:[UIImage imageNamed:@"tabbar_profile"] selectedImage:[UIImage imageNamed:@"tabbar_profile_selected"]];
 UITabBarItem * mineTabBarItem = [UIFactory createTabBarItemWithTitle:@"我" imageName:@"tabbar_profile" selectedImage:@"tabbar_profile_selected"];


 mineNavigationController.tabBarItem = mineTabBarItem;
 NSArray * viewControllers = @[homeNavigationController, messageNavigationController, mineNavigationController];
 self.viewControllers = viewControllers;
}


@end
3. 创建主题管理器
#import <Foundation/Foundation.h>
#import <UIKit/UIKit.h>

@interface ThemeManager : NSObject

@property (nonatomic, copy) NSString * themeName;   // 主题名字
@property (nonatomic, retain) NSDictionary * themePlistDict; // 主题属性列表字典

+ (ThemeManager *) sharedThemeManager;

- (UIImage *) themeImageWithName:(NSString *)imageName;
@end</span></span>
<span style="font-weight: normal;"><span style="font-weight: normal;">#import <Foundation/Foundation.h>
#import <UIKit/UIKit.h>

@interface ThemeManager : NSObject

@property (nonatomic, copy) NSString * themeName;   // 主题名字
@property (nonatomic, retain) NSDictionary * themePlistDict; // 主题属性列表字典

+ (ThemeManager *) sharedThemeManager;

- (UIImage *) themeImageWithName:(NSString *)imageName;
@end
#import "ThemeManager.h"
#import "NotificationMacro.h"
static ThemeManager * sharedThemeManager;

@implementation ThemeManager

- (id) init {
 if(self = [super init]) {
  NSString * themePath = [[NSBundle mainBundle] pathForResource:@"theme" ofType:@"plist"];
  self.themePlistDict = [NSDictionary dictionaryWithContentsOfFile:themePath];
  self.themeName = nil;
 }

 return self;
}

+ (ThemeManager *) sharedThemeManager {
 @synchronized(self) {
  if (nil == sharedThemeManager) {
   sharedThemeManager = [[ThemeManager alloc] init];
  }
 }

 return sharedThemeManager;
}

// Override 重写themeName的set方法
- (void) setThemeName:(NSString *)themeName {
 _themeName = themeName;
}

- (UIImage *) themeImageWithName:(NSString *)imageName {
 if (imageName == nil) {
  return nil;
 }

 NSString * themePath = [self themePath];
 NSString * themeImagePath = [themePath stringByAppendingPathComponent:imageName];
 UIImage * themeImage = [UIImage imageWithContentsOfFile:themeImagePath];

 return themeImage;
}

// 返回主题路径
- (NSString *)themePath {
 NSString * resourcePath = [[NSBundle mainBundle] resourcePath];
 if (self.themeName == nil || [self.themeName isEqualToString:@""]) {
  return resourcePath;
 }


 NSString * themeSubPath = [self.themePlistDict objectForKey:self.themeName]; // Skins/blue
 NSString * themeFilePath = [resourcePath stringByAppendingPathComponent:themeSubPath]; // .../Skins/blue

 return themeFilePath;
}
@end
4. 创建主题按钮 ThemeTabBarItem
#import <UIKit/UIKit.h>
@interface ThemeTabBarItem : UITabBarItem

@property (nonatomic, copy) NSString * imageName;
@property (nonatomic, copy) NSString * selectedImageName;


- (id) initWithTitle:(NSString *)title imageName:(NSString *)imageName selectedImage:(NSString *)selectedImageName;

@end </span></span>
<span style="font-weight: normal;"><span style="font-weight: normal;">#import "ThemeTabBarItem.h"
#import "ThemeManager.h"
#import "NotificationMacro.h"

@implementation ThemeTabBarItem

// 初始化时注册观察者
- (id) init {
 if (self = [super init]) {
  [[NSNotificationCenter defaultCenter] addObserver:self selector:@selector(themeChangedNotification:) name:kThemeChangedNotification object:nil];
 }

 return self;
}

- (id) initWithTitle:(NSString *)title imageName:(NSString *)imageName selectedImage:(NSString *)selectedImageName {
 if (self = [self init]) {
  self.title = title;
  self.imageName = imageName;   // 此时会调用[self setImageName:imageName] ---> [self reloadThemeImage] --->[self setImage:image]
  self.selectedImageName = selectedImageName;// 此时会调用[self setSelectedImageName:selectedImageName];
 }

 return self;
}


#pragma mark -
#pragma mark - Override Setter
- (void) setImageName:(NSString *)imageName {
 if (_imageName != imageName) {
  _imageName = imageName;
 }

 [self reloadThemeImage];
}

- (void) setSelectedImageName:(NSString *)selectedImageName {
 if (_selectedImageName != selectedImageName) {
  _selectedImageName = selectedImageName;
 }

 [self reloadThemeImage];
}


// 主题改变之后重新加载图片
- (void)themeChangedNotification:(NSNotification *)notification {
 [self reloadThemeImage];
}

- (void)reloadThemeImage {
 ThemeManager * themeManager = [ThemeManager sharedThemeManager];

 if (self.imageName != nil) {
  UIImage * image = [themeManager themeImageWithName:self.imageName];
  [self setImage:image];
 }

 if (self.selectedImageName != nil) {
  UIImage * selectedImage = [themeManager themeImageWithName:self.selectedImageName];
  [self setSelectedImage:selectedImage];
 }
}

- (void) dealloc {
 [[NSNotificationCenter defaultCenter] removeObserver:self];
}
5. 创建UI工厂
#import <Foundation/Foundation.h>
#import <UIKit/UIKit.h>

@interface UIFactory : NSObject

+ (UITabBarItem *) createTabBarItemWithTitle:(NSString *)title imageName:(NSString *)imageName selectedImage:(NSString *)selectedImageName;


@end</span></span>
<span style="font-weight: normal;"><span style="font-weight: normal;">#import <Foundation/Foundation.h>
#import <UIKit/UIKit.h>

@interface UIFactory : NSObject

+ (UITabBarItem *) createTabBarItemWithTitle:(NSString *)title imageName:(NSString *)imageName selectedImage:(NSString *)selectedImageName;


@end
#import "UIFactory.h"

#import "ThemeTabBarItem.h"
@implementation UIFactory

+ (UITabBarItem *) createTabBarItemWithTitle:(NSString *)title imageName:(NSString *)imageName selectedImage:(NSString *)selectedImageName {
 ThemeTabBarItem * themeTabBarItem = [[ThemeTabBarItem alloc] initWithTitle:title imageName:imageName selectedImage:selectedImageName];

 return themeTabBarItem;
}
@end
6. 实现选中单元格的事件
#import "BaseViewController.h"

@interface MineViewController : BaseViewController <UITableViewDelegate, UITableViewDataSource>


@property (weak, nonatomic) IBOutlet UITableView *tableView;

@property (nonatomic, retain) NSMutableArray * themeDataSource;
@end
#import "BaseViewController.h"

@interface MineViewController : BaseViewController <UITableViewDelegate, UITableViewDataSource>


@property (weak, nonatomic) IBOutlet UITableView *tableView;

@property (nonatomic, retain) NSMutableArray * themeDataSource;
@end
#import "MineViewController.h"

#import "ThemeManager.h"
#import "NotificationMacro.h"

@interface MineViewController ()

@end

@implementation MineViewController

- (void)viewDidLoad {
 [super viewDidLoad];
 self.title = @"我";

 ThemeManager * themeManager = [ThemeManager sharedThemeManager];
 _themeDataSource = [NSMutableArray arrayWithArray:themeManager.themePlistDict.allKeys];
}

- (void)didReceiveMemoryWarning {
 [super didReceiveMemoryWarning];
 // Dispose of any resources that can be recreated.
}


#pragma mark -
#pragma mark - UITableViewDelegate
- (NSInteger)tableView:(UITableView *)tableView numberOfRowsInSection:(NSInteger)section {

 return self.themeDataSource.count;
}

- (UITableViewCell *) tableView:(UITableView *)tableView cellForRowAtIndexPath:(NSIndexPath *)indexPath {
 static NSString * Identifier = @"Cell";
 UITableViewCell * cell = [tableView dequeueReusableCellWithIdentifier:Identifier];
 if (cell == nil) {
  cell = [[UITableViewCell alloc] initWithStyle:UITableViewCellStyleDefault reuseIdentifier:Identifier];
 }

 NSString * text = self.themeDataSource[indexPath.row];
 cell.textLabel.text = text;

 ThemeManager * themeManager = [ThemeManager sharedThemeManager];
 NSString * currentTheme = themeManager.themeName;
 if (currentTheme == nil) {
  currentTheme = @"默认";
 }
 if ([currentTheme isEqualToString:text]) {
  cell.accessoryType = UITableViewCellAccessoryCheckmark;
 } else {
  cell.accessoryType = UITableViewCellAccessoryNone;
 }

 return cell;
}

- (void)tableView:(UITableView *)tableView didSelectRowAtIndexPath:(NSIndexPath *)indexPath {

 ThemeManager * themeManager = [ThemeManager sharedThemeManager];
 NSString * themeName = self.themeDataSource[indexPath.row];

 if ([themeName isEqualToString:@"默认"]) {
  themeName = nil;
 }

 // 记录当前主题名字
 themeManager.themeName = themeName;
 [[NSNotificationCenter defaultCenter] postNotificationName:kThemeChangedNotification object:nil];


 // 主题持久化
 NSUserDefaults * userDefaults = [NSUserDefaults standardUserDefaults];
 [userDefaults setObject:themeName forKey:kThemeNameKey];
 [userDefaults synchronize];

 // 重新加载数据显示UITableViewCellAccessoryCheckmark 显示选中的对号 v
 [self.tableView reloadData];
}
以上就是本文的全部内容,希望对大家的学习有所帮助,也希望大家多多支持小牛知识库。
-
动态更改导航条和字体颜色,用于实现app换肤功能。 作者说:模仿QQ的换肤,实现方式很初级.仅供参考学习吧. [Code4App.com]
-
本文向大家介绍一步步实现Viewpager卡片翻页效果,包括了一步步实现Viewpager卡片翻页效果的使用技巧和注意事项,需要的朋友参考一下 这个CardStackViewpager的灵感来自Github上面的 FlippableStackView开源项目,而我想实现的效果方向上恰好与FlippableStackView相反,并且细节上也有些区别,详见下面的效果对比图: FlippableSta
-
本文向大家介绍Android 应用更换皮肤实现方法,包括了Android 应用更换皮肤实现方法的使用技巧和注意事项,需要的朋友参考一下 Android应用更换皮肤功能的实现思路 我们可以将皮肤包做成一个apk文件,在应用apk中读取皮肤包中的数据。 应用apk读取皮肤包apk的数据的条件 1. 有相同签名 2. AndroidManifest
-
本文向大家介绍js仿百度切换皮肤功能(html+css),包括了js仿百度切换皮肤功能(html+css)的使用技巧和注意事项,需要的朋友参考一下 js仿百度切换皮肤效果:(换肤出来一个div,选择你想要的图片,作为网页背景,保存) 要点:cookie保存状态 html代码: css代码: js代码: 效果图: 以上就是本文的全部内容,希望对大家的学习有所帮助,也希望大家多多支持呐喊教程。 作者
-
皮肤 皮肤机制为 moye 控件提供强大的样式自定义能力,可以支持 自定义样式 与 换肤 / 风格主题 。 功能特点: 首先,每个控件都有一个基础样式类型: ui-{type},其中{type}表示控件的主类型; 其次,控件可以设定皮肤参数,并可以指定多个皮肤。每个皮肤设定都会添加两个样式类型: skin-{skin} 与 skin-{skin}-{type}, 其中 {skin} 表示设定的皮肤
-
本文向大家介绍基于Android-Skin-Loader实现换肤效果,包括了基于Android-Skin-Loader实现换肤效果的使用技巧和注意事项,需要的朋友参考一下 skin-loader框架的换肤是通过插件化的形式替换资源文件,实现换肤效果。好处是可以在线更新皮肤换肤 android-skin-loader源码 Demo样例 流程 整个框架大概的流程是加载皮肤包,找到被标记的控件,通过自定

