iOS10全新推送功能实现代码
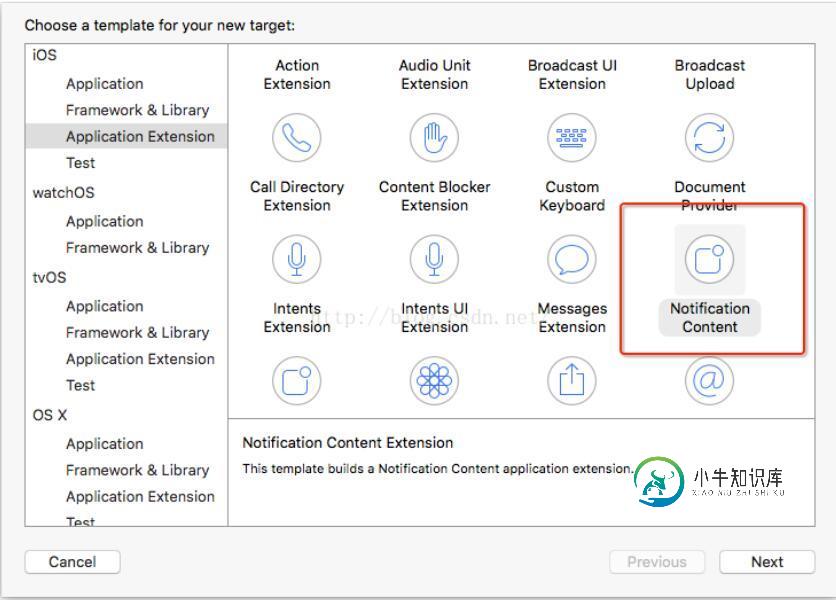
从iOS8.0开始推送功能的实现在不断改变,功能也在不断增加,iOS10又出来了一个推送插件的开发(见最后图),废话不多说直接上代码:
#import <UserNotifications/UserNotifications.h>


- (BOOL)application:(UIApplication *)application didFinishLaunchingWithOptions:(NSDictionary *)launchOptions {
 // Override point for customization after application launch.

 /* APP未启动,点击推送消息的情况下 iOS10遗弃UIApplicationLaunchOptionsLocalNotificationKey,使用代理UNUserNotificationCenterDelegate方法didReceiveNotificationResponse:withCompletionHandler:获取本地推送
 */
// NSDictionary *localUserInfo = launchOptions[UIApplicationLaunchOptionsLocalNotificationKey];
// if (localUserInfo) {
// NSLog(@"localUserInfo:%@",localUserInfo);
// //APP未启动,点击推送消息
// }
 NSDictionary *remoteUserInfo = launchOptions[UIApplicationLaunchOptionsRemoteNotificationKey];
 if (remoteUserInfo) {
 NSLog(@"remoteUserInfo:%@",remoteUserInfo);
 //APP未启动,点击推送消息,iOS10下还是跟以前一样在此获取
 }
 [self registerNotification];
 return YES;
}
注册推送方法的改变:
新增库 #import <UserNotifications/UserNotifications.h> 推送单列UNUserNotificationCenter 等API
- (void)registerNotification{
 /*
 identifier:行为标识符,用于调用代理方法时识别是哪种行为。
 title:行为名称。
 UIUserNotificationActivationMode:即行为是否打开APP。
 authenticationRequired:是否需要解锁。
 destructive:这个决定按钮显示颜色,YES的话按钮会是红色。
 behavior:点击按钮文字输入,是否弹出键盘
 */
 UNNotificationAction *action1 = [UNNotificationAction actionWithIdentifier:@"action1" title:@"策略1行为1" options:UNNotificationActionOptionForeground];
 /*iOS9实现方法
 UIMutableUserNotificationAction * action1 = [[UIMutableUserNotificationAction alloc] init];
 action1.identifier = @"action1";
 action1.title=@"策略1行为1";
 action1.activationMode = UIUserNotificationActivationModeForeground;
 action1.destructive = YES;
 */

 UNTextInputNotificationAction *action2 = [UNTextInputNotificationAction actionWithIdentifier:@"action2" title:@"策略1行为2" options:UNNotificationActionOptionDestructive textInputButtonTitle:@"textInputButtonTitle" textInputPlaceholder:@"textInputPlaceholder"];
 /*iOS9实现方法
 UIMutableUserNotificationAction * action2 = [[UIMutableUserNotificationAction alloc] init];
 action2.identifier = @"action2";
 action2.title=@"策略1行为2";
 action2.activationMode = UIUserNotificationActivationModeBackground;
 action2.authenticationRequired = NO;
 action2.destructive = NO;
 action2.behavior = UIUserNotificationActionBehaviorTextInput;//点击按钮文字输入,是否弹出键盘
 */

 UNNotificationCategory *category1 = [UNNotificationCategory categoryWithIdentifier:@"Category1" actions:@[action2,action1] minimalActions:@[action2,action1] intentIdentifiers:@[@"action1",@"action2"] options:UNNotificationCategoryOptionCustomDismissAction];
 // UIMutableUserNotificationCategory * category1 = [[UIMutableUserNotificationCategory alloc] init];
 // category1.identifier = @"Category1";
 // [category1 setActions:@[action2,action1] forContext:(UIUserNotificationActionContextDefault)];

 UNNotificationAction *action3 = [UNNotificationAction actionWithIdentifier:@"action3" title:@"策略2行为1" options:UNNotificationActionOptionForeground];
 // UIMutableUserNotificationAction * action3 = [[UIMutableUserNotificationAction alloc] init];
 // action3.identifier = @"action3";
 // action3.title=@"策略2行为1";
 // action3.activationMode = UIUserNotificationActivationModeForeground;
 // action3.destructive = YES;

 UNNotificationAction *action4 = [UNNotificationAction actionWithIdentifier:@"action4" title:@"策略2行为2" options:UNNotificationActionOptionForeground];
 // UIMutableUserNotificationAction * action4 = [[UIMutableUserNotificationAction alloc] init];
 // action4.identifier = @"action4";
 // action4.title=@"策略2行为2";
 // action4.activationMode = UIUserNotificationActivationModeBackground;
 // action4.authenticationRequired = NO;
 // action4.destructive = NO;

 UNNotificationCategory *category2 = [UNNotificationCategory categoryWithIdentifier:@"Category2" actions:@[action3,action4] minimalActions:@[action3,action4] intentIdentifiers:@[@"action3",@"action4"] options:UNNotificationCategoryOptionCustomDismissAction];
 // UIMutableUserNotificationCategory * category2 = [[UIMutableUserNotificationCategory alloc] init];
 // category2.identifier = @"Category2";
 // [category2 setActions:@[action4,action3] forContext:(UIUserNotificationActionContextDefault)];


 [[UNUserNotificationCenter currentNotificationCenter] setNotificationCategories:[NSSet setWithObjects:category1,category2, nil]];
 [[UNUserNotificationCenter currentNotificationCenter] requestAuthorizationWithOptions:UNAuthorizationOptionBadge | UNAuthorizationOptionSound | UNAuthorizationOptionAlert completionHandler:^(BOOL granted, NSError * _Nullable error) {
 NSLog(@"completionHandler");
 }];
 /*iOS9实现方法
 UIUserNotificationSettings *settings = [UIUserNotificationSettings settingsForTypes:(UIUserNotificationTypeAlert|UIUserNotificationTypeBadge|UIUserNotificationTypeSound) categories:[NSSet setWithObjects: category1,category2, nil]];

 [[UIApplication sharedApplication] registerUserNotificationSettings:settings];
 */
 [[UIApplication sharedApplication] registerForRemoteNotifications];


 [UNUserNotificationCenter currentNotificationCenter].delegate = self;
}
代理方法的改变:
一些本地和远程推送的回调放在了同一个代理方法
#pragma mark -

- (void)application:(UIApplication *)application didRegisterUserNotificationSettings:(UIUserNotificationSettings *)notificationSettings NS_AVAILABLE_IOS(8_0) __TVOS_PROHIBITED{
 NSLog(@"didRegisterUserNotificationSettings");
}

- (void)application:(UIApplication *)application didRegisterForRemoteNotificationsWithDeviceToken:(NSData *)deviceToken NS_AVAILABLE_IOS(3_0){
 NSLog(@"deviceToken:%@",deviceToken);
 NSString *deviceTokenSt = [[[[deviceToken description]
   stringByReplacingOccurrencesOfString:@"<" withString:@""]
  stringByReplacingOccurrencesOfString:@">" withString:@""]
  stringByReplacingOccurrencesOfString:@" " withString:@""];
 NSLog(@"deviceTokenSt:%@",deviceTokenSt);
}

- (void)application:(UIApplication *)application didFailToRegisterForRemoteNotificationsWithError:(NSError *)error NS_AVAILABLE_IOS(3_0){
 NSLog(@"didFailToRegisterForRemoteNotificationsWithError:%@",error);
}

/*iOS9使用方法
- (void)application:(UIApplication *)application didReceiveRemoteNotification:(NSDictionary *)userInfo NS_DEPRECATED_IOS(3_0, 10_0, "Use UserNotifications Framework's -[UNUserNotificationCenterDelegate willPresentNotification:withCompletionHandler:] or -[UNUserNotificationCenterDelegate didReceiveNotificationResponse:withCompletionHandler:] for user visible notifications and -[UIApplicationDelegate application:didReceiveRemoteNotification:fetchCompletionHandler:] for silent remote notifications"){

}
*/

- (void)userNotificationCenter:(UNUserNotificationCenter *)center willPresentNotification:(UNNotification *)notification withCompletionHandler:(void (^)(UNNotificationPresentationOptions))completionHandler{
 NSLog(@"willPresentNotification:%@",notification.request.content.title);

 // 这里真实需要处理交互的地方
 // 获取通知所带的数据
 NSString *notMess = [notification.request.content.userInfo objectForKey:@"aps"];

}

- (void)userNotificationCenter:(UNUserNotificationCenter *)center didReceiveNotificationResponse:(UNNotificationResponse *)response withCompletionHandler:(void (^)())completionHandler{
 //在没有启动本App时,收到服务器推送消息,下拉消息会有快捷回复的按钮,点击按钮后调用的方法,根据identifier来判断点击的哪个按钮
 NSString *notMess = [response.notification.request.content.userInfo objectForKey:@"aps"];
 NSLog(@"didReceiveNotificationResponse:%@",response.notification.request.content.title);
// response.notification.request.identifier
}

//远程推送APP在前台
- (void)application:(UIApplication *)application didReceiveRemoteNotification:(NSDictionary *)userInfo fetchCompletionHandler:(void (^)(UIBackgroundFetchResult))completionHandler{
 NSLog(@"didReceiveRemoteNotification:%@",userInfo);
}

/*
- (void)application:(UIApplication *)application handleActionWithIdentifier:(nullable NSString *)identifier forRemoteNotification:(NSDictionary *)userInfo completionHandler:(void(^)())completionHandler NS_DEPRECATED_IOS(8_0, 10_0, "Use UserNotifications Framework's -[UNUserNotificationCenterDelegate didReceiveNotificationResponse:withCompletionHandler:]") __TVOS_PROHIBITED
{

}
*/
/*
// 本地通知回调函数,当应用程序在前台时调用
- (void)application:(UIApplication *)application didReceiveLocalNotification:(UILocalNotification *)notification NS_DEPRECATED_IOS(4_0, 10_0, "Use UserNotifications Framework's -[UNUserNotificationCenterDelegate willPresentNotification:withCompletionHandler:] or -[UNUserNotificationCenterDelegate didReceiveNotificationResponse:withCompletionHandler:]") __TVOS_PROHIBITED{
 NSLog(@"didReceiveLocalNotification:%@",notification.userInfo);


 // 这里真实需要处理交互的地方
 // 获取通知所带的数据
 NSString *notMess = [notification.userInfo objectForKey:@"aps"];
 UIAlertView *alert = [[UIAlertView alloc] initWithTitle:@"本地通知(前台)"
    message:notMess
    delegate:nil
   cancelButtonTitle:@"OK"
   otherButtonTitles:nil];
 [alert show];

 // 更新显示的徽章个数
 NSInteger badge = [UIApplication sharedApplication].applicationIconBadgeNumber;
 badge--;
 badge = badge >= 0 ? badge : 0;
 [UIApplication sharedApplication].applicationIconBadgeNumber = badge;

 // 在不需要再推送时,可以取消推送
 [FirstViewController cancelLocalNotificationWithKey:@"key"];

}


- (void)application:(UIApplication *)application handleActionWithIdentifier:(nullable NSString *)identifier forLocalNotification:(UILocalNotification *)notification completionHandler:(void(^)())completionHandler NS_DEPRECATED_IOS(8_0, 10_0, "Use UserNotifications Framework's -[UNUserNotificationCenterDelegate didReceiveNotificationResponse:withCompletionHandler:]") __TVOS_PROHIBITED
{
 //在非本App界面时收到本地消息,下拉消息会有快捷回复的按钮,点击按钮后调用的方法,根据identifier来判断点击的哪个按钮,notification为消息内容
 NSLog(@"%@----%@",identifier,notification);
 completionHandler();//处理完消息,最后一定要调用这个代码块
}
*/
还有推送插件开发: 类似iOS tody widget插件开发


本文已被整理到了《iOS推送教程》,欢迎大家学习阅读。
以上就是本文的全部内容,希望对大家的学习有所帮助,也希望大家多多支持小牛知识库。
-
本文向大家介绍iOS10实现推送功能时的注意点和问题总结,包括了iOS10实现推送功能时的注意点和问题总结的使用技巧和注意事项,需要的朋友参考一下 1、在项目 target 中,打开Capabilitie —> Push Notifications,并会自动在项目中生成 .entitlement 文件。(很多同学升级后,获取不到 deviceToken,大概率是由于没开这个选项) Capabili
-
本文向大家介绍MFC实现全屏功能代码实例,包括了MFC实现全屏功能代码实例的使用技巧和注意事项,需要的朋友参考一下 windows应用程序中有很多的播放器都有快捷键控制窗口以全屏幕的方式显示。MFC实现给应用程序加上全屏幕的功能,并不需要很多的代码,比如给一个基于对话框的应用程序加上全屏功能只需要以下少量代码就可以实现了。 实现代码如下所示:
-
本文向大家介绍python发送邮件功能实现代码,包括了python发送邮件功能实现代码的使用技巧和注意事项,需要的朋友参考一下 本文实例为大家分享了python发邮件精简代码,供大家参考,具体内容如下 以上就是本文的全部内容,希望对大家的学习有所帮助,也希望大家多多支持呐喊教程。
-
本文向大家介绍python实现发送邮件功能代码,包括了python实现发送邮件功能代码的使用技巧和注意事项,需要的朋友参考一下 本文实例为大家分享了python实现发送邮件功能的具体代码,供大家参考,具体内容如下 以上就是本文的全部内容,希望对大家的学习有所帮助,也希望大家多多支持呐喊教程。
-
本文向大家介绍Asp.NET MVC中使用SignalR实现推送功能,包括了Asp.NET MVC中使用SignalR实现推送功能的使用技巧和注意事项,需要的朋友参考一下 一、简介 Signal 是微软支持的一个运行在 Dot NET 平台上的 html websocket 框架。它出现的主要目的是实现服务器主动推送(Push)消息到客户端页面,这样客户端就不必重新发送请求或使用轮询技术来获取消息
-
如题: 我用的是定时请求接口数据。 请问还有哪些常用方法吗? 谢谢

