
iOS 7:UITableViewController:更改/替换删除按钮

免责声明:我知道调整这类东西不是最佳做法,因为当苹果决定改变其内部行为时,它可能会崩溃。
有一些解决方案,比如https://stackoverflow.com/a/12511432/271150 这似乎适用于以前的iOS版本,但不适用于iOS 7。
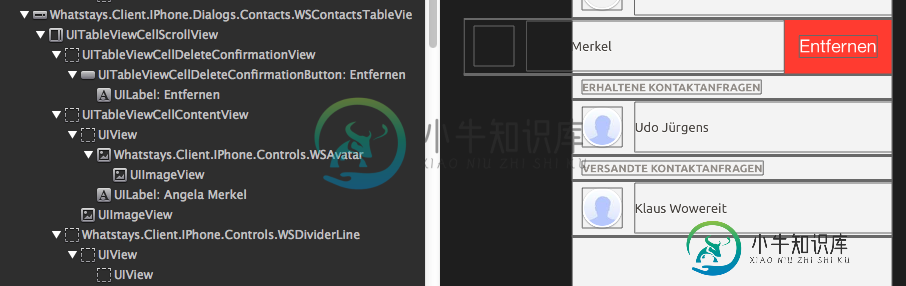
当查看控件层次结构时,我可以看到UITableViewCellDeleteConfirmationView在UITableViewCellScrollView中。但是,通过查看在layoutSubview或将SubView集合的SubView只有我自己的视图,UITableViewCellDeleteConfirmationView不会出现。
那么,有人知道如何修改默认的删除按钮/视图了吗?
共有3个答案

不确定这是否适用于iOS 7,但看看:
(void)tableView:(UITableView *)tableView commitEditingStyle:(UITableViewCellEditingStyle)editingStyle forRowAtIndexPath:(NSIndexPath *)indexPath
{

  if (editingStyle == UITableViewCellEditingStyleDelete)

   {

    //   Your Code

    }
}

在layoutSubviews或willTransitionState:中看不到视图的原因是删除按钮视图尚不存在,或者它还不是视图层次结构的一部分。为了“查看”视图,您需要稍微推迟浏览视图层次结构的代码,同时允许操作系统创建/添加视图:
- (void)willTransitionToState:(UITableViewCellStateMask)state
{
    [super willTransitionToState:state];

    if (state & UITableViewCellStateShowingDeleteConfirmationMask)
    {
        [self performSelector:@selector(findDeleteButtonViewThroughViewHierarchy:) withObject:self.subviews afterDelay:0];
    }
}
请注意,这是一个脆弱的解决方案,因为它基于苹果的内部实现,可能随时会发生变化。
在这里看到一个(几乎)完整的例子:
自定义iOS7删除按钮

我知道你可能不想覆盖苹果编辑表视图单元格的整个实现,但我的应用程序也有类似的问题。在我的例子中,当用户从左向右滑动时,我需要两个按钮(更多和丢失)来显示,就像iOS7的新提醒应用程序一样。而不是使用:
- (void)tableView:(UITableView *)tableView commitEditingStyle:(UITableViewCellEditingStyle)editingStyle forRowAtIndexPath:(NSIndexPath *)indexPath
我创建了一个自定义单元格,将按钮隐藏在顶层下,并使用平移手势识别器移动顶层,显示底层的按钮。因此,我可以完全控制显示的按钮以及它们的颜色等(见下文)。
static CGFloat const kEditButtonWidth = 82.0;

@interface MyCustomCell ()
@property (nonatomic, assign) CGFloat firstX;
@property (nonatomic, assign) CGFloat firstY;
@property (nonatomic, strong) UIView *topLayer;
@property (nonatomic, strong) UIButton *moreButton;
@property (nonatomic, strong) UIButton *lostButton;
@property (nonatomic, strong) UILabel *titleLabel;
@end

@implementation MyCustomCell

- (id)initWithStyle:(UITableViewCellStyle)style reuseIdentifier:(NSString *)reuseIdentifier {
    self = [super initWithStyle:UITableViewCellStyleDefault reuseIdentifier:reuseIdentifier];
    if (self) {

        // BOTTOM LAYER (MORE AND LOST BUTTONS)
        UIButton *aButton = [UIButton buttonWithType:UIButtonTypeCustom];
        [aButton setFrame:CGRectZero];
        [aButton setTitle:@"More" forState:UIControlStateNormal];
        [aButton setTitleShadowColor:[UIColor clearColor] forState:UIControlStateNormal];
        [aButton setBackgroundColor:[UIColor colorWithRed:0.78 green:0.78 blue:0.78 alpha:1.0]];
        [[self contentView] addSubview:aButton];
        [self setMoreButton:aButton];

        aButton = [UIButton buttonWithType:UIButtonTypeCustom];
        [aButton setFrame:CGRectZero];
        [aButton setTitle:@"Lost" forState:UIControlStateNormal];
        [aButton setTitleShadowColor:[UIColor clearColor] forState:UIControlStateNormal];
        [aButton setBackgroundColor:[UIColor colorWithRed:1.00f green:0.23f blue:0.19f alpha:1.00f]];
        [[self contentView] addSubview:aButton];
        [self setLostButton:aButton];

        // TOP LAYER
        UIView *aView = [[UIView alloc] initWithFrame:CGRectZero];
        [aView setBackgroundColor:[UIColor whiteColor]];
        [[self contentView] addSubview:aView];
        [self setTopLayer:aView];

        UIPanGestureRecognizer *aPanRecognizer = [[UIPanGestureRecognizer alloc] initWithTarget:self action:@selector(panGestureAction:)];
        [aPanRecognizer setMinimumNumberOfTouches:1];
        [aPanRecognizer setMaximumNumberOfTouches:1];
        [aView addGestureRecognizer:aPanRecognizer];

        // title label
        UILabel *aLabel = [[UILabel alloc] initWithFrame:CGRectZero];
        [aView addSubview:aLabel];
        [self setTitleLabel:aLabel];
    }
    return self;
}

- (void)layoutSubviews {

    [super layoutSubviews];

    CGRect bounds = [[self contentView] bounds];
    CGRect frame = CGRectZero;

    // BOTTOM LAYER (MORE AND LOST BUTTONS)
    frame.origin.x = bounds.size.width-(kEditButtonWidth+kEditButtonWidth); // two buttons wide
    frame.size.width = kEditButtonWidth;
    frame.size.height = bounds.size.height;
    [[self moreButton] setFrame:frame];

    frame.origin.x += kEditButtonWidth;
    [[self lostButton] setFrame:frame];

    // TOP LAYER
    frame = bounds;
    CGPoint anchorPoint = CGPointMake(0.0f, [[[self topLayer] layer] anchorPoint].y);
    [[[self topLayer] layer] setAnchorPoint:anchorPoint];
    [[self topLayer] setFrame:frame];

    // title label
    frame.origin.x = 20.0;
    frame.origin.y = 4.0;
    frame.size.width = bounds.size.width-40.0;
    frame.size.height = 21.0;
    [[self titleLabel] setFrame:frame];
}

- (void)panGestureAction:(id)sender {

    // on the first touch, get the center coordinates (x and y) of the view
    CGPoint translatedPoint = [(UIPanGestureRecognizer*)sender translationInView:self];
    if([(UIPanGestureRecognizer*)sender state] == UIGestureRecognizerStateBegan) {
        [self setFirstX:[[sender view] center].x];
        [self setFirstY:[[sender view] center].y];
    }

    // add translated point to reference points
    translatedPoint = CGPointMake([self firstX]+translatedPoint.x, [self firstY]);
    [[sender view] setCenter:translatedPoint];

    // when pan ends (set final x to be either back to zero or showing buttons)
    if ([(UIPanGestureRecognizer*)sender state] == UIGestureRecognizerStateEnded) {
        CGFloat finalX = translatedPoint.x+(0.30*[(UIPanGestureRecognizer*)sender velocityInView:self].x);
        if (finalX < -1.0f*FMEditButtonWidth) {
            finalX = -2.0f*FMEditButtonWidth;
            [self setEditMode:YES];
        } else {
            finalX = 0.0f;
            [self setEditMode:NO];
        }

        // animate view
        [UIView animateWithDuration:1.0 delay:0.0 usingSpringWithDamping:1.0f initialSpringVelocity:1.0f options:UIViewAnimationOptionCurveEaseOut | UIViewAnimationOptionAllowUserInteraction | UIViewAnimationOptionBeginFromCurrentState animations:^{
            [[sender view] setCenter:CGPointMake(finalX, [self firstY])];
        } completion:NULL];
    }
}

@end
希望这有帮助。
-
寻找 代码是;制表符分隔。 注意:标题和段落从不相同。 查找: 替换为: 首先,我要感谢你的帮助
-
嘿,我有一个使用JDBI改变表分区的问题。下面是我尝试运行的查询的一个示例: 当从表"table le1"中删除分区"P_1"时,这在MySQL中运行良好。 我在java代码中实现了如下: 并这样调用此函数 但是,这会导致以下错误: 导致:org.skife.jdbi.v2.异常。UnableToExecuteStateException:com.mysql.jdbc.exceptions.jdb
-
问题内容: 我有一段JavaScript代码,用于创建(使用D3.js)包含图表的元素。我想基于来自使用AJAX的Web服务的新数据来更新图表,问题是每次我单击更新按钮时,它都会生成一个新图表,因此我想删除旧的图表或更新其内容。 这是我创建的JavaScript函数的摘录: 如何删除旧元素或至少替换其内容? 问题答案: 解决方法如下: 这是D3.js提供的功能。
-
问题内容: 根据我到目前为止的研究,此字符表示数据库与前端之间的编码错误。不幸的是,我对这两个都没有任何控制权。我正在使用Teradata Studio。 如何过滤掉这个字符?我正在尝试在偶尔包含的列上执行函数,这将引发错误“字符串包含不可翻译的字符”。 这是我的SQL。是包含替换字符的列。 问题答案: 您的诊断是正确的,因此,首先,您可能需要检查 会话字符集 (它是连接定义的一部分)。如果是 A
-
我正在尝试从二叉查找树中删除节点。我可以成功地删除树上的任何其他节点,除了一个特殊的情况。如果目标节点有两个子节点,左边的子节点有右边的子树,我可以定位正确的替换节点,并将值切换到目标节点,但替换节点永远不会被删除。 看看上面的图片,如果我尝试删除17,程序将正确地导航到13,并用13替换17,但它不会像预期的那样删除原来的13。 我附加了我的remove方法和其中引用的方法。 这是我的Node类
-
问题内容: 如何停止事件的处理或切换事件的功能? 修改后的代码: 问题答案: 您只需使用事件的新功能再次调用即可。既然你没有利用第三个参数,在此只是简单地覆盖任何已经存在。默认情况下,此参数为,但它也接受,它将在该事件已触发的回调中添加回调。 但是,如果您开始使用该可选参数,则需要使用该函数删除单个回调。当你调用一个返回。您可以将此作为第二个参数传递给。 例: