Angular Lib for OpenID Connect & OAuth2
Secure your Angular app using the latest standards for OpenID Connect & OAuth2. Provides support for token refresh, all modern OIDC Identity Providers and more.
Acknowledgements
This library is certified by OpenID Foundation. (RP Implicit and Config RP)
Features
- Code samples for most of the common use cases
- Supports schematics via
ng addsupport - Supports all modern OIDC identity providers
- Supports OpenID Connect Code Flow with PKCE
- Supports Code Flow PKCE with Refresh tokens
- Supports OpenID Connect Implicit Flow
- Supports OpenID Connect Session Management 1.0
- Supports RFC7009 - OAuth 2.0 Token Revocation
- Supports RFC7636 - Proof Key for Code Exchange (PKCE)
- Supports OAuth 2.0 Pushed authorisation requests (PAR) draft
- Semantic releases
- Github actions
- Modern coding guidelines with prettier, husky
- Up to date documentation
- Implements OIDC validation as specified, complete client side validation for REQUIRED features
- Supports authentication using redirect or popup
Installation
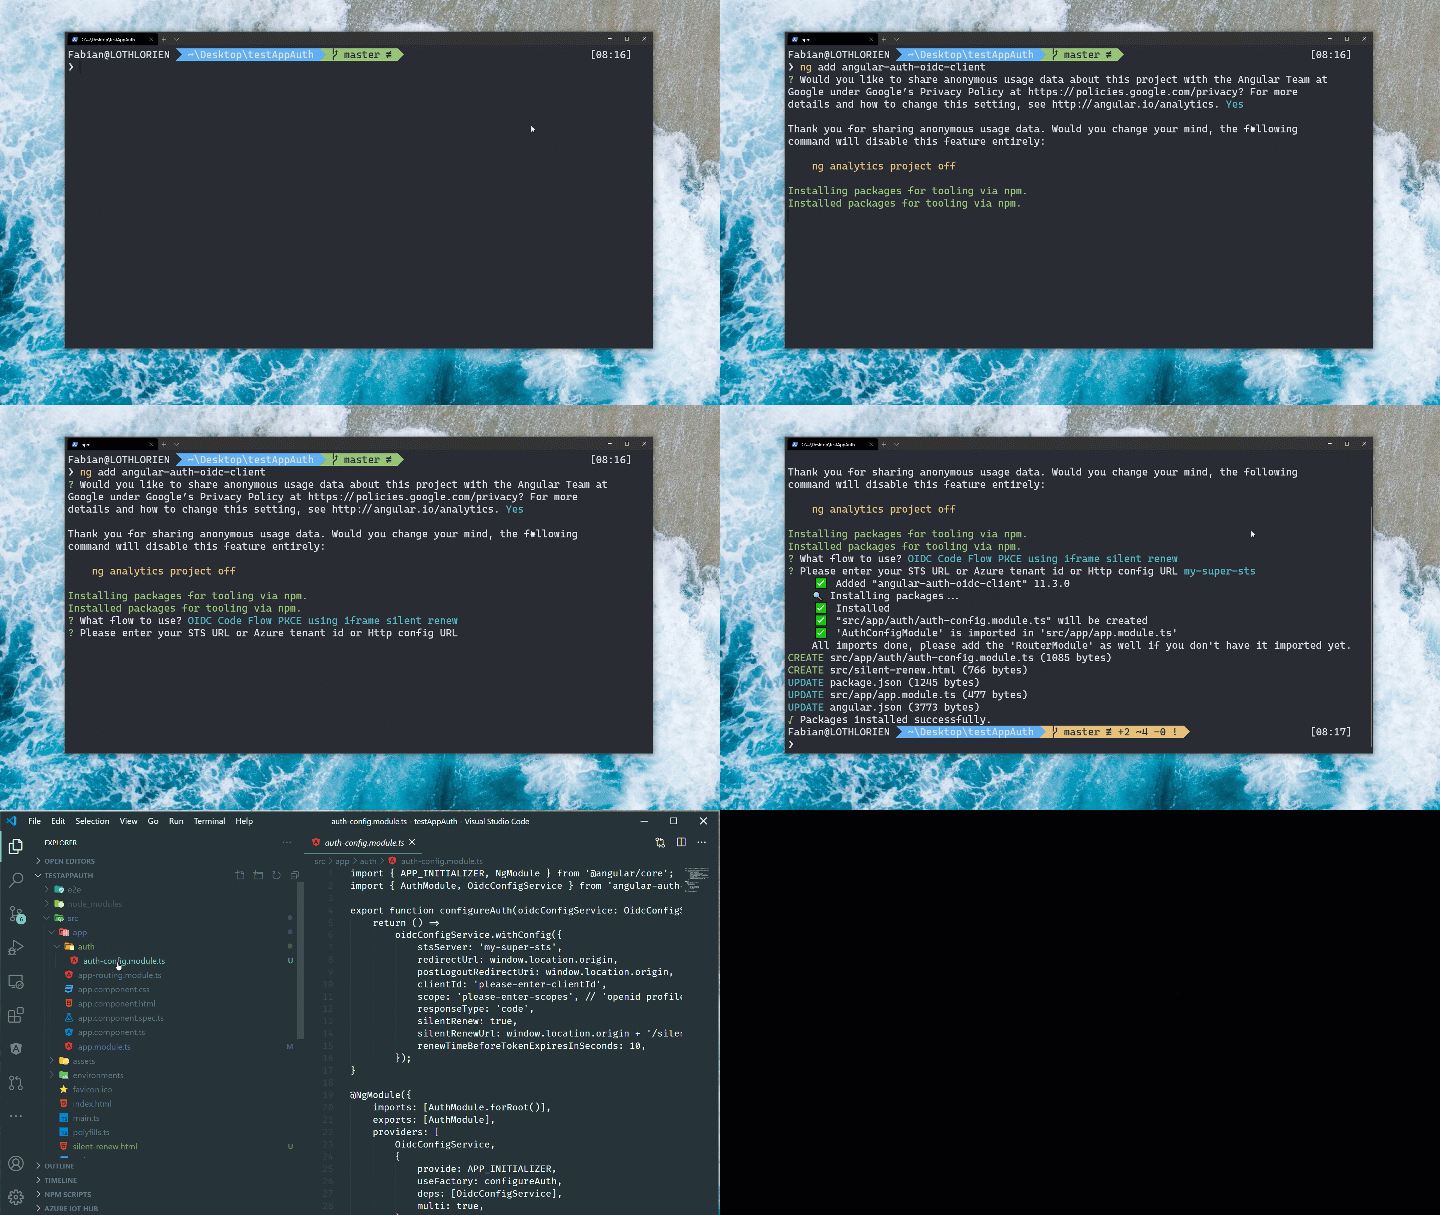
Ng Add
You can use the schematics and ng add the library.
ng add angular-auth-oidc-client
And answer the questions. A module will be created which encapsulates your configuration.
Npm / Yarn
Navigate to the level of your package.json and type
npm install angular-auth-oidc-client
or with yarn
yarn add angular-auth-oidc-client
Documentation
Samples
Quickstart
For the example of the Code Flow. For further examples please check the Samples Section.
If you have done the installation with the schematics, these modules and files should be available already!
Configuration
Import the AuthModule in your module.
import { NgModule } from '@angular/core';
import { AuthModule, LogLevel } from 'angular-auth-oidc-client';
// ...

@NgModule({
  // ...
  imports: [
    // ...
    AuthModule.forRoot({
      config: {
        authority: '<your authority address here>',
        redirectUrl: window.location.origin,
        postLogoutRedirectUri: window.location.origin,
        clientId: '<your clientId>',
        scope: 'openid profile email offline_access',
        responseType: 'code',
        silentRenew: true,
        useRefreshToken: true,
        logLevel: LogLevel.Debug,
      },
    }),
  ],
  // ...
})
export class AppModule {}
And call the method checkAuth() from your app.component.ts. The method checkAuth() is needed to process the redirect from your Security Token Service and set the correct states. This method must be used to ensure the correct functioning of the library.
import { Component, OnInit } from '@angular/core';
import { OidcSecurityService } from 'angular-auth-oidc-client';

@Component({
  /*...*/
})
export class AppComponent implements OnInit {
  constructor(public oidcSecurityService: OidcSecurityService) {}

  ngOnInit() {
    this.oidcSecurityService.checkAuth().subscribe(({ isAuthenticated, userData, accessToken, idToken }) => {
      /*...*/
    });
  }

  login() {
    this.oidcSecurityService.authorize();
  }

  logout() {
    this.oidcSecurityService.logoff();
  }
}
Using the access token
You can get the access token by calling the method getAccessToken() on the OidcSecurityService
const token = this.oidcSecurityService.getAccessToken();
And then you can use it in the HttpHeaders
import { HttpHeaders } from '@angular/common/http';

const token = this.oidcSecurityServices.getAccessToken();

const httpOptions = {
  headers: new HttpHeaders({
    Authorization: 'Bearer ' + token,
  }),
};
Versions
Current Version is Version 12.x
License
Authors
-
配置相对较为繁琐,最后会放上 Github 源码地址 新建一个 ng 项目 ng new angular-oidc 进入目录 cd angular-oidc 安装 oidc-client npm i oidc-client --save 配置 oidc-client 参数 打开 environment.ts 将下面的代码覆盖原来的内容 import { WebStorageStateStore
-
本篇详细描述怎么为Angular SPA程序添加Authorization的全记录。相对应的,本篇中使用了Identity Server (.Net Core开源项目)作为Identity Provider。 AccessToken和Refresh Token 权限控制无所不在,基于OAuth, OpenID这些解决方案在今时今日的开发中几乎是必不可少的。 这里只强调下Access Token和R
-
我用Quarkus创建了一个Rest-API和一个前端,作为一个自包含的系统。前端是静态服务的。
-
实现的计划是向现有的DB连接添加DTO/TABLE。我将添加一个高优先级过滤器或auth机制,如果状态未设置,则检查缓存,然后检查数据库中的现有数据。对于auth机制实现,如果不存在状态或cookie,我将返回到default/super。 是我把这件事搞得太复杂了,有一个包可以管理它,还是这是问题的解决方案?任何反馈都将不胜感激!
-
OAUTH2/OIDC Client Universal OAUTH2/OpenID Connect Client library Installation: npm install oauth2-oidc-client --save Usage auth.ts (Angular NativeScript) import { Component, OnInit } from "@angular/c
-
kong-oidc 是诺基亚开源的一个 Kong 插件,实现了 OpenID Connect Relying Party (RP) 功能。它使用 OpenID Connect Discovery 和基本客户端配置(即授权代码流),针对 OpenID Connect Provider 对用户进行身份验证。 kong-oidc 支持在服务器缓存已解析的 Discovery 文档和验证通过的访问令牌(A
-
我正在使用Quarkus 1.0.1框架开发一套微服务。我希望使用KeyCloak8.0.1作为我的身份提供程序来保护这些信息。我已经在一个Docker容器中启动并运行了Keycloak,并为我的微服务配置了一个领域和相应的客户机。现在我到了我想保护他们的地步,我遇到了一个问题。 我的REST服务没有为它配置的注释或任何授权要求。这应该意味着,即使我没有经过身份验证,我也能够访问该服务。但是,当我
-
AUTH password 通过设置配置文件中 requirepass 项的值(使用命令 CONFIG SET requirepass password ),可以使用密码来保护 Redis 服务器。 如果开启了密码保护的话,在每次连接 Redis 服务器之后,就要使用 AUTH 命令解锁,解锁之后才能使用其他 Redis 命令。 如果 AUTH 命令给定的密码 password 和配置文件中的密码


