FaceNet based Attendance System
A Deep Learning based Web Application for marking attendance of students by recognizing the student's faces from the surveillance video footage of classroom.
Getting Started
A Web Application in Python for recognizing student's faces in a classroom from the surveillance video and marking the attendance in an Excel Sheet. Deep learning algorithms like MTCNN and FaceNet are used for face detection and recognition respectively. And using the Flask framework, the Web App was created.
Algorithms Used
- MTCNN (Multi-Task Cascaded Convolutional Neural Networks)
- FaceNet
Prerequisites
The following things needs to be installed properly in your machine.
- Tensorflow
- Python
- Flask
- scipy
- opencv
- h5py
- matplotlib
- Pillow
- requests
- psutil
For installing the packages use pip install command.
How to use
Step 1: Prepare Dataset
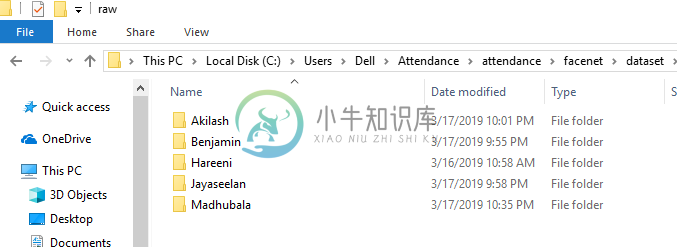
The required number of images (atleast 10) for each students should be collected and stored in seperate folders. The folders should be named in the respective students name. The path to folders can be Root_folder/attendance/facenet/dataset/raw/
Step 2: Detect and Align Faces
Here the MTCNN face detection algorithm is used. It takes Root_folder/attendance/facenet/dataset/raw/ as input and returns Root_folder/attendance/facenet/dataset/aligned/ as output. Basically, it detects the faces, aligns face region of each image and store it in the aligned directory.
Run the following command in the command prompt.
$ python attendance/facenet/src/align/align_dataset_mtcnn.py
attendance/facenet/dataset/raw attendance/facenet/dataset/aligned
--image_size 160 --margin 32
Step 3: Training The Faces
The output dataset from Step 2 are fed into the Support Vector Machine classifier which generates a 512 dimensional embedding vector for faces of each students and trains the classifier on the generated vectors.
Run the following commands in the command prompt.
$ python attendance/facenet/src/classifier.py TRAIN
attendance/facenet/dataset/aligned attendance/facenet/src/20180402-114759/
attendance/facenet/src/20180402-114759/my_classifier.pkl
--batch_size 1000 --min_nrof_images_per_class 10  --nrof_train_images_per_class 10 --use_split_dataset
Step 4: Report folder
Create an empty folder named Reports. This is for storing the Excel sheets report of the attendance, which is automatically generated when the Facenet algorithm recognizes the students. This is implemented using XlsxWriter Python module.
Step 5: Running the Web Application
Now run the Web application by $ python run.py It will show a localhost address like http://127.0.0.1:5000/ which will be the URL for the Web App.
Step 6: Storing Data
While running the application, it redirects to the Home page. On that page, there is an Add class details hyperlink. Basically it asks the user to enter the student's details. The provided details are stored in the Sqlite Database.
Note: The Name of each students entered should be the same as the name of the student's dataset created in step 1.
Step 7: Uploading Image
On pressing the Take Attendance hyperlink, it redirects you to a page where the user needs to upload an image of the classroom.
Note: The image should be in a good resolution and also it contains the clear faces of all students.
Result
After uploading the image it takes sometime to process. You can view the running background details in the command prompt. Then it creates an Excel sheet in the Reports folder which contains the attendance details.
References
-
Face Recognition using Tensorflow This is a TensorFlow implementation of the face recognizer described in the paper"FaceNet: A Unified Embedding for Face Recognition and Clustering". The project also
-
Face_recognition_attendance_system The Basic Approach This is my attempt to make a Face recognition system for classroom or office attendance. The system is based on a special type of cnn architecture
-
@AspectJ指的是将方面声明为使用Java 5注释注释的常规Java类的样式。 通过在基于XML模式的配置文件中包含以下元素来启用@AspectJ支持。 <aop:aspectj-autoproxy/> 您还需要在应用程序的类路径上使用以下AspectJ库。 这些库位于AspectJ安装的“lib”目录中,否则您可以从Internet下载它们。 aspectjrt.jar aspectjwe
-
到目前为止,您已经了解了我们如何使用XML配置文件配置Spring bean。 如果您对XML配置感到满意,那么实际上不需要了解如何继续使用基于Java的配置,因为您将使用任一可用配置获得相同的结果。 基于Java的配置选项使您可以在没有XML的情况下编写大部分Spring配置,但是在本章中介绍的几个基于Java的注释的帮助下。 @Configuration&@Bean Annotations 使
-
最近Clear应用很火,有一部分原因是其超炫的列表交互效果,用户可以用手指手势来直接对列表进行编辑。这份代码实现了Clear应用中大部分的列表交互效果,包括,手指划动列表行来更新列表,手指划动列表行来删除列表行,下拉新增列表行,pinch移动列表来插入列表行等等。 [Code4App.com]
-
我正在用facenet pytorch做一个人脸识别应用(https://github.com/timesler/facenet-pytorch)在python中使用两种方法。 第一种方法代码- 在这个代码中,我从给定的图像中提取人脸,并获得用于识别人脸的512编码。 在本例中,我使用了两个不同的面,并绘制了面之间的距离 它工作得很好... 第二种方法代码- 在这段代码中,我通常先获得面坐标,然后


