

The simplest way to deploy your apps in the Cloud
Deploy your apps on any Cloud providers in just a few seconds

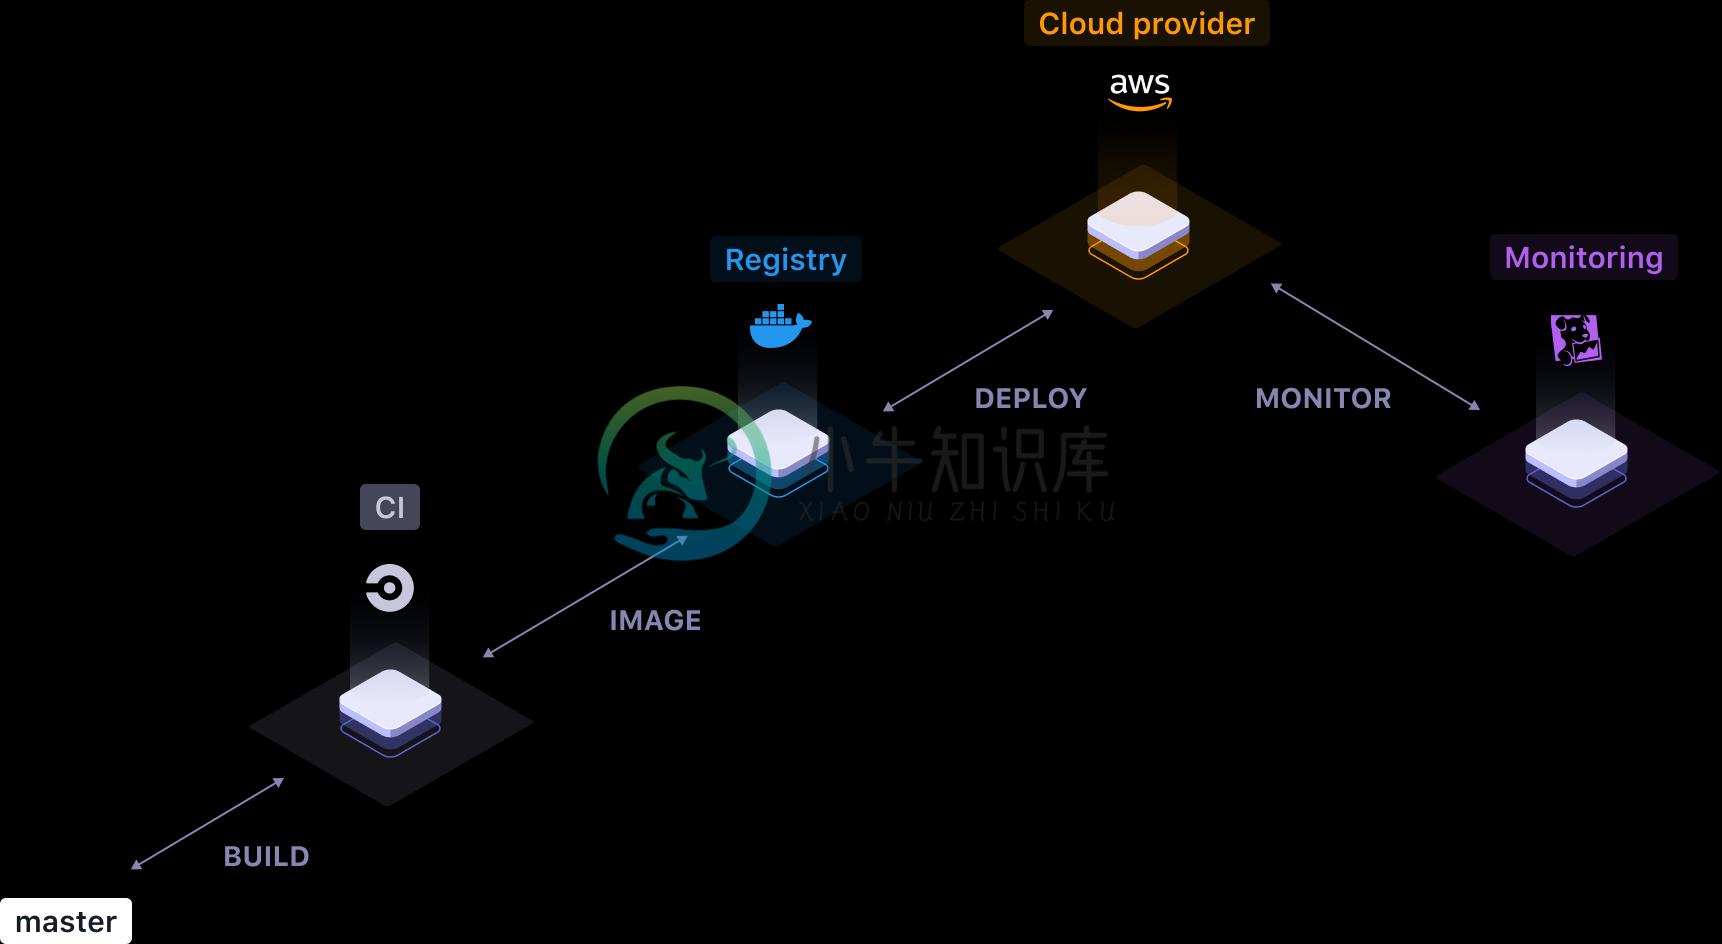
Qovery Engine is an open-source abstraction layer library that turns easy apps deployment on AWS, GCP, Azure, and other Cloud providers in just a few minutes. The Qovery Engine is written in Rust and takes advantage of Terraform, Helm, Kubectl, and Docker to manage resources.
- Website: https://www.qovery.com
- Full doc: https://docs.qovery.com
- Qovery Engine doc: coming soon
- Community: Join us on Discord and on our Q&A forum
Please note: We take Qovery's security and our users' trust very seriously. If you believe you have found a security issue in Qovery, please responsibly disclose by contacting us at security@qovery.com.
✨
Features
- Zero infrastructure management: Qovery Engine initializes, configures, and manages your Cloud account for you.
- Multi Cloud: Qovery Engine is built to work on AWS, GCP, Azure and any Cloud provider.
- On top of Kubernetes: Qovery Engine takes advantage of the power of Kubernetes at a higher level of abstraction.
- Terraform and Helm: Qovery Engine uses Terraform and Helm files to manage the infrastructure and app deployment.
- Powerful CLI: Use the provided Qovery Engine CLI to deploy your app on your Cloud account seamlessly.
- Web Interface: Qovery provides a web interface through qovery.com
��
Plugins
Qovery engine supports a number of different plugins to compose your own deployment flow:
- Cloud providers: AWS, Digital Ocean (in beta), Azure (vote), GCP (vote), Scaleway (vote)
- Build platforms: Qovery CI, Circle CI (vote), Gitlab CI (vote), Github Actions (vote)
- Container registries: ECR, DockerHub, DOCR (vote), ACR (vote), SCR (vote)
- DNS providers: Cloudflare
- Monitoring services: Datadog (vote), Newrelic (vote)
Demo
Here is a demo from Qovery CLI from where we use the Qovery Engine.

Getting Started
Installation
Use the Qovery Engine as a Cargo dependency.
qovery-engine = { git = "https://github.com/Qovery/engine", branch="main" }
Usage
Rust lib
Initialize EKS (AWS Kubernetes) and ECR (AWS container registry) on AWS
let engine = Engine::new(
    context, // parameters
    local_docker, // initialize Docker as a Build Platform
    ecr, // initialize Elastic Container Registry
    aws, // initialize AWS account
    cloudflare, // initialize Cloudflare as DNS Nameservers
);

let session = match engine.session() {
    Ok(session) => session, // get the session
    Err(config_error) => panic!("configuration error {:?}", config_error),
};

let mut tx = session.transaction();

// create EKS (AWS managed Kubernetes cluster)
tx.create_kubernetes(&eks);

// create the infrastructure and wait for the result
match tx.commit() {
    TransactionResult::Ok => println!("OK"),
    TransactionResult::Rollback(commit_err) => println!("ERROR but rollback OK"),
    TransactionResult::UnrecoverableError(commit_err, rollback_err) => println!("FATAL ERROR")
};
Deploy an app from a Github repository on AWS
// create a session before
//------------------------

let mut environment = Environment {...};

let app = Application {
    id: "app-id-1".to_string(),
    name: "app-name-1".to_string(),
    action: Action::Create, // create the application, you can also do other actions
    git_url: "https://github.com/Qovery/node-simple-example.git".to_string(),
    git_credentials: GitCredentials {
        login: "github-login".to_string(), // if the repository is a private one, then use credentials
        access_token: "github-access-token".to_string(),
        expired_at: Utc::now(), // it's provided by the Github API
    },
    branch: "main".to_string(),
    commit_id: "238f7f0454783defa4946613bc17ebbf4ccc514a".to_string(),
    dockerfile_path: "Dockerfile".to_string(),
    private_port: Some(3000),
    total_cpus: "1".to_string(),
    cpu_burst: "1.5".to_string(),
    total_ram_in_mib: 256,
    total_instances: 1,
    storage: vec![], // you can add persistent storage here
    environment_variables: vec![], // you can include env var here
};

// add the app to the environment that we want to deploy
environment.applications.push(app);

// open a transaction
let mut tx = session.transaction();

// request to deploy the environment
tx.deploy_environment(&EnvironmentAction::Environment(environment));

// commit and deploy the environment
tx.commit();
Note: the repository needs to have a Dockerfile at the root.
Documentation
Full, comprehensive documentation is available on the Qovery website: https://docs.qovery.com
Contributing
Please read our Contributing Guide before submitting a Pull Request to the project.
Community support
For general help using Qovery Engine, please refer to the official Qovery Engine documentation. For additional help, you can use one of these channels to ask a question:
- Discord (For live discussion with the Community and Qovery team)
- GitHub (Bug reports, Contributions)
- Roadmap (Roadmap, Feature requests)
- Twitter (Get the news fast)
Roadmap
Check out our roadmap to get informed of the latest features released and the upcoming ones. You may also give us insights and vote for a specific feature.
FAQ
Why does Qovery exist?
At Qovery, we believe that the Cloud must be simpler than what it is today. Our goal is to consolidate the Cloud ecosystem and makes it accessible to any developer, DevOps, and company. Qovery helps people to focus on what they build instead of wasting time doing plumbing stuff.
What is the difference between Qovery and Qovery Engine?
Qovery is a Container as a Service platform for developers. It combines the simplicity of Heroku, the reliability of AWS, and the power of Kubernetes. It makes the developer and DevOps life easier to deploy complex applications.
Qovery Engine is the Open Source abstraction layer used by Qovery to abstract the deployment of containers and databases on any Cloud provider.
Why is the Qovery Engine written in Rust?
Rust is underrated in the Cloud industry. At Qovery, we believe that Rust can help in building resilient, efficient, and performant products. Qovery wants to contribute to make Rust being a significant player in the Cloud industry for the next 10 years.
Why do you use Terraform, Helm and Kubectl binaries?
The Qovery Engine is designed to operate as an administrator and takes decisions on the output of binaries, service, API, etc. Qovery uses the most efficient tools available in the market to manage resources.
License
See the LICENSE file for licensing information.
Qovery
Qovery is a CNCF and Linux Foundation silver member.

-
2021SC@SDUSC 上次我们分析了flaxEgnine游戏引擎中WheeledVehicle.h文件。而本次我将针对flaxEngine游戏引擎中的WheeledVehicle.c文件进行源码的分析。 void FreeDrive(WheeledVehicle::DriveTypes driveType, PxVehicleWheels* drive) { switc
-
用法 engine = create_engine('dialect+driver://username:password@host:port/database') dialect -- 数据库类型 driver -- 数据库驱动选择 username -- 数据库用户名 password -- 用户密码 host 服务器地址 port 端口 database 数据库 engine =
-
tensorRT踩坑日常之engine推理 再进行tensorRT进行推理之前,需要将训练好的模型转onnx再进行序列化生成engine,然后反序列化context推理 此文章是进行序列化生成engine和推理的,不知道如何生成engine和onnx的小伙伴可以参考另一篇博客 https://blog.csdn.net/chaocainiao/article/details/124197430?s
-
1. 官网指导: https://docs.unrealengine.com/zh-CN/Engine/Basics/Projects/Packaging/index.html 在Unreal Editor界面中操作进行打包时,在linux机上遇到了问题,首先是Error: Error: declaration shadows a variable in namespace 'Chaos' 用了
-
如题,使用pandas读取txt数据时,报如下警告: D:\Program Files\python3.7\lib\site-packages\pandas\util_decorators.py:311: ParserWarning: Falling back to the ‘python’ engine because the ‘c’ engine does not support skipfo
-
# engine-cleanup [ INFO ] Stage: Initializing [ INFO ] Stage: Environment setup Configuration files: ['/etc/ovirt-engine-setup.conf.d/10-packaging-jboss.conf', '/etc/ovirt-engine-setup.con
-
在任务管理器中发现一个叫reason security engine的进程一直占用cpu资源20%~30%,点开文件所在位置发现是一个叫RAVAntivirus的软件一直在后台运行。 执行它的卸载程序,火绒拦截到在执行插入疑似重新安装的shell,流氓软件的成分很明了了。最后搜索RAV Antivirus关键字,彻底粉碎所有相关文件,cpu占用率又回归正常。 看了一下知乎,大家都反映说是安装che
-
Windows 10 64 位,四核 Intel 或 AMD,2.5 GHz 或更快,8 GB RAM macOS Big Sur,四核 Intel,2.5 GHz 或更快,8 GB RAM Linux Ubuntu 18.04,四核 Intel 或 AMD,2.5 GHz 或更快,32 GB RAM
-
背景 最近解决了python版本为啥执行不了trtexec.exe生成的trt文件的bug,是环境里pytorch自带的cuda和trt的冲突,卸了重装了CPU版本就OK了。但是在我尝试解决的过程中出现了问题,环境有点玩坏了,之后用trtexec.exe生成的engine直接摆烂,输出的全是NaN。行吧,那我在python环境里生成吧。但是网上搜索的onnx2tensorrt代码基本上是7代之前的
-
用法 engine = create_engine('dialect+driver://username:password@host:port/database') dialect:数据库类型 driver:数据库驱动选择 username:数据库用户名 password: 用户密码 host:服务器地址 port:端口 database:数据库 PostgreSQL default engin
-
问题内容: 如何通过App Engine的URLFetch服务(在Java中)指定用于发出基本身份验证请求的用户名和密码? 看来我可以设置HTTP标头: Basic-Auth的适当标题是什么? 问题答案: 这是HTTP上的基本身份验证标头: 授权:基本的base64编码(用户名:password) 例如: 您将需要执行以下操作: 为此,您将需要一个base64编解码器api,例如Apache Co
-
问题内容: 我想在Google App Engine上创建一个RESTful应用。我想提供XML和JSON服务。我已经对Restlet,Resteasy和Jersey进行了简短的实验。除了Restlet中的一些简单示例之外,我在其中的任何方面都没有取得太大的成功。 您能否分享使用Java在Google App Engine上创建Restful Web应用程序的经验,或者对上述GAE工具包提供任何见
-
问题内容: 更新:这些天modules被称为services。 我想将项目的模块组织到各个子文件夹中,其中每个子文件夹都包含与每个模块相关的代码。特别是,我希望包含默认模块的文件夹与其他模块处于同一级别(即,它们都是同级的)。我遵循模块文档中显示的图: 图 (来源:google.com) 但是,令我感到困惑的是“重要提示:app.yaml文件必须位于应用程序的根目录中”。这是否意味着默认模块(及其
-
问题内容: 尝试开始使用Google App Engine-可以在Java 8中使用吗? 我已按照此页面上的说明进行操作:https : //console.developers.google.com/start/appengine 选择“ Java”,我成功完成了Maven构建,但是当我访问localhost:8080时,没有任何运行。 说明中说“确保已安装Java 7 JDK”,但是我刚刚安装
-
问题内容: 我在App Engine上有一个文件。应用引擎上文件的路径是什么? 例如: 问题答案: 这对我有用:
-
问题内容: 因此,我正在尝试向项目添加一些功能,以允许在部署工件中使用用户定义的属性-一个简单的key:value .properties文件。我将service.properties文件放在 在ServiceImpl.java构造函数中,我具有以下内容: 属性URL的所有实例均为空。我知道我确实缺少某些明显的东西,但是我需要第二双眼睛。问候。 编辑: 嗯,似乎我很困惑,因为默认的GAE项目在/
-
问题内容: 我正在Android Studio中开发App Engine应用程序,并在本地计算机(带有本地数据存储)上对其进行测试。这是基于Java的应用程序。每次我重新运行服务器时,都会清除本地数据存储。我为Python开发人员找到了几种解决方案,但是Java似乎没有答案。 Android Studio仅允许更改: 战争路径 虚拟机Args 服务器地址 服务器端口 我已经尝试过使用VM参数,但是
-
问题内容: 我已经在Google App Engine上创建了一个项目,但无法部署项目ID为“我的项目ID”的项目 以下是发生问题的详细信息: 您选择的应用程序ID“我的项目ID”不存在。转到http://cloud.google.com/console查看现有的应用程序ID或创建新的应用程序ID。 无法更新应用:错误发布到URL: https //appengine.google.com/api