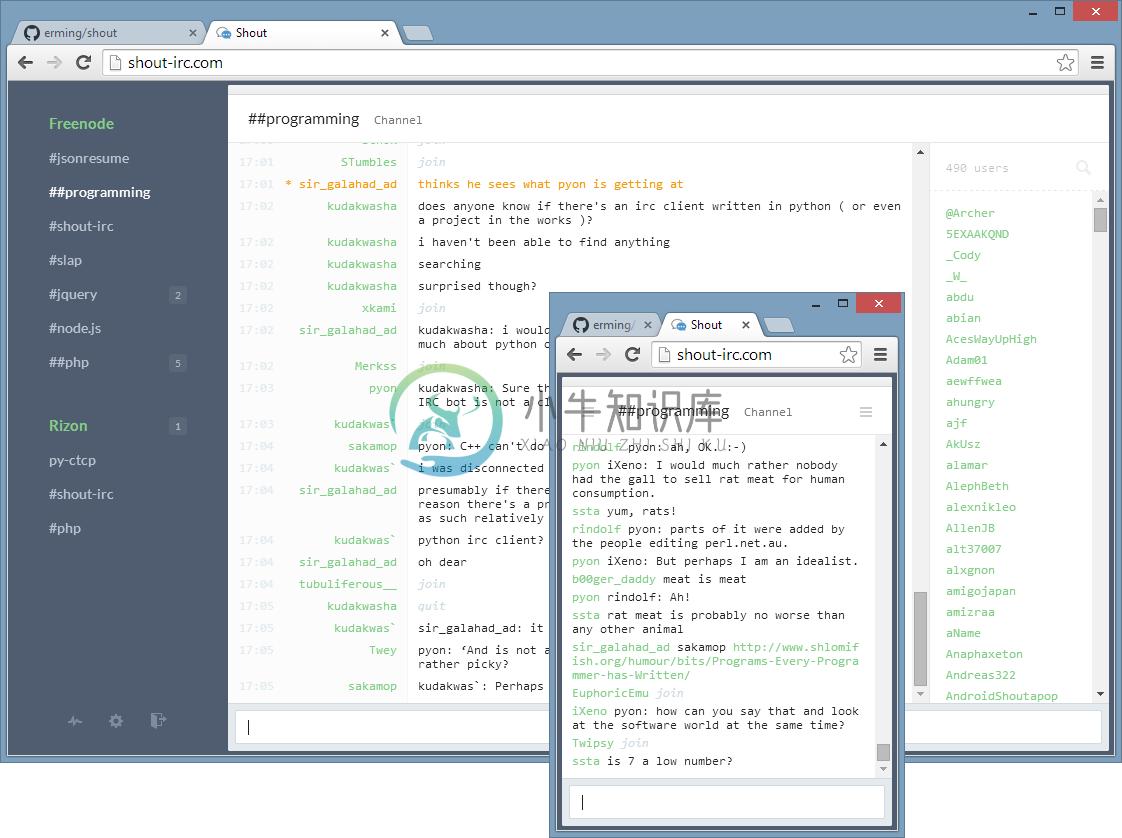
Shout 是一个 Web IRC 客户端,你可以把TA放置在你的服务器上。
特性:
-
支持多用户
-
即使关闭了浏览器还是可以保持连接
-
可以一次性从多个设备进行连接
-
响应式布局 —可以很好的在智能手机上运行
-
等等
好啦,是否吸引到你了呢,赶紧来尝试吧!
这里是一个在公共模式下运行的 Shout 服务器,允许匿名连接:
Try the Shout client
注意:如果大量用户尝试示例,你可以尝试另外一个网络 irc.freenode.org,免费节点只能允许大约 5 个的连接。
安装
sudo npm install -g shout
使用
安装好后启动服务器:
shout
更多相关信息
shout --help
截图
配置
打开 config.json 文件,运行:
shout config
设置:
port
使用默认端口
你可以覆盖,通过运行: shout --port 80
public
Set to either true|false.
When set to false, a login will be required for connecting users.
用户管理
运行 shout --help:
Usage: shout [options] [command]

Commands:

  list
    List all existing users

  add <name>
    Add a new user

  remove <name>
    Remove an existing user

  edit <name>
    Edit an existing user
如果你需要编辑用户手册,请看 users/example/user.json.
命令
-
/close
-
/connect
-
/deop
-
/devoice
-
/disconnect
-
/invite
-
/join
-
/kick
-
/leave
-
/me
-
/mode
-
/msg
-
/nick
-
/notice
-
/op
-
/part
-
/query
-
/quit
-
/quote
-
/raw
-
/say
-
/send
-
/server
-
/slap
-
/topic
-
/voice
-
/whois
-
package chaoxingerya; public class work02 { public static void main(String[] args) { Animal c = new Cat(); c.shout(); Animal d = new Dog(); d.shout(); } } class Animal{ public void shout(){ } } class
-
About This module allow one to play local and remote mp3 files at any sample rate. title: 1.1Configure and Install 2Overview 2.1Play Capabilities 2.1.1Using shoutcast stream for MOH 2.1.2Using mod_s
-
mod_shout Skip to end of metadata Created by Belaid Areski, last modified by Danny Gershman on 2015.10.05 Go to start of metadata About This module allow one to play local and remote mp3 files at any
-
package Chouxiangfangfa; public class work01 { public static void main(String[] args) { Coat c = new Coat(); c.shot(); Cow c2 = new Cow(); c2.shot(); } } abstract class Animal{ abstract public void s
-
mod_shout 模块添加如下参数 mod_shout_la_LIBADD = $(switch_builddir)/libfreeswitch.la -lmp3lame -lmpg123 配置文件: <action application="record_session" data="$${base_dir}/recordings/archive/${strftime(%Y-%m-%d-%
-
由于录制mp3文件需要mod_shout,所以需要编译安装 该模块 1. 按照wiki操作 yum install libshout-devel lame-devel libmpg123-devel 。按但是不能安装libmpg123-devel,需要手动到http://mpg123.org/download/?V=1&O=D下载,我下载的是mpg123-1.23.8.tar.bz2 2. 解压m
-
mod_shout Skip to end of metadata Created by Belaid Areski, last modified by Danny Gershman on 2015.10.05 Go to start of metadata About This module allow one to play local and remote mp3 files at any
-
【单选题】下面的程序段执行后,输出的结果是以下哪个选项? StringBuffer buf=new StringBuffer("Beijing2008"); buf.insert(7,"@"); System.out.println(buf.toString()); 【判断题】集合中不能存放基本数据类型,而只能存放引用数据类型。 【简答题】Please upload recitation vide
-
1. yum install -y patch 2. yum install -y libshout-devel lame-devel libmpg123-devel 3. make install mod_shout 4. load mod_shout 转载于:https://www.cnblogs.com/logo-fox/p/5201063.html
-
我想在一些计算机之间建立点对点连接,这样用户就可以在没有外部服务器的情况下聊天和交换文件。我最初的想法如下: 我在服务器上制作了一个中央服务器插座,所有应用程序都可以连接到该插座。此ServerSocket跟踪已连接的套接字(客户端),并将新连接的客户端的IP和端口提供给所有其他客户端。每个客户端都会创建一个新的ServerSocket,所有客户端都可以连接到它。 换句话说:每个客户端都有一个Se
-
URI 方法 URI() string 返回当前客户端使用的服务器地址。 SetURI 方法 SetURI(uri string) 设置当前客户端使用的服务器地址。如果你想要设置多个服务器地址,请使用 SetURIList 方法代替该方法。 URIList 方法 URIList() []string 返回当前客户端可使用的服务器地址列表。 SetURIList 方法 SetURIList(uriL
-
客户端事件通过 SetEvent 方法进行设置。 客户端事件有两个,它们分别定义为: type onErrorEvent interface { OnError(name string, err error) } type onFailswitchEvent interface { OnFailswitch(Client) } 因为 go 语言不需要显式实现接口的特点,所以这两
-
创建客户端有两种方式,一种是直接使用特化的构造器函数,另一种是使用工厂构造器函数。 第一种方式返回的是具体的客户端结构体指针对象,第二种方式返回的是客户端接口对象。 使用特化的构造器函数创建客户端 特化的构造器函数有下面几个: func NewHTTPClient(uri ...string) (client *HTTPClient) func NewTCPClient(uri ...string
-
客户端下载地址: windows 32位安装包 windows 64位安裝包 mac 安装包 Android App iOS App
-
问题 你想使用网络上提供的服务。 解决方案 创建一个基本的 TCP 客户机。 在 Node.js 中 net = require 'net' domain = 'localhost' port = 9001 connection = net.createConnection port, domain connection.on 'connect', () -> console.log
-
客户端调用服务端 服务端的proto文件copy到客户端 获取grpc客户端 //sample 为服务名称 var client = await provider.FindGrpcClient<RpcTest.RpcTestClient>("sample"); 调用服务方法 var result = await client.SayHelloAsync(new HelloRequest() {
-
Disque 在源码中附带了命令行客户端程序 disque , 通过这个程序可以以交互的形式向 Disque 发送命令: $ ./disque 127.0.0.1:7711> PING PONG 另外你也可以使用以下编程语言的客户端来操作 Disque : Ruby 客户端 https://rubygems.org/gems/disque Java 客户端 https://github.com/x


