
Android Tab标签的使用基础

Android程序中,Tab标签窗口是一种常用的UI界面元素。它的实现主要是利用了TabHost类。
TabHost说明
TabHost是一个标签窗口的容器。
一个TabHost对象包含两个子元素对象:
一个对象是tab标签集合(TabWidget),用户点击它们来选择一个特定的标签;
另一个是FrameLayout对象,展示当前页的内容。
子元素通常是通过容器对象来控制,而不是直接设置子元素的值。
下面结合ApiDemos中的例子来说明TabHost的用法。
第一个Tab例子:使用TabActivity
这个例子使用了 TabActivity。
Java程序代码:
package com.meng.hellotab;
import android.os.Bundle;
import android.view.LayoutInflater;
import android.widget.TabHost;
import android.app.TabActivity;
@SuppressWarnings("deprecation")
public class HelloTabActivity extends TabActivity
{
@Override
protected void onCreate(Bundle savedInstanceState)
{
super.onCreate(savedInstanceState);
// 得到TabActivity中的TabHost对象
TabHost tabHost = getTabHost();
// 内容:采用布局文件中的布局
LayoutInflater.from(this).inflate(R.layout.activity_hello_tab,
tabHost.getTabContentView(), true);
// 加上标签
// 参数设置:新增的TabSpec的标签,标签中显示的字样
// setContent设置内容对应的View资源标号
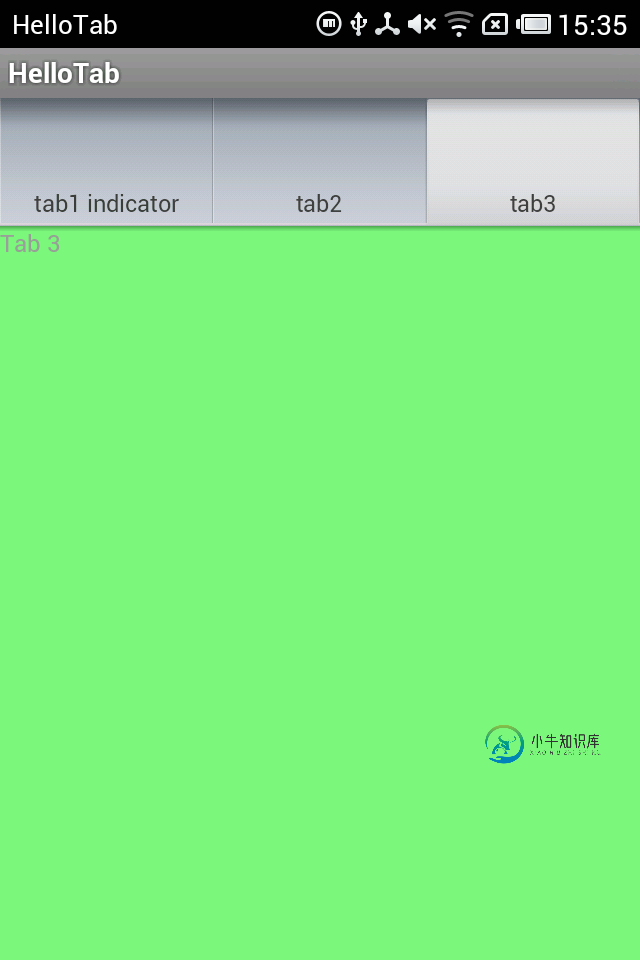
tabHost.addTab(tabHost.newTabSpec("tab1")
.setIndicator("tab1 indicator").setContent(R.id.view1));
tabHost.addTab(tabHost.newTabSpec("tab3").setIndicator("tab2")
.setContent(R.id.view2));
tabHost.addTab(tabHost.newTabSpec("tab3").setIndicator("tab3")
.setContent(R.id.view3));
}
}
其中布局文件如下:
布局文件1
布局文件1

<?xml version="1.0" encoding="utf-8"?>
<FrameLayout xmlns:android="http://schemas.android.com/apk/res/android"
  android:layout_width="match_parent"
  android:layout_height="match_parent" >

  <TextView
    android:id="@+id/view1"
    android:layout_width="match_parent"
    android:layout_height="match_parent"
    android:background="@drawable/blue"
    android:text="@string/tab1" />

  <TextView
    android:id="@+id/view2"
    android:layout_width="match_parent"
    android:layout_height="match_parent"
    android:background="@drawable/red"

    android:text="@string/tab2" />

  <TextView
    android:id="@+id/view3"
    android:layout_width="match_parent"
    android:layout_height="match_parent"
    android:background="@drawable/green"
    android:text="@string/tab3" />

</FrameLayout>
布局文件中的颜色字符串如下:文本字符串略。
colors.xml

<?xml version="1.0" encoding="utf-8"?>
<resources>

  <drawable name="red">#7f00</drawable>
  <drawable name="blue">#770000ff</drawable>
  <drawable name="green">#7700ff00</drawable>
  <drawable name="yellow">#77ffff00</drawable>
  <drawable name="screen_background_black">#ff000000</drawable>
  <drawable name="translucent_background">#e0000000</drawable>
  <drawable name="transparent_background">#00000000</drawable>

  <color name="solid_red">#f00</color>
  <color name="solid_blue">#0000ff</color>
  <color name="solid_green">#f0f0</color>
  <color name="solid_yellow">#ffffff00</color>

</resources>
运行截图:


注意 TabActivity这个类已经被标注为:This class was deprecated in API level 13。
第二个程序:使用TabHost.TabContentFactory
TabHost.TabContentFactory这个接口是用来在tab被选择时自己创建内容,而不是显示一个已经存在的view或者启动一个activity,这两种要用其他的方法。
具体实现见代码:
package com.meng.hellotab;
import android.os.Bundle;
import android.view.LayoutInflater;
import android.view.View;
import android.widget.TabHost;
import android.widget.TextView;
import android.app.TabActivity;
@SuppressWarnings("deprecation")
public class HelloTabActivity extends TabActivity implements
TabHost.TabContentFactory
{
@Override
protected void onCreate(Bundle savedInstanceState)
{
super.onCreate(savedInstanceState);
TabHost tabHost = getTabHost();
// 不再需要载入布局文件,如果此句不注释掉会导致content的重叠
// LayoutInflater.from(this).inflate(R.layout.activity_hello_tab,
// tabHost.getTabContentView(), true);
// setContent中传递this
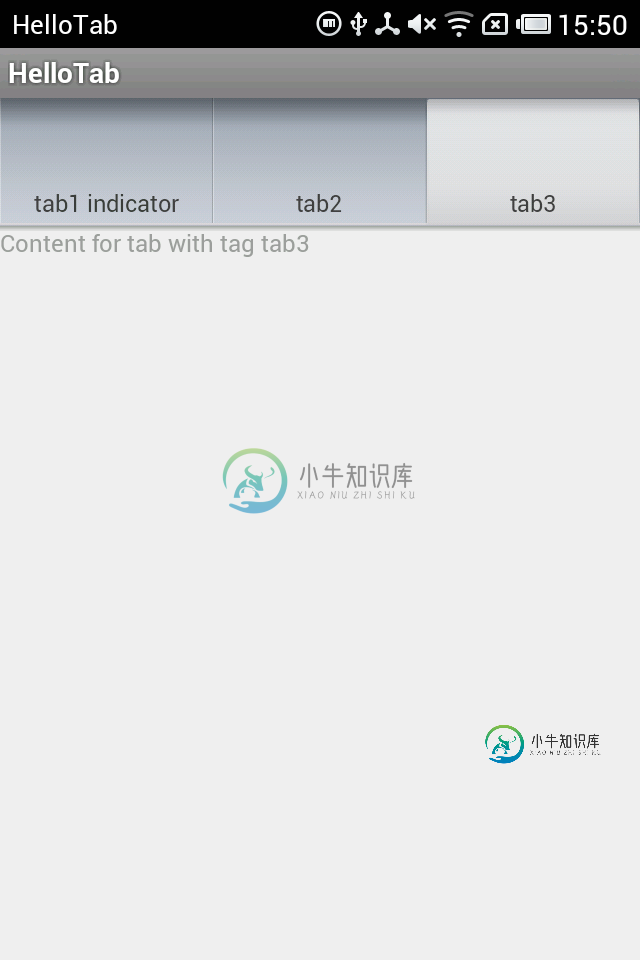
tabHost.addTab(tabHost.newTabSpec("tab1")
.setIndicator("tab1 indicator").setContent(this));
tabHost.addTab(tabHost.newTabSpec("tab3").setIndicator("tab2")
.setContent(this));
tabHost.addTab(tabHost.newTabSpec("tab3").setIndicator("tab3")
.setContent(this));
}
// setContent的参数设为this时,从这个方法得到每一个Tab的内容(此次不用布局文件,用的话会重叠)
@Override
public View createTabContent(String tag)
{
// 参数: 这个方法会接受到被选择的tag的标签
final TextView tv = new TextView(this);
tv.setText("Content for tab with tag " + tag);
return tv;
}
}
程序运行截图:
另外,Tab的content的内容还可以启动另一个Activity,只要在setContent方法中传入一个Intent即可。
此部分不再介绍,可以参见ApiDemos中的Tabs3.java代码。
第三个程序:不继承TabActivity
前面两个程序例子中都是继承了TabActivity类,如果不继承它,需要自己写TabHost的布局,其中包含了两个必要的子元素:TabWidget和FrameLayout,其id都是固定值,见代码。
布局文件代码:
<?xml version="1.0" encoding="utf-8"?>
<LinearLayout xmlns:android="http://schemas.android.com/apk/res/android"
  android:layout_width="match_parent"
  android:layout_height="match_parent"
  android:orientation="vertical" >

  <TextView
    android:layout_width="wrap_content"
    android:layout_height="wrap_content"
    android:text="@string/hello_world" />

  <!-- TabHost必须包含一个 TabWidget和一个FrameLayout -->

  <TabHost
    android:id="@+id/myTabHost"
    android:layout_width="match_parent"
    android:layout_height="match_parent" >

    <LinearLayout
      android:layout_width="fill_parent"
      android:layout_height="fill_parent"
      android:orientation="vertical" >

      <!-- TabWidget的id属性必须为 @android:id/tabs -->

      <TabWidget
        android:id="@android:id/tabs"
        android:layout_width="match_parent"
        android:layout_height="wrap_content"
        android:layout_weight="0"
        android:orientation="horizontal" />

      <!-- FrameLayout的id属性必须为 @android:id/tabcontent -->

      <FrameLayout
        android:id="@android:id/tabcontent"
        android:layout_width="match_parent"
        android:layout_height="match_parent"
        android:layout_weight="0" >

        <TextView
          android:id="@+id/view1"
          android:layout_width="match_parent"
          android:layout_height="match_parent"
          android:text="Tab1 Content" />

        <TextView
          android:id="@+id/view2"
          android:layout_width="match_parent"
          android:layout_height="match_parent"
          android:text="Tab2 Content" />

        <TextView
          android:id="@+id/view3"
          android:layout_width="match_parent"
          android:layout_height="match_parent"
          android:text="Tab3 Content" />
      </FrameLayout>
    </LinearLayout>
  </TabHost>

</LinearLayout>
Activity代码:
package com.meng.hellotabhost;

import android.os.Bundle;
import android.app.Activity;
import android.view.Menu;
import android.widget.TabHost;

public class HelloTabHostActivity extends Activity
{

  @Override
  protected void onCreate(Bundle savedInstanceState)
  {
    super.onCreate(savedInstanceState);
    setContentView(R.layout.activity_hello_tab_host);

    TabHost tabHost = (TabHost) findViewById(R.id.myTabHost);

    // 如果不是继承TabActivity,则必须在得到tabHost之后,添加标签之前调用tabHost.setup()
    tabHost.setup();

    // 这里content的设置采用了布局文件中的view
    tabHost.addTab(tabHost.newTabSpec("tab1")
        .setIndicator("tab1 indicator").setContent(R.id.view1));
    tabHost.addTab(tabHost.newTabSpec("tab3").setIndicator("tab2")
        .setContent(R.id.view2));
    tabHost.addTab(tabHost.newTabSpec("tab3").setIndicator("tab3")
        .setContent(R.id.view3));
  }

}
这种方式可以实现比较灵活的布局,可以方便地加入其他组件,还可以改变标签栏和内容栏的相对位置。
第四个程序:scrolling Tab
当标签太多时,需要把标签设置进一个ScrollView中进行滚动。有了上面的程序做基础,这个很好理解。
ApiDemos中给出的仍然是继承TabActivity的方法,在这里给出另一种不用继承TabActivity的方法,两种方法很类似。
布局文件:
<?xml version="1.0" encoding="utf-8"?>
<LinearLayout xmlns:android="http://schemas.android.com/apk/res/android"
  android:layout_width="match_parent"
  android:layout_height="match_parent"
  android:orientation="vertical" >

  <TabHost
    android:id="@+id/myTabHost"
    android:layout_width="match_parent"
    android:layout_height="match_parent" >

    <LinearLayout
      android:layout_width="match_parent"
      android:layout_height="match_parent"
      android:orientation="vertical"
      android:padding="5dp" >

      <HorizontalScrollView
        android:layout_width="match_parent"
        android:layout_height="wrap_content"
        android:scrollbars="none" >

        <TabWidget

          android:id="@android:id/tabs"
          android:layout_width="wrap_content"
          android:layout_height="wrap_content" />
      </HorizontalScrollView>

      <FrameLayout
        android:id="@android:id/tabcontent"
        android:layout_width="match_parent"
        android:layout_height="match_parent"
        android:padding="5dp" />
    </LinearLayout>
  </TabHost>

</LinearLayout>
Java代码:
package com.meng.hellotabscroll;

import android.os.Bundle;
import android.app.Activity;
import android.view.View;
import android.widget.TabHost;
import android.widget.TextView;

public class HelloTabScrollActivity extends Activity implements
    TabHost.TabContentFactory
{

  @Override
  protected void onCreate(Bundle savedInstanceState)
  {
    super.onCreate(savedInstanceState);
    setContentView(R.layout.activity_hello_tab_scroll);

    // 从布局中获取TabHost并建立
    TabHost tabHost = (TabHost) findViewById(R.id.myTabHost);
    tabHost.setup();

    // 加上30个标签
    for (int i = 1; i <= 30; i++)
    {
      String name = "Tab " + i;
      tabHost.addTab(tabHost.newTabSpec(name).setIndicator(name)
          .setContent(this));
    }

  }

  @Override
  public View createTabContent(String tag)
  {
    final TextView tv = new TextView(this);
    tv.setText("Content for tab with tag " + tag);
    return tv;
  }

}
以上就是本文的全部内容,希望对大家的学习有所帮助,也希望大家多多支持小牛知识库。
-
在本章中,您将了解各种类型的基本JSF标记。 JSF提供标准的HTML标记库。 这些标记将呈现为相应的html输出。 对于这些标记,您需要在html节点中使用以下URI名称空间。 <html xmlns = "http://www.w3.org/1999/xhtml" xmlns:h = "http://java.sun.com/jsf/html" > 以下是JSF 2.0中重
-
标题标签 任何文档都以标题开头。 您可以为标题使用不同的大小。 HTML还有六个级别的标题,使用元素《h1》, 《h2》, 《h3》, 《h4》, 《h5》,和《h6》 。 在显示任何标题时,浏览器在该标题之前添加一行,在该标题之后添加一行。 例子 (Example) <!DOCTYPE html> <html> <head> <title>Heading Example</ti
-
一、简介 本章节主要介绍PHPCMS内置模块标签,标签说明及自定义调用数据的方式 二、目录 PC标签使用说明 PC标签保留参数 功能模块 工具箱
-
标签(Tag),我们需要你!有时 Puppet 的一个类需要知道另一个类,或者至少要知道其是否已存在。 例如,一个管理防火墙的类或许需要知道一个节点是否是 web 服务器。 Puppet 的 tagged 函数会告诉你一个被命名的类或资源是否已经存在于这个节点的目录中。 你还可以对一个节点或类应用任何标签并检查这些标签是否存在。 操作步骤 为了帮你辨别你是否运行在一个指定的节点或一组节点,所有节点
-
像其他版本控制系统(VCS)一样,Git 可以给历史中的某一个提交打上标签,以示重要。 比较有代表性的是人们会使用这个功能来标记发布结点(v1.0 等等)。 在本节中,你将会学习如何列出已有的标签、如何创建新标签、以及不同类型的标签分别是什么。 列出标签 在 Git 中列出已有的标签是非常简单直观的。 只需要输入 git tag: $ git tag v0.1 v1.3 这个命令以字母顺序列出标签
-
本文向大家介绍svn 使用标签,包括了svn 使用标签的使用技巧和注意事项,需要的朋友参考一下 示例 “标签”是一种标签,可以在某个时间点应用于存储库。它们通常用于为重要的里程碑提供易于理解的名称,以便以后可以轻松访问它们(例如,“ 1.2版”)。 创建标签与创建分支完全相同: 在此特定情况下,该-r 1234参数用于指示应从主干的修订版1234创建标签。 Subversion在标签和普通分支之间