
springboot+thymeleaf 文件上传功能的实现代码

pom.xml
<dependency>
   <groupId>org.springframework.boot</groupId>
   <artifactId>spring-boot-starter-thymeleaf</artifactId>
 </dependency>
 <dependency>
   <groupId>org.springframework.boot</groupId>
   <artifactId>spring-boot-starter-web</artifactId>
 </dependency>
application.yml
spring:
 servlet:
  multipart:
   #上传文件总的最大值
   max-request-size: 10MB
   #上传文件的最大值
   max-file-size: 10MB
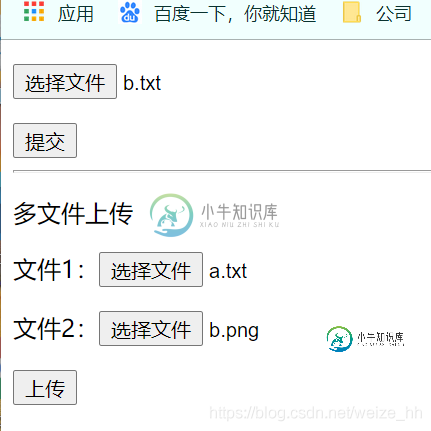
index.html 文件上传页面
<!DOCTYPE html>
<html lang="en" xmlns:th="http://www.thymeleaf.org">
<head>
  <meta charset="UTF-8">
  <title>文件上传</title>
</head>
<body>
  <p>单文件上传</p>
  <form method="post" action="/upload" enctype="multipart/form-data">
    <p><input type="file" name="file00"></p>
    <p><span th:text="${msg}"></span></p>
    <input type="submit" value="提交">
  </form>

  <hr/>
  <p>多文件上传</p>
  <form method="post" enctype="multipart/form-data" action="/batch">
    <p>文件1:<input type="file" name="file"/></p>
    <p>文件2:<input type="file" name="file"/></p>
    <p><input type="submit" value="上传"/></p>
  </form>

</body>
</html>
hello.html 上传成功的页面
<!DOCTYPE html>
<html lang="en" xmlns:th="http://www.thymeleaf.org">
<head>
  <meta charset="UTF-8">
  <title>Title</title>
</head>
<body>

  <p>单文件上传</p>
  <p th:text="${msg}"></p>
  <hr>
  <p>多文件上传</p>
  <ul>
    <li th:each="msg1:${msgList}" th:text="${msg1}"></li>
  </ul>

</body>
</html>
controller: 文件上传
import org.springframework.core.io.ResourceLoader;
import org.springframework.http.ResponseEntity;
import org.springframework.stereotype.Controller;
import org.springframework.ui.Model;
import org.springframework.util.ResourceUtils;
import org.springframework.web.bind.annotation.RequestMapping;
import org.springframework.web.bind.annotation.RequestParam;

import org.springframework.web.multipart.MultipartFile;
import org.springframework.web.multipart.MultipartRequest;

import javax.servlet.http.HttpServletRequest;
import java.io.File;
import java.io.FileNotFoundException;
import java.io.IOException;
import java.text.SimpleDateFormat;
import java.util.ArrayList;
import java.util.Date;
import java.util.List;
import java.util.UUID;


@Controller
public class FileUploadController {

  //单一文件上传
  @RequestMapping("/upload")
  public String uploadFile(@RequestParam("file00") MultipartFile file, Model model){
    String msg="";
    try {
      if(file.isEmpty()){
        model.addAttribute("msg","上传失败,请选择文件!");
        return "index";
      }
      String filename = file.getOriginalFilename();
      //String filePath = request.getServletContext().getRealPath("/upload");
      String filePath = ResourceUtils.getURL("classpath:").getPath()+"static/";

      //避免文件重复覆盖
      String uuid= UUID.randomUUID().toString().replaceAll("-", "");
      //时间戳分类文件
      String time = new SimpleDateFormat("YYYY-MM").format(new Date());

      String realPath = filePath+time+"/"+uuid+filename;
      File dest = new File(realPath);
      //检测是否存在目录,无,则创建
      if(!dest.getParentFile().exists()){
        dest.getParentFile().mkdirs();//新建文件夹 多级目录
      }

      file.transferTo(dest);//文件写入

    } catch (IOException e) {
      e.printStackTrace();
    }
    model.addAttribute("msg","文件上传成功!");
    return "hello";

  }

  //多文件上传
  @RequestMapping("/batch")
  public String uploadMoreFiles(HttpServletRequest request, Model model){
    MultipartRequest request1 = (MultipartRequest)request;
    //猜测 file为 input 类型为 file
    List<MultipartFile> fileList = request1.getFiles("file");
    List<String> msgList = new ArrayList<>();
    System.out.println(fileList.size());
    try {
      String filepath = ResourceUtils.getURL("classpath:").getPath()+"static/";
      for (int i=1;i<=fileList.size();i++){
        MultipartFile file = fileList.get(i-1);
        if (file.isEmpty()){
          msgList.add("上传第"+i+"个文件失败");
          model.addAttribute("msgList",msgList);
          continue;
        }
        String filename = file.getOriginalFilename();
        //避免文件重复覆盖
        String uuid= UUID.randomUUID().toString().replaceAll("-", "");
        //时间戳分类文件
        String time = new SimpleDateFormat("YYYY-MM").format(new Date());

        String realPath = filepath+time+"s/"+uuid+filename;
        File dest = new File(realPath);
        //System.out.println("realPath"+realPath);
        //检测是否存在目录,无,则创建
        if(!dest.getParentFile().exists()){
          dest.getParentFile().mkdirs();//新建文件夹 多级目录
        }
        msgList.add("第"+i+"个文件,上传成功!");
        file.transferTo(dest);
      }
    } catch (FileNotFoundException e) {
      e.printStackTrace();
    } catch (IOException e) {
      e.printStackTrace();
    }
    model.addAttribute("msgList",msgList);
    return "hello";
  }

}
测试:

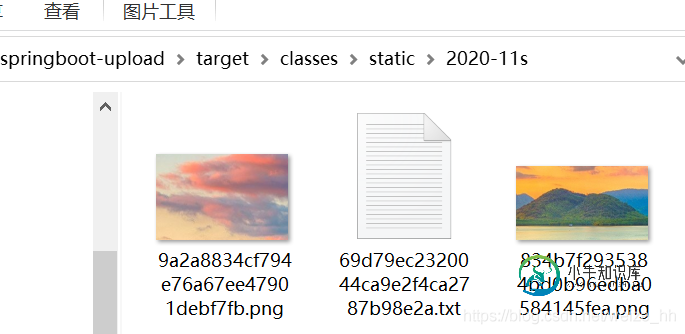
注:目前仅实现了文件的上传
计划补充:文件下载+上传的图片展示;
上传的图片展示:
遇到的问题: 直接使用 realPath 作为图片拼接地址 浏览器报 安全错误
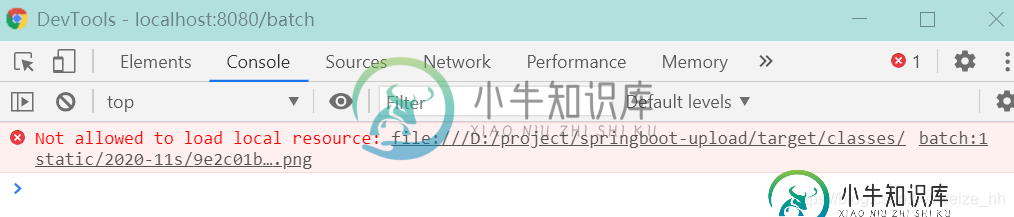
使用字符串拼接,也会报错404
index = realPath.lastIndexOf("static");
upFilePaths.add("../"+realPath.substring(index));
到此这篇关于springboot+thymeleaf 文件上传功能的实现代码的文章就介绍到这了,更多相关springboot thymeleaf 文件上传内容请搜索小牛知识库以前的文章或继续浏览下面的相关文章希望大家以后多多支持小牛知识库!
-
本文向大家介绍SpringBoot+layui实现文件上传功能,包括了SpringBoot+layui实现文件上传功能的使用技巧和注意事项,需要的朋友参考一下 什么是spring boot Spring Boot是由Pivotal团队提供的全新框架,其设计目的是用来简化新Spring应用的初始搭建以及开发过程。该框架使用了特定的方式来进行配置,从而使开发人员不再需要定义样板化的配置。用我的话来理解
-
本文向大家介绍springboot实现文件上传和下载功能,包括了springboot实现文件上传和下载功能的使用技巧和注意事项,需要的朋友参考一下 spring boot 引入”约定大于配置“的概念,实现自动配置,节约了开发人员的开发成本,并且凭借其微服务架构的方式和较少的配置,一出来就占据大片开发人员的芳心。大部分的配置从开发人员可见变成了相对透明了,要想进一步熟悉还需要关注源码。 1.文件上传
-
本文向大家介绍Spring Boot + thymeleaf 实现文件上传下载功能,包括了Spring Boot + thymeleaf 实现文件上传下载功能的使用技巧和注意事项,需要的朋友参考一下 最近同事问我有没有有关于技术的电子书,我打开电脑上的小书库,但是邮件发给他太大了,公司又禁止用文件夹共享,于是花半天时间写了个小的文件上传程序,部署在自己的Linux机器上。 提供功能: 1 .文件上
-
本文向大家介绍基于SpringBoot上传任意文件功能的实现,包括了基于SpringBoot上传任意文件功能的实现的使用技巧和注意事项,需要的朋友参考一下 一、pom文件依赖的添加 二、controller层 三、实现的service层 四、在application.properties文件上配置上传的属性 spring.http.multipart.max-file-size=128KB spr
-
本文向大家介绍SpringBoot实现文件上传下载功能小结,包括了SpringBoot实现文件上传下载功能小结的使用技巧和注意事项,需要的朋友参考一下 最近做的一个项目涉及到文件上传与下载。前端上传采用百度webUploader插件。有关该插件的使用方法还在研究中,日后整理再记录。本文主要介绍SpringBoot后台对文件上传与下载的处理。 单文件上传 如果想要修改文件路径及文件名,修改fileP
-
本文向大家介绍PHP实现文件上传功能实例代码,包括了PHP实现文件上传功能实例代码的使用技巧和注意事项,需要的朋友参考一下 点击浏览,将所选的文件上传到创建的images文件夹内 代码如下: 1.wenjian.php 2.chuli.php 以上所述是小编给大家介绍的PHP实现文件上传功能实例代码,希望对大家有所帮助,如果大家有任何疑问请给我留言,小编会及时回复大家的。在此也非常感谢大家对呐喊教