jquery实现移动端点击图片查看大图特效
本文的需求很简单:点击图片查看大图,再点大图隐藏。多用于移动端,因为移动端屏幕小,可能需要查看大图。
具体实现代码
<!DOCTYPE html>
<html>
<meta charset="utf-8"/>
<head runat="server">
<title>JQuery点击图片查看大图by starof</title>
<style type="text/css">
.exampleImg { height:100px; cursor:pointer;}
</style>
<script src="http://code.jquery.com/jquery-latest.js"></script>
<script type="text/javascript">
//alert($);
// (function (window, undefined) {
// var MyJQuery = function () {
// window.MyjQuery = window.$ = jQuery; window.$ = MyJQuery;
// };
// })(window);
// alert($);

$.fn.ImgZoomIn = function () {

bgstr = '<div id="ImgZoomInBG" style=" background:#000000; filter:Alpha(Opacity=70); opacity:0.7; position:fixed; left:0; top:0; z-index:10000; width:100%; height:100%; display:none;"><iframe src="about:blank" frameborder="5px" scrolling="yes" style="width:100%; height:100%;"></iframe></div>';
//alert($(this).attr('src'));
imgstr = '<img id="ImgZoomInImage" src="' + $(this).attr('src')+'" onclick=$(\'#ImgZoomInImage\').hide();$(\'#ImgZoomInBG\').hide(); style="cursor:pointer; display:none; position:absolute; z-index:10001;" />';
if ($('#ImgZoomInBG').length < 1) {
$('body').append(bgstr);
}
if ($('#ImgZoomInImage').length < 1) {
$('body').append(imgstr);
}
else {
$('#ImgZoomInImage').attr('src', $(this).attr('src'));
}
//alert($(window).scrollLeft());
//alert( $(window).scrollTop());
$('#ImgZoomInImage').css('left', $(window).scrollLeft() + ($(window).width() - $('#ImgZoomInImage').width()) / 2);
$('#ImgZoomInImage').css('top', $(window).scrollTop() + ($(window).height() - $('#ImgZoomInImage').height()) / 2);
$('#ImgZoomInBG').show();
$('#ImgZoomInImage').show();
};

$(document).ready(function () {
$("#imgTest").bind("click", function () {
$(this).ImgZoomIn();
});
});
</script>
</head>
<body>
<div>
<!--第一种写法-->
<img class="exampleImg" src="images/03.jpg" id="imgTest"/>
<!--第二种写法-->
<img class="exampleImg" src="images/p1_nav2.png" onClick="$(this).ImgZoomIn();"/>
</div>
</body>
</html>

jquery实现移动端点击图片查看大图特效需要用到的技巧
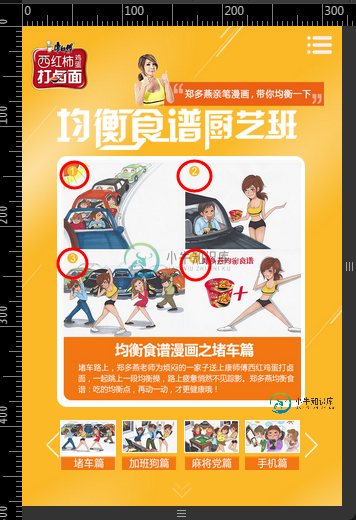
需要点击图片中1、2、3、4四张小图分别查看大图,而下面左右按钮切换时是需要同时切换4张小图。

因为移动端无法添加热点,最终一个解决方法是使用四个a标签定位到左上角,右上角,左下角,右下角四个区域。
<dl>
  <dd style="display:block;">
   <img src="images/four-duche.jpg" onClick="$(this).ImgZoomIn();">
   <a href="javascript:;" src="images/11.jpg" class="topleft" onClick="$(this).ImgZoomIn();"></a>
   <a href="javascript:;" src="images/12.jpg" class="topright" onClick="$(this).ImgZoomIn();"></a>
   <a href="javascript:;" src="images/13.jpg" class="bottomleft" onClick="$(this).ImgZoomIn();"></a>
   <a href="javascript:;" src="images/14.jpg" class="bottomright" onClick="$(this).ImgZoomIn();"></a>
 </dd>
 ...
</dl>
css
.topleft,.topright,.bottomleft,.bottomright{
 width:50%;
 height:50%;
 position:absolute;
}

.topleft{
 /*background-color:red;*/
 top:0;
 left:0;
}
.topright{
 /*background-color:green;*/
 top:0;
 right:0;
}
.bottomleft{
 /*background-color:blue;*/
 bottom:0;
 left:0;
}
.bottomright{
 /*background-color:yellow;*/
 bottom:0;
 right:0;
}
以上就是移动端点击图片查看大图的实现过程,希望对大家的学习有所帮助。
-
本文向大家介绍移动端点击图片放大特效PhotoSwipe.js插件实现,包括了移动端点击图片放大特效PhotoSwipe.js插件实现的使用技巧和注意事项,需要的朋友参考一下 PhotoSwipe插件能实现手机端点击图片全屏放大 再双击图片放大等功能 PhotoSwipe插件官方网站 http://www.photoswipe.com/ photoswipe之移动端图片放大查看,滑动切换下一张,图
-
本文向大家介绍jQuery手动点击实现图片轮播特效,包括了jQuery手动点击实现图片轮播特效的使用技巧和注意事项,需要的朋友参考一下 本文写了一个轮播图练练手,先写了一个手动点击轮播的轮播图,随后我会慢慢接着深入写自动轮播图和鼠标悬浮图片停止移动轮播图等。 下面来看看最终做的手动点击轮播效果: 一、原理说明 (1)首先是轮播图的架构,我采用了一个最外边的大div包住两个小div,一个小div
-
本文向大家介绍移动端js图片查看器,包括了移动端js图片查看器的使用技巧和注意事项,需要的朋友参考一下 本文实例为大家分享了js图片查看器插件的使用方法,制作手机使用的网页图片查看器,供大家参考,具体内容如下 这几天抽空在为项目开发一个量身的图片查看器,目前已初步完成需求。 开发场景是:在一个多文件下载展示列表中,如检测某些文件为图片时,则点击该文件时打开图片查看器展示该图片,并将列表内其它图片同
-
本文向大家介绍手机端点击图片放大特效PhotoSwipe.js插件实现,包括了手机端点击图片放大特效PhotoSwipe.js插件实现的使用技巧和注意事项,需要的朋友参考一下 PhotoSwipe插件能实现手机端点击图片全屏放大 再双击图片放大等功能 PhotoSwipe插件官方网站 http://www.photoswipe.com/ 但有一点不太好的是图片放大后再单击不能关闭浏览,要点击关闭按
-
通过 UIWebView 加载网页,然后结合 JS 代码实现点击网页中图片,让图片从最初位置动画过渡到全屏显示图片。 [Code4App.com]
-
本文向大家介绍jQuery实现简单的图片查看器,包括了jQuery实现简单的图片查看器的使用技巧和注意事项,需要的朋友参考一下 项目中自己diy了一个图片查看器。因为初始代码不是自己的,只是在上面改了一下也没有弄的很漂亮。等以后有时间了在重写一下样式和封装,作为备用的只是积累吧。如果有童鞋有用到,完全可以在此基础上改,比较容易,代码也比较简单 图片查看器主要有几个功能: 1.显示图片和图片信息(

