Android Studio设置颜色拾色器工具Color Picker教程
你可能下载过一些获取颜色值的一些小工具,
这种方式获取颜色,需要先切换窗口转跳到桌面,然后打开拾色器小工具程序,然后去拾取颜色;
你可能也知道Android Studio自带一个颜色拾色器,通过下面这种方式才能找到
这种方式获取颜色值限制性很强,需要特定的窗口,需要点击那么一小块颜色才能弹出窗口,才能使用
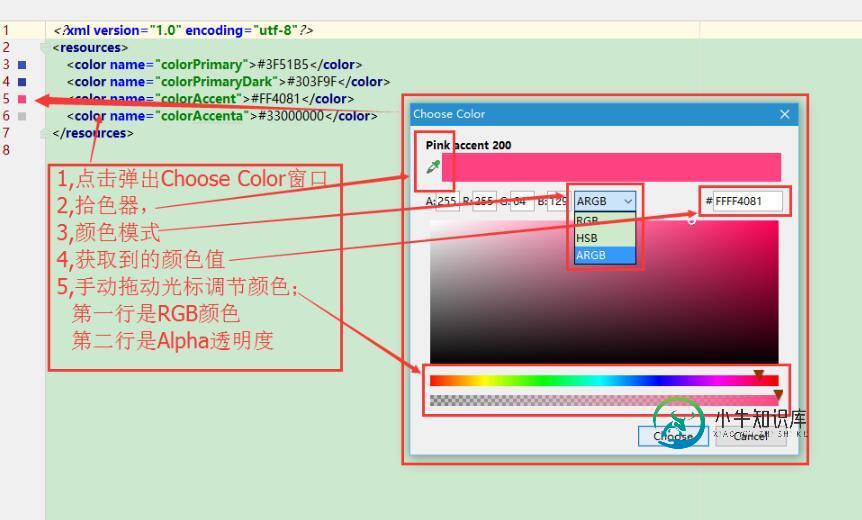
那有没有更好的方式? 答案是肯定的,不然这些个干嘛~~
不用向上面那样去打开拾色器小工具程序,不用在特定的窗口点击特定的位置弹出拾色器工具,是用我们最喜欢的快捷键的方式打开
Android Studio自带了颜色拾色器工具,但是它没有设置快捷键,也没有告诉我们, 这才是问题,
不罗嗦了,跟着下面的设置去设置快捷键吧
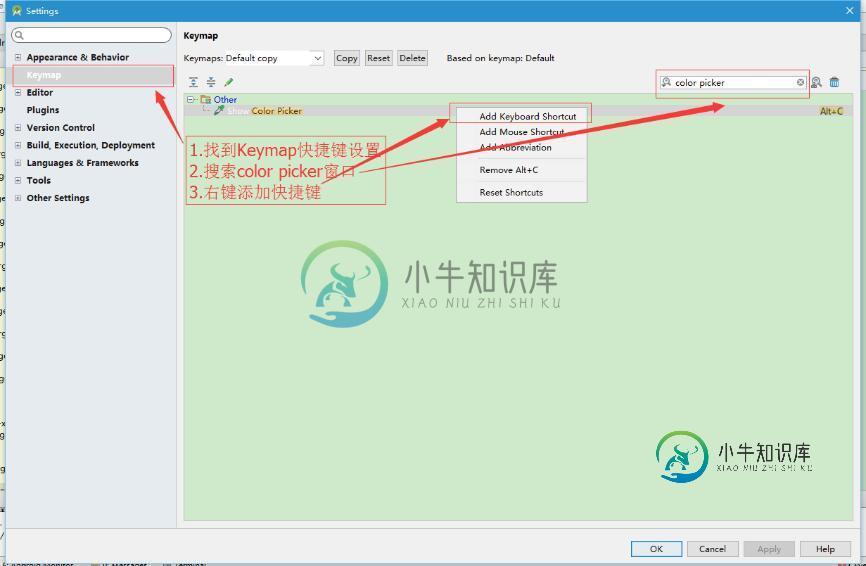
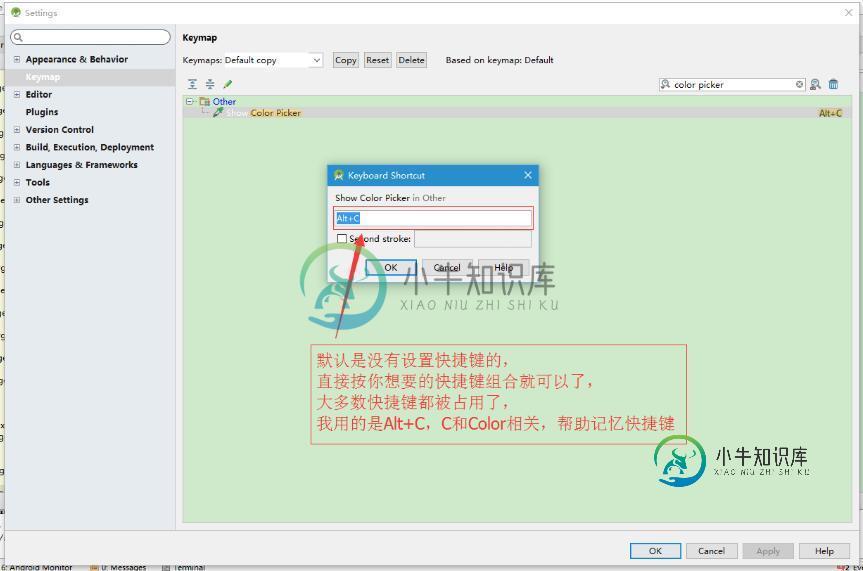
设置好之后Apply应用 + OK确认下就好了
下面就能愉快的玩耍了,Alt+C~~
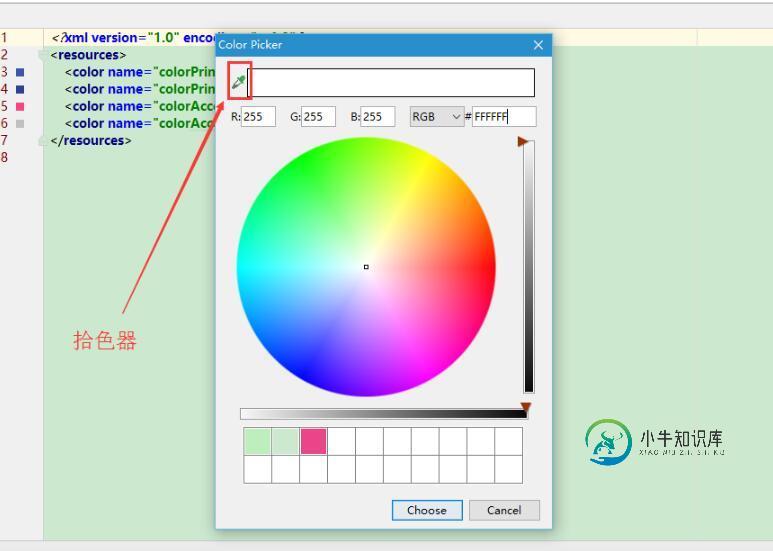
补充知识:Android 自定义一个简版的取色器ColorPicker
最近在一个项目中要用到修改颜色功能,于是搜索了一波android自定义取色器,虽然搜索结果很多,但是都不是令人十分满意(可能是用久了AndroidStudio自带取色器的原因,真的是太好用了有没有?)。
既然这么喜欢AS的调色板,何不自己撸一个?心动不如行动,马上动手!
常规操作,先上效果图,简版取色器效果如下:
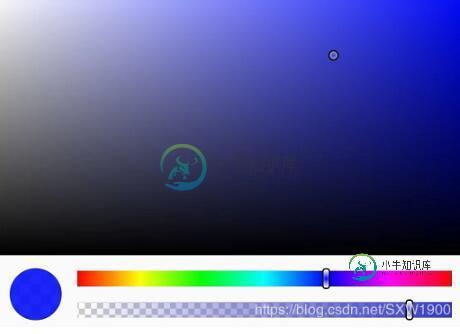
项目地址:
https://github.com/shixiuwen/colorpicker
布局单位使用的是dp,没有做其他过多适配操作,程序的源码很简单,可以直接clone下来修改成自己想要的效果或者做其他定制操作,直接使用的话,集成参考如下:
Step 1. Add the JitPack repository to your build file
//在根 build.gradle 中添加
allprojects {
 repositories {
 ...
 maven { url 'https://jitpack.io' }
 }
 }
Step 2. Add the dependency
//在模块 build.gradle 中添加
dependencies {
 //v1.0.3是版本号,博客不会经常更新,最新版本见github
   implementation 'com.github.shixiuwen:colorpicker:v1.0.3'
 }
调用示例:
// .xml文件中
<com.shixia.colorpickerview.ColorPickerView
  android:id="@+id/cpv_color"
  android:layout_width="match_parent"
  android:layout_height="wrap_content" />
// Activity中
final TextView tvTest = findViewById(R.id.tv_test);
ColorPickerView colorPicker = findViewById(R.id.cpv_color_picker);
//对控件进行回调监听,获取颜色值color
colorPicker.setOnColorChangeListener(new OnColorChangeListener() {
 @Override
 public void colorChanged(int color) {
 tvTest.setBackgroundColor(color);
 }
});
该控件的颜色变化过程是通过观察AndroidStudio取色板颜色变化规律而得到的,因为项目没有其他要求,所以目前没有提供其他公开方法可以供外部调用,有这方面需求的可以自己把库下载下来自动修改,有修改困难的可以邮件联系。另外,如果后面该库会收到几个start的话会考虑加一些其他功能,比如 布局适配、颜色初始化功能、常用颜色记录功能…… 等等。
以下是关键类代码:
package com.shixia.colorpickerview;

import android.content.Context;
import android.graphics.Color;
import android.graphics.drawable.GradientDrawable;
import android.util.AttributeSet;
import android.view.LayoutInflater;
import android.view.MotionEvent;
import android.view.View;
import android.widget.ImageView;
import android.widget.LinearLayout;
import android.widget.RelativeLayout;

public class ColorPickerView extends LinearLayout {

 private final View llColorProgress;
 private final View vColorBar;
 private final View rlTransBar;
 private final View vTransBar;
 private final RelativeLayout.LayoutParams transBarLayoutParams;
 private int red = 255, green = 0, blue = 0;
 private int index = 0;
 private ColorPreviewView cpvColorPreview;
 private View vLocation;
 private View vBgColor;
 private final RelativeLayout.LayoutParams colorBarLayoutParams;

 private int transValue = 255; //透明度
 private final ImageView vTransPreview;

 private OnColorChangeListener onColorChangeListener;
 private RelativeLayout.LayoutParams vLocationLayoutParams;

 public ColorPickerView(Context context, AttributeSet attrs) {
  super(context, attrs);
  View view = LayoutInflater.from(context).inflate(R.layout.view_color_picker, this);
  vBgColor = view.findViewById(R.id.fl_color);
  vLocation = view.findViewById(R.id.view_location);
  vLocationLayoutParams = (RelativeLayout.LayoutParams) vLocation.getLayoutParams();

  llColorProgress = findViewById(R.id.ll_color_progress);
  cpvColorPreview = view.findViewById(R.id.cpv_color_preview);
  vColorBar = view.findViewById(R.id.view_color_bar);
  colorBarLayoutParams = (RelativeLayout.LayoutParams) vColorBar.getLayoutParams();

  rlTransBar = view.findViewById(R.id.rl_trans_bar);
  vTransBar = view.findViewById(R.id.view_trans_bar);
  transBarLayoutParams = (RelativeLayout.LayoutParams) vTransBar.getLayoutParams();

  vTransPreview = view.findViewById(R.id.view_trans_preview);

  /*调整颜色*/
  llColorProgress.setOnTouchListener(new OnTouchListener() {
   @Override
   public boolean onTouch(View v, MotionEvent event) {
    int action = event.getAction();
    int width = llColorProgress.getWidth();
    switch (action) {
     case MotionEvent.ACTION_DOWN:
      break;
     case MotionEvent.ACTION_MOVE:
      break;
     case MotionEvent.ACTION_UP:
      break;
    }
    float leftMargin = event.getX();
    float x = 0;
    if (leftMargin < vColorBar.getWidth() / 2) {
     colorBarLayoutParams.leftMargin = 0;
    } else if (leftMargin > width - vColorBar.getWidth() / 2) {
     x = 100;
     colorBarLayoutParams.leftMargin = width - vColorBar.getWidth();
    } else {
     x = event.getX() / width * 100;
     colorBarLayoutParams.leftMargin = (int) (leftMargin - vColorBar.getWidth() / 2);
    }
    vColorBar.setLayoutParams(colorBarLayoutParams);
    onProgressChanged((int) x);
    return true;
   }
  });

  /*调整透明度*/
  rlTransBar.setOnTouchListener(new OnTouchListener() {
   @Override
   public boolean onTouch(View v, MotionEvent event) {
    int action = event.getAction();
    int width = rlTransBar.getWidth();
    switch (action) {
     case MotionEvent.ACTION_DOWN:
      break;
     case MotionEvent.ACTION_MOVE:
      break;
     case MotionEvent.ACTION_UP:
      break;
    }
    float leftMargin = event.getX();
    float x = 0;
    if (leftMargin < vTransBar.getWidth() / 2) {
     transBarLayoutParams.leftMargin = 0;
    } else if (leftMargin > width - vTransBar.getWidth() / 2) {
     x = 100;
     transBarLayoutParams.leftMargin = width - vTransBar.getWidth();
    } else {
     x = event.getX() / width * 100;
     transBarLayoutParams.leftMargin = (int) (leftMargin - vTransBar.getWidth() / 2);
    }
    vTransBar.setLayoutParams(transBarLayoutParams);
    changeTransparency((int) x);
    return true;
   }
  });

  /*调整颜色明暗*/
  vBgColor.setOnTouchListener(new OnTouchListener() {
   @Override
   public boolean onTouch(View v, MotionEvent event) {
    int width = vBgColor.getWidth();
    int height = vBgColor.getHeight();
    int action = event.getAction();
    int leftMargin;
    int topMargin;
    switch (action) {
     case MotionEvent.ACTION_DOWN:
      break;
     case MotionEvent.ACTION_MOVE:
      //防止越界处理
      if (event.getX() > width - vLocation.getWidth() / 2F) {
       leftMargin = width - vLocation.getWidth();
      } else if (event.getX() < vLocation.getWidth() / 2F) {
       leftMargin = 0;
      } else {
       leftMargin = (int) (event.getX() - vLocation.getWidth() / 2F);
      }
      if (event.getY() > height - vLocation.getHeight() / 2F) {
       topMargin = height - vLocation.getHeight();
      } else if (event.getY() <= vLocation.getHeight() / 2F) {
       topMargin = 0;
      } else {
       topMargin = (int) (event.getY() - vLocation.getHeight() / 2F);
      }
      vLocationLayoutParams.leftMargin = leftMargin;
      vLocationLayoutParams.topMargin = topMargin;
      vLocation.setLayoutParams(vLocationLayoutParams);
      changeColor();
      break;
     case MotionEvent.ACTION_UP:
      break;
    }
    return true;
   }
  });
 }


 /**
  * 颜色值调整
  *
  * @param progressColor
  */
 private void onProgressChanged(int progressColor) {
  red = 0;
  green = 0;
  blue = 0;
  index = (int) (progressColor / (100 / 6F));
  float v = progressColor % (100 / 6F) / (100 / 6F);
  switch (index) {
   case 0: //红<-->中--绿
    red = 255;
    green = (int) (255 * v);
    break;
   case 1://红--中<-->绿
    red = (int) (255 * (1 - v));
    green = 255;
    break;
   case 2: //绿<-->中--蓝
    green = 255;
    blue = (int) (255 * v);
    break;
   case 3://绿--中<-->蓝
    green = (int) (255 * (1 - v));
    blue = 255;
    break;
   case 4: //蓝<-->中--红
    blue = 255;
    red = (int) (255 * v);
    break;
   case 5://蓝--中<-->红
    blue = (int) (255 * (1 - v));
    red = 255;
    break;
   default:
    red = 255;
    break;
  }
  vBgColor.setBackgroundColor(Color.rgb(red, green, blue));
  changeColor();
 }

 /**
  * 颜色明暗度调整
  */
 private void changeColor() {
  int tempRed = red;
  int tempGreen = green;
  int tempBlue = blue;
  float hPercent = 1 - (vLocation.getX() / (vBgColor.getWidth() - vLocation.getWidth()));
  float vPercent = vLocation.getY() / (vBgColor.getHeight() - vLocation.getHeight());
  switch (index) {
   case 0:
    tempGreen = (int) (green + hPercent * (255 - green));
    tempBlue = (int) (blue + hPercent * (255 - blue));
    break;
   case 1:
    tempRed = (int) (red + hPercent * (255 - red));
    tempBlue = (int) (blue + hPercent * (255 - blue));
    break;
   case 2:
    tempRed = (int) (red + hPercent * (255 - red));
    tempBlue = (int) (blue + hPercent * (255 - blue));
    break;
   case 3:
    tempRed = (int) (red + hPercent * (255 - red));
    tempGreen = (int) (green + hPercent * (255 - green));
    break;
   case 4:
    tempRed = (int) (red + hPercent * (255 - red));
    tempGreen = (int) (green + hPercent * (255 - green));
    break;
   case 5:
   case 6:
    tempGreen = (int) (green + hPercent * (255 - green));
    tempBlue = (int) (blue + hPercent * (255 - blue));
    break;
  }
  tempRed = (int) (tempRed - tempRed * vPercent);
  tempGreen = (int) (tempGreen - tempGreen * vPercent);
  tempBlue = (int) (tempBlue - tempBlue * vPercent);
  int color = Color.argb(transValue, tempRed, tempGreen, tempBlue);
  cpvColorPreview.setColor(color);
  if (onColorChangeListener != null) {
   onColorChangeListener.colorChanged(color);
  }
  int[] gradientColor = {Color.argb(0, 0, 0, 0), Color.rgb(tempRed, tempGreen, tempBlue)};
  GradientDrawable drawable = new GradientDrawable(GradientDrawable.Orientation.LEFT_RIGHT, gradientColor);
  vTransPreview.setBackground(drawable);
 }

 /**
  * 改变透明度
  *
  * @param progress
  */
 private void changeTransparency(int progress) {
  transValue = (int) (progress / 100F * 255);
  int color = Color.argb(transValue, red, green, blue);
  cpvColorPreview.setColor(color);
  if (onColorChangeListener != null) {
   onColorChangeListener.colorChanged(color);
  }
 }

 @Override
 public void onWindowFocusChanged(boolean hasWindowFocus) {
  super.onWindowFocusChanged(hasWindowFocus);
  RelativeLayout.LayoutParams layoutParams = (RelativeLayout.LayoutParams) vLocation.getLayoutParams();
  layoutParams.leftMargin = vBgColor.getWidth() - vLocation.getWidth();
  vLocation.setLayoutParams(layoutParams);

  colorBarLayoutParams.leftMargin = llColorProgress.getWidth() - vColorBar.getWidth();
  vColorBar.setLayoutParams(colorBarLayoutParams);

  transBarLayoutParams.leftMargin = rlTransBar.getWidth() - vTransBar.getWidth();
  vTransBar.setLayoutParams(transBarLayoutParams);

  int[] color = {Color.argb(0, 0, 0, 0), Color.rgb(255, 0, 0)};
  GradientDrawable drawable = new GradientDrawable(GradientDrawable.Orientation.LEFT_RIGHT, color);
  vTransPreview.setBackground(drawable);
 }

 /**
  * 设置该方法,颜色改变的时候会回调颜色值
  *
  * @param onColorChangeListener
  */
 public void setOnColorChangeListener(OnColorChangeListener onColorChangeListener) {
  this.onColorChangeListener = onColorChangeListener;
 }
}
以上这篇Android Studio设置颜色拾色器工具Color Picker教程就是小编分享给大家的全部内容了,希望能给大家一个参考,也希望大家多多支持小牛知识库。
-
用于颜色选择,支持多种格式。 基础用法 使用 v-model 与 Vue 实例中的一个变量进行双向绑定,绑定的变量需要是字符串类型。 <div class="block"> <span class="demonstration">有默认值</span> <el-color-picker v-model="color1"></el-color-picker> </div> <div clas
-
ColorPicker 颜色选择器 用于颜色选择,支持多种格式。 基础用法 :::demo 通过value属性控制当前显示的颜色。 render() { const color1 = '#20a0ff'; const color2 = null; return ( <div> <div className="block"> <span classNa
-
ColorPicker 颜色选择器 用于颜色选择,支持多种格式。 基础用法 使用 v-model 与 Vue 实例中的一个变量进行双向绑定,绑定的变量需要是字符串类型。 <div class="block"> <span class="demonstration">有默认值</span> <el-color-picker v-model="color1"></el-color-picker
-
本文向大家介绍js实现拾色器插件(ColorPicker),包括了js实现拾色器插件(ColorPicker)的使用技巧和注意事项,需要的朋友参考一下 对一个前端来说,颜色选择的插件肯定不陌生,许多小伙伴对这类插件的实现可能会比较好奇,这里奉上原生js版本的拾色器。 效果图: 讲下实现方式: 1.颜色除了RGB跟十六进制的表现外,还有一个HSV的表现形式。H(hue)是色相,值域是0度到360度,
-
主要内容:创建ColorPicker,示例,自定义颜色颜色选择器控件允许用户从可用的颜色范围中选择颜色,或通过指定RGB或HSB组合设置其他颜色。JavaFX ColorPicker控件具有颜色选择器,调色板和自定义颜色对话框窗口。 创建ColorPicker 以下代码使用空构造函数创建一个颜色选择器控件,颜色选择器控件使用默认颜色,即。 还可以提供颜色常量作为当前选择的颜色。 还可以提供网络颜色值作为当前选择的颜色 示例 如下示例代码 - 自定义颜
-
自定颜色设置 对于大多数色彩管理工作流程,最好使用 Adobe Systems 已经测试过的预设颜色设置。只有在色彩管理知识很丰富并且对自己所做的更改非常有信心的时候,才建议您更改特定选项。 自定选项完成后,可以将它们保存为预设。保存颜色设置确保您可以再次使用它们并与其他用户或应用程序共享。 要将颜色设置保存为预设,请单击 “颜色设置”对话框中的“存储”。要确保应用程序在 “颜色设置”对话框中显示

