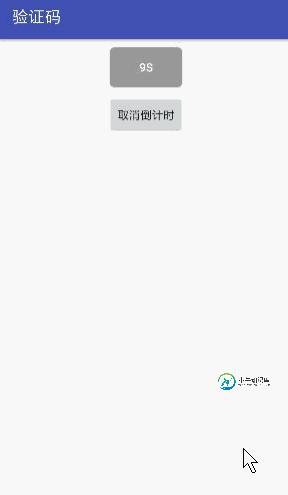
android实现验证码按钮
开发过程中会遇见很多app注册时,需要通过手机发送验证码验证 ,这是可以封装一个验证码按钮:

attrs.xml
<?xml version="1.0" encoding="utf-8"?>
<resources>
  <declare-styleable name="VerifyCodeButton">
    <!--默认背景-->
    <attr name="android:background" />
    <!--点击后背景-->
    <attr name="clickedBackground" format="reference" />
    <!--倒计时间-->
    <attr name="countdownTime" format="integer" />
    <!--倒计时间后提示文字-->
    <attr name="countdownText" format="string" />
  </declare-styleable>
</resources>
自定义Button
public class VerifyCodeButton extends Button {
  private Context mContext;
  private int mClickedBackground;//点击后背景
  private int mBackground;//当前背景
  private String mCountdownownText;
  private int mCountdownTime = 60;
  private TimeCount mTimeCount;

  public VerifyCodeButton(Context context) {
    this(context, null);
  }

  public VerifyCodeButton(Context context, AttributeSet attrs) {
    this(context, attrs, android.R.attr.buttonStyle);
  }

  public VerifyCodeButton(Context context, AttributeSet attrs, int defStyleAttr) {
    super(context, attrs, defStyleAttr);
    mContext = context;
    initAttrs(attrs);
    init();
  }

  private void initAttrs(AttributeSet attrs) {
    TypedArray typedArray = mContext.obtainStyledAttributes(attrs, R.styleable.VerifyCodeButton);
    mBackground = typedArray.getResourceId(R.styleable.VerifyCodeButton_android_background, mBackground);
    mClickedBackground = typedArray.getResourceId(R.styleable.VerifyCodeButton_clickedBackground, mClickedBackground);
    mCountdownTime = typedArray.getInt(R.styleable.VerifyCodeButton_countdownTime, mCountdownTime);
    mCountdownownText = typedArray.getString(R.styleable.VerifyCodeButton_countdownText);
    typedArray.recycle();
  }

  private void init() {
    setBackgroundResource(mBackground);
    mTimeCount = new TimeCount(mCountdownTime * 1000, 1000);
  }

  /**
   * 开始计时
   */
  public void start() {
    mTimeCount.start();
  }

  /**
   * 取消计时
   */
  public void cancle() {
    mTimeCount.cancel();
    setClickable(true);
    setText(mCountdownownText != null ? mCountdownownText : "");
    setBackgroundResource(mBackground);
  }

  class TimeCount extends CountDownTimer {

    /**
     * @param millisInFuture  总时间
     * @param countDownInterval 间隔时间
     */
    public TimeCount(long millisInFuture, long countDownInterval) {
      super(millisInFuture, countDownInterval);
    }

    /**
     * @param millisUntilFinished 当前时间
     */
    @Override
    public void onTick(long millisUntilFinished) {
      setClickable(false);
      setText(String.valueOf(millisUntilFinished / 1000 + "s"));
      setBackgroundResource(mClickedBackground);
    }

    @Override
    public void onFinish() {
      setClickable(true);
      setText(mCountdownownText != null ? mCountdownownText : "");
      setBackgroundResource(mBackground);
    }
  }
}
自定义2个drawable
<?xml version="1.0" encoding="utf-8"?>
<shape xmlns:android="http://schemas.android.com/apk/res/android"
  android:shape="rectangle">
  <corners android:radius="5dp" />
  <solid android:color="#feacc3" />
</shape>
<?xml version="1.0" encoding="utf-8"?>
<shape xmlns:android="http://schemas.android.com/apk/res/android"
  android:shape="rectangle">
  <corners android:radius="5dp" />
  <solid android:color="#999999" />
</shape>
layout.xml
<?xml version="1.0" encoding="utf-8"?>
<LinearLayout xmlns:android="http://schemas.android.com/apk/res/android"
  xmlns:app="http://schemas.android.com/apk/res-auto"
  xmlns:tools="http://schemas.android.com/tools"
  android:layout_width="match_parent"
  android:layout_height="match_parent"
  android:orientation="vertical"
  tools:context="com.sample.verify.MainActivity">

  <com.sample.verify.widget.VerifyCodeButton
    android:id="@+id/btn_verify_code"
    android:layout_width="wrap_content"
    android:layout_height="wrap_content"
    android:layout_gravity="center"
    android:layout_margin="10dp"
    android:background="@drawable/bg_btn_default"
    android:gravity="center"
    android:text="获取验证码"
    android:textColor="#ffffff"
    android:textSize="14sp"
    app:clickedBackground="@drawable/bg_btn_clicked"
    app:countdownText="重新获取"
    app:countdownTime="10" />

  <Button
    android:id="@+id/btn_cancle"
    android:layout_width="wrap_content"
    android:layout_height="wrap_content"
    android:layout_gravity="center_horizontal"
    android:text="取消倒计时" />

</LinearLayout>
Activity
package com.sample.verify;

import android.os.Bundle;
import android.support.v7.app.AppCompatActivity;
import android.view.View;
import android.widget.Button;

import com.sample.verify.widget.VerifyCodeButton;

public class MainActivity extends AppCompatActivity implements View.OnClickListener {

  private VerifyCodeButton btn_verify_code;
  private Button btn_cancle;

  @Override
  protected void onCreate(Bundle savedInstanceState) {
    super.onCreate(savedInstanceState);
    setContentView(R.layout.activity_main);
    setTitle("验证码");

    btn_verify_code = (VerifyCodeButton) findViewById(R.id.btn_verify_code);
    btn_cancle = (Button) findViewById(R.id.btn_cancle);

    btn_verify_code.setOnClickListener(this);
    btn_cancle.setOnClickListener(this);
  }

  @Override
  public void onClick(View v) {
    switch (v.getId()) {
      case R.id.btn_verify_code:
        btn_verify_code.start();
        break;
      case R.id.btn_cancle:
        btn_verify_code.cancle();
        break;
    }
  }

  @Override
  protected void onDestroy() {
    super.onDestroy();
    if (btn_verify_code != null) {
      btn_verify_code.cancle();
    }
  }
}
代码下载:android实现验证码按钮
以上就是本文的全部内容,希望对大家的学习有所帮助,也希望大家多多支持小牛知识库。
-
本文向大家介绍Android自定义View实现验证码,包括了Android自定义View实现验证码的使用技巧和注意事项,需要的朋友参考一下 本文章是基于鸿洋的Android 自定义View (一) 的一些扩展,以及对Android自定义View构造函数详解里面内容的一些转载。 首先我们定义一个declare-styleable标签declare-styleable标签的作用是给自定义控件添加自定义
-
本文向大家介绍vue实现验证码按钮倒计时功能,包括了vue实现验证码按钮倒计时功能的使用技巧和注意事项,需要的朋友参考一下 本人最近开始尝试学习vue.js。想使用vue写一个小例子,就选择做验证码按钮倒计时功能。 上网上搜了一下,也把他们的代码试了一下,自己出了很多问题。所以,需要写一篇基础入门的文章,避免后面人采坑。 这是按照网上写的HTML页面 js写成 发现浏览器一直报错Un
-
本文向大家介绍Ajax+Struts2实现验证码验证功能实例代码,包括了Ajax+Struts2实现验证码验证功能实例代码的使用技巧和注意事项,需要的朋友参考一下 众所周知,验证码在我们的生活中都是非常常见的,很多公司都在各种折腾各种各样的验证码,这里简要的用一个小案例来实现验证码的功能(ps:其实我挺讨厌验证码这个东西的)。 今天分享的是通过ajax来动态的验证验证码输入是否正确。我们这里采用的
-
本文向大家介绍JavaScript Canvas实现验证码,包括了JavaScript Canvas实现验证码的使用技巧和注意事项,需要的朋友参考一下 在通常的登录界面我们都可以看到验证码,验证码的作用是检测是不是人在操作,防止机器等非人操作,防止数据库被轻而易举的攻破。 验证码一般用PHP和java等后端语言编写。 但是在前端,用canva或者SVG也可以绘制验证码。 绘制验证码不能是简单的随机
-
本文向大家介绍javascript实现密码验证,包括了javascript实现密码验证的使用技巧和注意事项,需要的朋友参考一下 本文为大家分享了javascript密码验证的实现方法,欢迎大家阅读。 javascript密码验证代码如下 希望本文对大家学习javascript程序设计有所帮助。
-
本文向大家介绍ionic+AngularJs实现获取验证码倒计时按钮,包括了ionic+AngularJs实现获取验证码倒计时按钮的使用技巧和注意事项,需要的朋友参考一下 按钮功能为:点击“获取验证码”——按钮不可用-设置倒计时-60秒后重新获取。 主要实现原理:点击后,设置一个$interval,每一秒更改一次剩余时间,并依赖Angular数据绑定实时显示在页面中。设置一个$timeout,60

