轻松创建nodejs服务器(10):处理上传图片
本节我们将实现,用户上传图片,并将该图片在浏览器中显示出来。
这里我们要用到的外部模块是Felix Geisendörfer开发的node-formidable模块。它对解析上传的文件数据做了很好的抽象。
要安装这个外部模块,需在cmd下执行命令:
npm install formidable
如果输出类似的信息就代表安装成功了:
npm info build Success: formidable@1.0.14
安装成功后我们用request将其引入即可:
var formidable = require(“formidable”);
这里该模块做的就是将通过HTTP POST请求提交的表单,在Node.js中可以被解析。我们要做的就是创建一个新的IncomingForm,它是对提交表单的抽象表示,之后,就可以用它解析request对象,获取表单中需要的数据字段。
本文案例的图片文件存储在 /tmp文件夹中。
我们先来解决一个问题:如何才能在浏览器中显示保存在本地硬盘中的文件?
我们使用fs模块来将文件读取到服务器中。
我们来添加/showURL的请求处理程序,该处理程序直接硬编码将文件/tmp/test.png内容展示到浏览器中。当然了,首先需要将该图片保存到这个位置才行。
我们队requestHandlers.js进行一些修改:
var querystring = require("querystring"),

 fs = require("fs");

function start(response, postData) {

 console.log("Request handler 'start' was called.");

 var body = '<html>'+

    '<head>'+

    '<meta http-equiv="Content-Type" '+

    'content="text/html; charset=UTF-8" />'+

    '</head>'+

    '<body>'+

    '<form action="/upload" method="post">'+

    '<textarea name="text" rows="20" cols="60"></textarea>'+

    '<input type="submit" value="Submit text" />'+

    '</form>'+

    '</body>'+

    '</html>';

 response.writeHead(200, {"Content-Type": "text/html"});

 response.write(body);

 response.end();

}

function upload(response, postData) {

 console.log("Request handler 'upload' was called.");

 response.writeHead(200, {"Content-Type": "text/plain"});

 response.write("You've sent the text: "+ querystring.parse(postData).text);

 response.end();

}

function show(response, postData) {

 console.log("Request handler 'show' was called.");

 fs.readFile("/tmp/test.png", "binary", function(error, file) {

  if(error) {

   response.writeHead(500, {"Content-Type": "text/plain"});

   response.write(error + "\n");

   response.end();

  } else {

   response.writeHead(200, {"Content-Type": "image/png"});

   response.write(file, "binary");

   response.end();

  }

 });

}

exports.start = start;

exports.upload = upload;

exports.show = show;
我们还需要将这新的请求处理程序,添加到index.js中的路由映射表中:
var server = require("./server");

var router = require("./router");

var requestHandlers = require("./requestHandlers");

var handle = {}

handle["/"] = requestHandlers.start;

handle["/start"] = requestHandlers.start;

handle["/upload"] = requestHandlers.upload;

handle["/show"] = requestHandlers.show;

server.start(router.route, handle);
重启服务器之后,通过访问http://localhost:8888/show,就可以看到保存在/tmp/test.png的图片了。
好,最后我们要的就是:
在/start表单中添加一个文件上传元素
将node-formidable整合到我们的upload请求处理程序中,用于将上传的图片保存到/tmp/test.png
将上传的图片内嵌到/uploadURL输出的HTML中
第一项很简单。只需要在HTML表单中,添加一个multipart/form-data的编码类型,移除此前的文本区,添加一个文件上传组件,并将提交按钮的文案改为“Upload file”即可。 如下requestHandler.js所示:
var querystring = require("querystring"),

 fs = require("fs");

function start(response, postData) {

 console.log("Request handler 'start' was called.");

 var body = '<html>'+

    '<head>'+

    '<meta http-equiv="Content-Type" '+

    'content="text/html; charset=UTF-8" />'+

    '</head>'+

    '<body>'+

    '<form action="/upload" enctype="multipart/form-data" '+

    'method="post">'+

    '<input type="file" name="upload">'+

    '<input type="submit" value="Upload file" />'+

    '</form>'+

    '</body>'+

    '</html>';

 response.writeHead(200, {"Content-Type": "text/html"});

 response.write(body);

 response.end();

}

function upload(response, postData) {

 console.log("Request handler 'upload' was called.");

 response.writeHead(200, {"Content-Type": "text/plain"});

 response.write("You've sent the text: "+ querystring.parse(postData).text);

 response.end();

}

function show(response, postData) {

 console.log("Request handler 'show' was called.");

 fs.readFile("/tmp/test.png", "binary", function(error, file) {

  if(error) {

   response.writeHead(500, {"Content-Type": "text/plain"});

   response.write(error + "\n");

   response.end();

  } else {

   response.writeHead(200, {"Content-Type": "image/png"});

   response.write(file, "binary");

   response.end();

  }

 });

}

exports.start = start;

exports.upload = upload;

exports.show = show;
接下来,我们要完成第二步,我们从server.js开始 —— 移除对postData的处理以及request.setEncoding (这部分node-formidable自身会处理),转而采用将request对象传递给请求路由的方式:
var http = require("http");

var url = require("url");

function start(route, handle) {

 function onRequest(request, response) {

  var pathname = url.parse(request.url).pathname;

  console.log("Request for " + pathname + " received.");

  route(handle, pathname, response, request);

 }

 http.createServer(onRequest).listen(8888);

 console.log("Server has started.");

}

exports.start = start;
接下来修改router.js,这次要传递request对象:
function route(handle, pathname, response, request) {

 console.log("About to route a request for " + pathname);

 if (typeof handle[pathname] === 'function') {

  handle[pathname](response, request);

 } else {

  console.log("No request handler found for " + pathname);

  response.writeHead(404, {"Content-Type": "text/html"});

  response.write("404 Not found");

  response.end();

 }

}

exports.route = route;
现在,request对象就可以在我们的upload请求处理程序中使用了。node-formidable会处理将上传的文件保存到本地/tmp目录中,而我们需
要做的是确保该文件保存成/tmp/test.png。
接下来,我们把处理文件上传以及重命名的操作放到一起,如下requestHandlers.js所示:
var querystring = require("querystring"),

 fs = require("fs"),

 formidable = require("formidable");

function start(response) {

 console.log("Request handler 'start' was called.");

 var body = '<html>'+

    '<head>'+

    '<meta http-equiv="Content-Type" content="text/html; '+

    'charset=UTF-8" />'+

    '</head>'+

    '<body>'+

    '<form action="/upload" enctype="multipart/form-data" '+

    'method="post">'+

    '<input type="file" name="upload" multiple="multiple">'+

    '<input type="submit" value="Upload file" />'+

    '</form>'+

    '</body>'+

    '</html>';

 response.writeHead(200, {"Content-Type": "text/html"});

 response.write(body);

 response.end();

}

function upload(response, request) {

 console.log("Request handler 'upload' was called.");

 var form = new formidable.IncomingForm();

 console.log("about to parse");

 form.parse(request, function(error, fields, files) {

  console.log("parsing done");

  fs.renameSync(files.upload.path, "/tmp/test.png");

  response.writeHead(200, {"Content-Type": "text/html"});

  response.write("received image:<br/>");

  response.write("<img src='/show' />");

  response.end();

 });

}

function show(response) {

 console.log("Request handler 'show' was called.");

 fs.readFile("/tmp/test.png", "binary", function(error, file) {

  if(error) {

   response.writeHead(500, {"Content-Type": "text/plain"});

   response.write(error + "\n");

   response.end();

  } else {

   response.writeHead(200, {"Content-Type": "image/png"});

   response.write(file, "binary");

   response.end();

  }

 });

}

exports.start = start;

exports.upload = upload;

exports.show = show;
做到这里,我们的服务器就全部完成了。
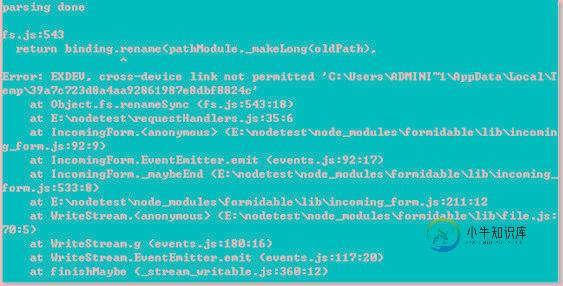
在执行图片上传的过程中,有的人可能会遇到这样的问题:

照成这个问题的原因我猜测是由于磁盘分区导致的,要解决这个问题就需要改变formidable的默认零时文件夹路径,保证和目标目录处于同一个磁盘分区。
我们找到requestHandlers.js的 upload函数,将它做一些修改:
function upload(response, request) {

 console.log("Request handler 'upload' was called.");

 var form = new formidable.IncomingForm();

 console.log("about to parse");


 form.uploadDir = "tmp";


 form.parse(request, function(error, fields, files) {

  console.log("parsing done");

  fs.renameSync(files.upload.path, "/tmp/test.png");

  response.writeHead(200, {"Content-Type": "text/html"});

  response.write("received image:<br/>");

  response.write("<img src='/show' />");

  response.end();

 });

}
我们增加了一句 form.uploadDir = “tmp”,现在重启服务器,再执行上传操作,问题完美解决。
-
本文向大家介绍轻松创建nodejs服务器(10):处理POST请求,包括了轻松创建nodejs服务器(10):处理POST请求的使用技巧和注意事项,需要的朋友参考一下 目前为止,我们做的服务器没有实际的用处,接下来我们开始实现一些实际有用的功能。 我们要做的是:用户选择一个文件,上传该文件,然后在浏览器中看到上传的文件。 首先我们需要一个文本区(textarea)供用户输入内容,然后通过POST请
-
本文向大家介绍轻松创建nodejs服务器(5):事件处理程序,包括了轻松创建nodejs服务器(5):事件处理程序的使用技巧和注意事项,需要的朋友参考一下 为了对不同请做出不同的反馈,我们引入一个事件处理器的模块。 该模块命名为 requestHandlers,我们先添加start() 和 upload()两个占位函数。 requestHandlers.js 代码如下: 在真实的应用中,请求处理程
-
本文向大家介绍轻松创建nodejs服务器(4):路由,包括了轻松创建nodejs服务器(4):路由的使用技巧和注意事项,需要的朋友参考一下 服务器需要根据不同的URL或请求来执行不一样的操作,我们可以通过路由来实现这个步骤。 第一步我们需要先解析出请求URL的路径,我们引入url模块。 我们来给onRequest()函数加上一些逻辑,用来找出浏览器请求的URL路径: 好了,pathname就是请求
-
本文向大家介绍轻松创建nodejs服务器(2):nodejs服务器的构成分析,包括了轻松创建nodejs服务器(2):nodejs服务器的构成分析的使用技巧和注意事项,需要的朋友参考一下 紧接上一节,我们来分析一下代码: 第一行请求(require)Node.js自带的 http 模块,并且把它赋值给 http 变量。 接下来我们调用http模块提供的函数: createServer 。 这个函数
-
本文向大家介绍轻松创建nodejs服务器(6):作出响应,包括了轻松创建nodejs服务器(6):作出响应的使用技巧和注意事项,需要的朋友参考一下 我们接着改造服务器,让请求处理程序能够返回一些有意义的信息。 我们来看看如何实现它: 1、让请求处理程序通过onRequest函数直接返回(return())他们要展示给用户的信息。 2、让我们从让请求处理程序返回需要在浏览器中显示的信息开始。 我们需
-
本文向大家介绍轻松创建nodejs服务器(1):一个简单nodejs服务器例子,包括了轻松创建nodejs服务器(1):一个简单nodejs服务器例子的使用技巧和注意事项,需要的朋友参考一下 我们先来实现一个简单的例子,hello world。 似乎每种语言教程的第一节都会讲这个,我们也不例外。 首先我们先创建一个项目目录,目录可自己定义,本案例的目录为 e:/nodetest/。 由于我们要搭建

