学习Android自定义Spinner适配器
本文为大家分享Android自定义Spinner适配器的相关知识点,供大家参考,具体内容如下
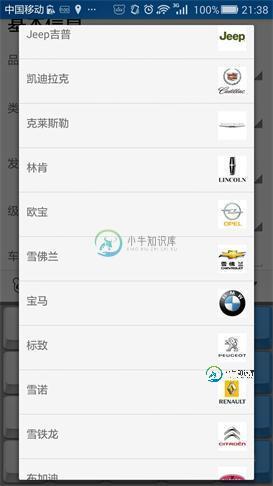
一、大致效果

二.关键代码
在注释中讲重点吧。
(1)Spinner的布局: car_brand_spinner.xml
即为弹出来的下拉列表的布局啦,后面的那个布局就不拿出来丢人现眼了,反正知道有一个Spinner的id为carBrandSpinner就可以了。
<?xml version="1.0" encoding="utf-8"?>
<LinearLayout xmlns:android="http://schemas.android.com/apk/res/android"
  android:layout_width="wrap_content" android:layout_height="wrap_content"
  android:orientation="horizontal">

  <RelativeLayout
    android:layout_width="match_parent"
    android:layout_height="match_parent"
    android:layout_margin="10dp">

    <TextView
      android:layout_width="wrap_content"
      android:layout_height="wrap_content"
      android:text="New Text"
      android:id="@+id/car_brand_name"
      android:layout_gravity="left"
      android:layout_alignParentLeft="true"
      android:layout_marginTop="5dp"
      android:layout_marginBottom="5dp" />

    <ImageView
      android:layout_width="wrap_content"
      android:layout_height="wrap_content"
      android:id="@+id/car_brand_flag"
      android:layout_gravity="right"
      android:layout_alignParentRight="true" />
  </RelativeLayout>
</LinearLayout>
(2)适配器
ArrayAdapter carBrandAdapter=new ArrayAdapter<String>
(
  AddCarActivity.this,
  android.R.layout.simple_spinner_dropdown_item,
  carBrandNameList//是String[],就是所有要显示的brandName
){
  @Override
  public View getDropDownView(int position, View convertView, ViewGroup parent) {
  convertView = View.inflate(AddCarActivity.this,R.layout.car_brand_spinner,null);//获得Spinner布局View
  if(convertView!=null)
  {
    TextView carBrandNameView = (TextView)convertView.findViewById(R.id.car_brand_name);
    ImageView carBrandFlagView = (ImageView)convertView.findViewById(R.id.car_brand_flag);
    try
    {
      JSONObject json = new JSONObject(carBrandList.get(position).get("carBrand").toString());
      carBrandNameView.setText(json.getString("carBrandName"));//设置数据,我这里的数据是从服务器读出来的,所以前面有一个转化取值的过程
      }catch (Exception e){}
      Bitmap bitmap =Common.String2Bitmap(carBrandList.get(position).get("carBrandFlagContent").toString());//这里也一样,图片数据来自于服务器,同时有一个将数据从String转Bitmap的过程
      if(bitmap!=null)
      carBrandFlagView.setImageBitmap(bitmap);//显示图片
      }
      return convertView;
      }
};
//给Spinner set适配器
Spinner carBrandSpinner=(Spinner)findViewById(R.id.carBrandSpinner);
carBrandSpinner.setAdapter(carBrandAdapter);
carBrandSpinner.setOnItemSelectedListener(new AdapterView.OnItemSelectedListener()
{
   @Override//重写Item被选择的事件
   public void onItemSelected(AdapterView<?> parent, View view, int position, long id) {}
   @Override
   public void onNothingSelected(AdapterView<?> parent) {}
});
到此结束!
以上就是关于Android Spinner适配器的全部内容,希望对大家的学习有所帮助。
-
英文原文:http://emberjs.com/guides/models/customizing-adapters/ 在Ember Data中,处理与后台数据仓库通信的逻辑是通过Adapter来完成的。Ember Data适配器内置了一些关于REST API的假定。如果后台的实现与Ember Data假定的惯例不同,那么通过扩展缺省的适配器可能很容易的实现。 有时因为一些原因需要自定义适配器,例
-
Ember.js适配器指定如何在后端数据存储中保存数据,例如URL格式和REST API标头。 默认的Ember适配器包含一些REST API的内置假设。 这些假设有助于更轻松,更好地构建Web应用程序。 可以使用以下命令创建适配器 - ember generate adapter adapter-name 运行上面的命令时,它将显示以下行 - import DS from 'ember-dat
-
主要内容:创建自定义适配器,注册自定义适配器,使用适配器Gson使用其内置适配器执行对象的序列化/反序列化。 它也支持自定义适配器。 让我们来讨论如何创建一个自定义适配器以及如何使用它。 创建自定义适配器 通过扩展类并传递目标类型的对象来创建自定义适配器。 重写读写方法分别执行自定义的反序列化和序列化。 注册自定义适配器 使用注册自定义适配器并使用创建一个Gson实例。参考以下实现代码 - 使用适配器 Gson现在将使用自定义适配器将Json文本转换为
-
问题内容: 这是我遵循的使用自定义Listview适配器的教程。我遇到的问题是,当我尝试清除适配器时,应用程序崩溃并抛出 更新的代码: 问题答案: 环顾四周,似乎是使用数组初始化适配器。请参阅带有ArrayAdapter.remove的UnsupportedOperationException和无法在ListView中修改ArrayAdapter:UnsupportedOperationExcep
-
我尝试按照幻灯片youtube 6部分教程创建一个带有自定义行的列表视图。在他的教程中,他使用了1个图像和2个文本视图,我需要3个图像和3个文本视图,当我运行应用程序时,它在尝试加载列表视图时崩溃。 -------------家庭单行.xml----------------------- - Homelistview.xml - Homeactivitylistview.java 04-22 15
-
Gson使用其内置适配器执行对象的序列化/反序列化。 它还支持自定义适配器。 我们将讨论如何创建自定义适配器以及如何使用它。 创建自定义适配器 通过扩展TypeAdapter类并将其传递给目标对象的类型来创建自定义适配器。 重写read和write方法以分别执行自定义反序列化和序列化。 class StudentAdapter extends TypeAdapter<Student> {

