MyBatis与Spring整合过程实例解析
这篇文章主要介绍了MyBatis与Spring整合过程实例解析,文中通过示例代码介绍的非常详细,对大家的学习或者工作具有一定的参考学习价值,需要的朋友可以参考下
从之前的代码中可以看出直接使用 MyBatis 框架的 SqlSession 访问数据库并不简便。MyBatis 框架的重点是 SQL 映射文件,为方便后续学习,本节讲解 MyBatis 与 Spring 的整合。教程的后续讲解中将使用整合后的框架进行演示。
导入相关JAR包
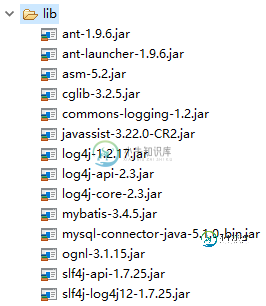
1)MyBatis 框架所需的 JAR 包

图 1MyBatis相关的JAR包
2)Spring 框架所需的 JAR 包
- aopalliance-1.0.jar
- aspectjweaver-1.6.9.jar
- spring-aop-3.2.13.RELEASE.jar
- spring-aspects-3.2.13.RELEASE.jar
- spring-beans-3.2.13.RELEASE.jar
- spring-context-3.2.13.RELEASE.jar
- spring-core-3.2.13.RELEASE.jar
- spring-expression-3.2.13.RELEASE.jar
- spring-jdbc-3.2.13.RELEASE.jar
- spring-tx-3.2.13.RELEASE.jar
3)MyBatis 与 Spring 整合的中间 JAR 包
该中间 JAR 包的版本为 mybatis-spring-1.3.1.jar,此版本可以从网址“http://mvnrepository.com/artifact/org.mybatis/mybatis-spring/1.3.1”下载。
4)数据库驱动 JAR 包
教程所使用的Mybatis数据库驱动包为 mysql-connector-java-5.1.25-bin.jar。
5)数据源所需的 JAR 包
在整合时使用的是 DBCP 数据源,需要准备 DBCP 和连接池的 JAR 包。
本教程所用版本的 DBCP 的 JAR 包为 commons-dbcp2-2.2.0.jar,可以从网址“htttp://commons.apache.org/proper/commons-dbcp/download_dbcp.cgi”下载。
最新版本的连接池的 JAR 包为 commons-pool2-2.5.0.jar,可以从网址“http://commons.apache.org/proper/commons-pool/download_pool.cgi”下载。
在Spring中配置MyBatis工厂
通过与 Spring 的整合,MyBatis 的 SessionFactory 交由 Spring 来构建,在构建时需要在 Spring 的配置文件中添加如下代码:
<!--配置数据源--> <bean id="dataSource" class="org.apache.commons.dbcp.BasicDataSource"> <property name="driverClassName" value="com.mysql.jdbc.Driver" /> <property name="url" value="jdbc:mysql://127.0.0.1:3306/springtest?seUnicode=true&characterEncoding=utf-8" /> <property name="username" value="root" /> <property name="password" value="1128" /> <!-- 最大连接数 --> <property name="maxTotal" value="30"/> <!-- 最大空闲连接数 --> <property name="maxIdle" value="10"/> <!-- 初始化连接数 --> <property name="initialSize" value="5"/> </bean> <!-- 配置SqlSessionFactoryBean --> <bean id="sqlSessionFactory" class="org.mybatis.spring.SqlSessionFactoryBean"> <!-- 引用数据源组件 --> <property name="dataSource" ref="dataSource" /> <!-- 引用MyBatis配置文件中的配置 --> <property name="configLocation" value="classpath:mybatis-config.xml" /> </bean>
使用 Spring 管理 MyBatis 的数据操作接口
使用 Spring 管理 MyBatis 数据操作接口的方式有多种,其中最常用、最简洁的一种是基于 MapperScannerConfigurer 的整合。该方式需要在 Spring 的配置文件中加入以下内容:
<!-- Mapper代理开发,使用Spring自动扫描MyBatis的接口并装配 (Sprinh将指定包中的所有被@Mapper注解标注的接口自动装配为MyBatis的映射接口) -->
<bean class="org.mybatis.spring.mapper.MapperScannerConfigurer">
<!-- mybatis-spring组件的扫描器,com.dao只需要接口(接口方法与SQL映射文件中的相同) -->
<property name="basePackage" value="com.dao" />
<property name="sqlSessionFactoryBeanName" value="sqlSessionFactory" />
</bean>
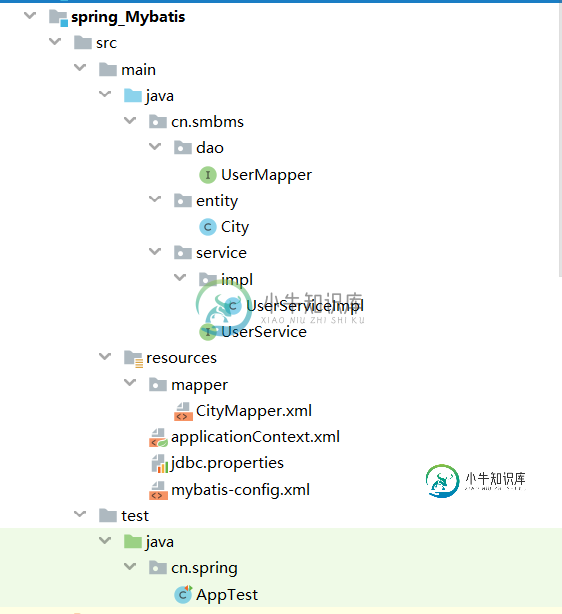
项目结构

第一步:entity层
public class City implements Serializable {

 private long cid;
 private String cname;
 private long pid;


 public long getCid() {
  return cid;
 }

 public void setCid(long cid) {
  this.cid = cid;
 }


 public String getCname() {
  return cname;
 }

 public void setCname(String cname) {
  this.cname = cname;
 }


 public long getPid() {
  return pid;
 }

 public void setPid(long pid) {
  this.pid = pid;
 }

}
第二步:Dao层
@MapperScan
public interface UserMapper {
  public City getUserList(Integer cid);
}
第三步:service层
public interface UserService {
  public City getUserList(Integer cid);
}
第四步:service实现层
@Service("userService")
public class UserServiceImpl implements UserService {
  @Resource
  private UserMapper userMapper;//声明UserMapper接口引用


  @Override
  public City getUserList(Integer cid) {

    return userMapper.getUserList(cid);
  }
}
第五步:CityMapper.xml
<?xml version="1.0" encoding="utf-8" ?>
<!DOCTYPE mapper
    PUBLIC "-//mybatis.org//DTO Mapper 3.0//EN"
    "http://mybatis.org/dtd/mybatis-3-mapper.dtd">

<mapper namespace="cn.smbms.dao.UserMapper">
  <!--查-->
  <select id="getUserList" resultType="cn.smbms.entity.City"><!--resultMap属性值指向resultMap节点的ID-->
    select * from city where cid=#{cid}
  </select>

</mapper>
第六步:applicationContext.xml
<?xml version="1.0" encoding="UTF-8"?>
<!--根节点是我们的beans节点-->
<beans xmlns="http://www.springframework.org/schema/beans"
    xmlns:xsi="http://www.w3.org/2001/XMLSchema-instance"
    xmlns:context="http://www.springframework.org/schema/context"
    xmlns:tx="http://www.springframework.org/schema/tx"
    xmlns:aop="http://www.springframework.org/schema/aop"
    xsi:schemaLocation="http://www.springframework.org/schema/beans
      http://www.springframework.org/schema/beans/spring-beans-2.5.xsd
      http://www.springframework.org/schema/context
      http://www.springframework.org/schema/context/spring-context.xsd
      http://www.springframework.org/schema/tx
      http://www.springframework.org/schema/tx/spring-tx-2.5.xsd
      http://www.springframework.org/schema/aop
      http://www.springframework.org/schema/aop/spring-aop-2.5.xsd">

  <!-- 自动扫描 -->
  <context:component-scan base-package="cn.smbms" />
  <!-- 引入配置文件 -->
  <context:property-placeholder location="classpath:jdbc.properties"/>
  <!-- 数据源配置-->
  <bean id="dataSource" class="org.springframework.jdbc.datasource.DriverManagerDataSource">
    <property name="driverClassName" value="${jdbc.driver}" />
    <property name="url" value="${jdbc.url}" />
    <property name="username" value="${jdbc.username}" />
    <property name="password" value="${jdbc.password}" />
  </bean>
  <!-- spring和MyBatis完美整合,不需要mybatis的配置映射文件 -->
  <bean id="sqlSessionFactory" class="org.mybatis.spring.SqlSessionFactoryBean">
    <property name="dataSource" ref="dataSource" />
    <!--别名-->
    <property name="typeAliasesPackage" value="cn.smbms.entity"/>
    <!-- 自动扫描mapping.xml文件,**表示迭代查找 -->
    <property name="mapperLocations" value="classpath*:mapper/*.xml" />
  </bean>

  <!-- DAO接口所在包名,Spring会自动查找其下的类 ,包下的类需要使用@MapperScan注解,否则容器注入会失败 -->
  <bean class="org.mybatis.spring.mapper.MapperScannerConfigurer">
    <property name="basePackage" value="cn.smbms.dao" />
    <property name="sqlSessionFactoryBeanName" value="sqlSessionFactory" />
  </bean>

  <!-- (事务管理)transaction manager, use JtaTransactionManager for global tx -->
  <bean id="transactionManager" class="org.springframework.jdbc.datasource.DataSourceTransactionManager">
    <property name="dataSource" ref="dataSource" />
  </bean>
</beans>
第七步:jdbc.properties
jdbc.driver=com.mysql.jdbc.Driver
jdbc.url=jdbc:mysql://localhost:3306/test?useUniCode=true&characterEncoding=utf-8
jdbc.username=root
jdbc.password=root
第八步:mybatis-config.xml
<?xml version="1.0" encoding="UTF-8"?>
<!-- xml文件的头文件,起到对文件的约束作用(例如:必须存在哪些节点) -->
<!DOCTYPE configuration
    PUBLIC "-//mybatis.org//DTD Config 3.0//EN"
    "http://mybatis.org/dtd/mybatis-3-config.dtd">
<configuration><!--核心配置-->
</configuration>
第九步:测试
@Test
  public void shouldAnswerWithTrue()
  {
    ApplicationContext ctx=new ClassPathXmlApplicationContext("applicationContext.xml");
    UserService userService = (UserService)ctx.getBean("userService");
    City userList = userService.getUserList(130000);
    System.out.println(userList.getCname());

  }
以上代码是基于注解,如果想要XML方式,下面就是,谢谢根据上面的进行修改:修改applicationContext.xml
<?xml version="1.0" encoding="UTF-8"?>
<!--根节点是我们的beans节点-->
<beans xmlns="http://www.springframework.org/schema/beans"
    xmlns:xsi="http://www.w3.org/2001/XMLSchema-instance"
    xmlns:context="http://www.springframework.org/schema/context"
    xmlns:tx="http://www.springframework.org/schema/tx"
    xmlns:aop="http://www.springframework.org/schema/aop"
    xsi:schemaLocation="http://www.springframework.org/schema/beans
      http://www.springframework.org/schema/beans/spring-beans-2.5.xsd
      http://www.springframework.org/schema/context
      http://www.springframework.org/schema/context/spring-context.xsd
      http://www.springframework.org/schema/tx
      http://www.springframework.org/schema/tx/spring-tx-2.5.xsd
      http://www.springframework.org/schema/aop
      http://www.springframework.org/schema/aop/spring-aop-2.5.xsd">

  <!-- 自动扫描 -->
  <context:component-scan base-package="cn.smbms" />
  <!-- 引入配置文件 -->
  <context:property-placeholder location="classpath:jdbc.properties"/>
  <!-- 数据源配置-->
  <bean id="dataSource" class="org.springframework.jdbc.datasource.DriverManagerDataSource">
    <property name="driverClassName" value="${jdbc.driver}" />
    <property name="url" value="${jdbc.url}" />
    <property name="username" value="${jdbc.username}" />
    <property name="password" value="${jdbc.password}" />
  </bean>
  <!-- spring和MyBatis完美整合,不需要mybatis的配置映射文件 -->
  <bean id="sqlSessionFactory" class="org.mybatis.spring.SqlSessionFactoryBean">
    <property name="dataSource" ref="dataSource" />
    <!--别名-->
    <property name="typeAliasesPackage" value="cn.smbms.entity"/>
    <!-- 自动扫描mapping.xml文件,**表示迭代查找 -->
    <property name="mapperLocations" value="classpath*:mapper/*.xml" />
  </bean>

  <!-- DAO接口所在包名,Spring会自动查找其下的类 ,包下的类需要使用@MapperScan注解,否则容器注入会失败 -->
  <bean class="org.mybatis.spring.mapper.MapperScannerConfigurer">
    <property name="basePackage" value="cn.smbms.dao" />
    <property name="sqlSessionFactoryBeanName" value="sqlSessionFactory" />
  </bean>

  <bean id="userService" class="org.mybatis.spring.mapper.MapperFactoryBean">
    <property name="mapperInterface" value="cn.smbms.dao.UserMapper"/>
    <property name="sqlSessionFactory" ref="sqlSessionFactory"/>
  </bean>
 <!-- Service层-->
  <bean id="iBankService" class="cn.smbms.service.impl.UserServiceImpl">
    <property name="UserMapper" ref="userService"/>
  </bean>-->

  <!-- (事务管理)transaction manager, use JtaTransactionManager for global tx -->
  <bean id="transactionManager" class="org.springframework.jdbc.datasource.DataSourceTransactionManager">
    <property name="dataSource" ref="dataSource" />
  </bean>
</beans>
修改Dao层
public interface UserMapper {
  public City getUserList(Integer cid);
}
修改Service实现类
public class UserServiceImpl implements UserService {


  public UserMapper getUserMapper() {
    return userMapper;
  }

  public void setUserMapper(UserMapper userMapper) {
    this.userMapper = userMapper;
  }

  private UserMapper userMapper;//声明UserMapper接口引用


  @Override
  public City getUserList(Integer cid) {

    return userMapper.getUserList(cid);
  }
}
以上都是对Spring和Mybatis进行整合,希望对你有一些帮助,谢谢
以上就是本文的全部内容,希望对大家的学习有所帮助,也希望大家多多支持小牛知识库。
-
本文向大家介绍JavaMail与Spring整合过程解析,包括了JavaMail与Spring整合过程解析的使用技巧和注意事项,需要的朋友参考一下 这篇文章主要介绍了JavaMail与Spring整合过程解析,文中通过示例代码介绍的非常详细,对大家的学习或者工作具有一定的参考学习价值,需要的朋友可以参考下 简介 javaMail与spring整合完成后,可大大加大邮件发送效率。当服务器一启动,配置
-
本文向大家介绍springboot与mybatis整合实例详解(完美融合),包括了springboot与mybatis整合实例详解(完美融合)的使用技巧和注意事项,需要的朋友参考一下 简介 从 Spring Boot 项目名称中的 Boot 可以看出来,Spring Boot 的作用在于创建和启动新的基于 Spring 框架的项目。它的目的是帮助开发人员很容易的创建出独立运行和产品级别的基于 Sp
-
本文向大家介绍浅析mybatis和spring整合的实现过程,包括了浅析mybatis和spring整合的实现过程的使用技巧和注意事项,需要的朋友参考一下 根据官方的说法,在ibatis3,也就是Mybatis3问世之前,Spring3的开发工作就已经完成了,所以Spring3中还是没有对Mybatis3的支持。因此由Mybatis社区自己开发了一个Mybatis-Spring用来满足Mybati
-
本文向大家介绍SpringBoot整合Junit实例过程解析,包括了SpringBoot整合Junit实例过程解析的使用技巧和注意事项,需要的朋友参考一下 这篇文章主要介绍了SpringBoot整合Junit实例过程解析,文中通过示例代码介绍的非常详细,对大家的学习或者工作具有一定的参考学习价值,需要的朋友可以参考下 前提条件:SpringBoot已经整合了Mybatis,至于SpringBoot
-
本文向大家介绍Spring Boot 整合mybatis 与 swagger2,包括了Spring Boot 整合mybatis 与 swagger2的使用技巧和注意事项,需要的朋友参考一下 之前使用springMVC+spring+mybatis,总是被一些繁琐的xml配置,有时候如果配置出错,还要检查各种xml配置,偶然接触到了spring boot 后发现搭建一个web项目真的是1分钟的事情
-
本文向大家介绍Spring Boot整合mybatis(一)实例代码,包括了Spring Boot整合mybatis(一)实例代码的使用技巧和注意事项,需要的朋友参考一下 sprig-boot是一个微服务架构,加快了spring工程快速开发,以及简便了配置。接下来开始spring-boot与mybatis的整合。 1、创建一个maven工程命名为spring-boot-entity,pom.xml

