
在CentOS 7上安装Docker环境的方法与注意事项

官网文档:https://docs.docker.com/engine/installation/linux/centos/ ,本文大部分是照搬官方文档写的,如果你英文还不错,那么就直接移步官方文档吧,如果你英文实在是不行,那就勉强看一下本人这生涩的翻译~
以下操作均在roothtml" target="_blank">用户下完成
docker的安装要求64位系统且内核版本大于3.10。所以如果是centos的话,必须安装CentOS7.0或以上版本。
我们这里使用的是CentOS7.2 mininul。
uname -r
3.10.0-327.28.3.el7.x86_64
安装docker前执行一下全系统的软件版本升级:
yum -y update
1.配置yum软件库
为保证安装的成功,首先使用yum update更新Yum包,表示我的好多yum包都需要更新,1500+的包,如果你像我一样好久没有更新过,那就耐心等候吧。
然后在yum软件库中新增docker的配置:
# tee /etc/yum.repos.d/docker.repo <<-'EOF'
[dockerrepo]
name=Docker Repository
baseurl=https://yum.dockerproject.org/repo/main/centos/7/
enabled=1
gpgcheck=1
gpgkey=https://yum.dockerproject.org/gpg
EOF
2.安装Docker
有了yum软件库的配置之后,安装也变得异常的简单,只需要以下一句即可:
# yum install docker-engine
3.启动Docker
一切就绪之后,使用start命令来启动Docker守护进程:
# service docker start
4.输出hello-world
程序员貌似跟hello-world有仇,有事儿没事就打印人家一下,玩docker咱们当前也不例外,先来个hello-world吧,这里的基本原理是利用人家已经写好的hello-world镜像,下载到本地,然后把他运行起来~
使用以下命令:
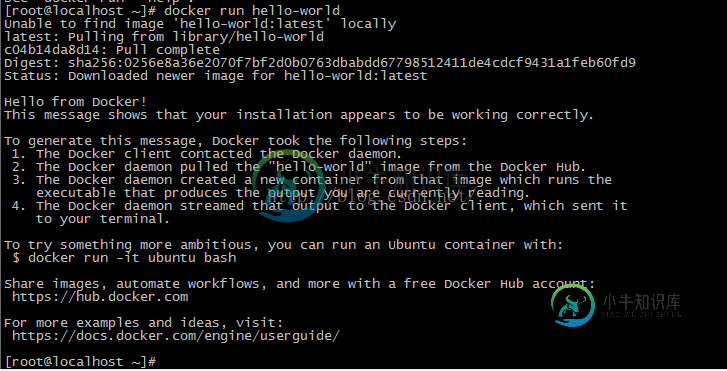
# docker run hello-world
然后控制端会输出类似于如下的信息,就证明我们的docker环境安装成功了~
在这里,我第一次失败了~显示:
Unable to find image 'hello-world:latest' locally
docker: Error response from daemon: Get https://registry-1.docker.io/v2/library/hello-world/manifests/latest: Get https://auth.docker.io/token?scope=repository%3Alibrary%2Fhello-world%3Apull&service=registry.docker.io: net/http: TLS handshake timeout.
See 'docker run --help'.
然后我又来了一次就好了,应该是墙的原因吧,看着是网络访问失败了~
Unable to find image 'hello-world:latest' locally
latest: Pulling from library/hello-world
c04b14da8d14: Pull complete
Digest: sha256:0256e8a36e2070f7bf2d0b0763dbabdd67798512411de4cdcf9431a1feb60fd9
Status: Downloaded newer image for hello-world:latest

Hello from Docker!
This message shows that your installation appears to be working correctly.

To generate this message, Docker took the following steps:
 1. The Docker client contacted the Docker daemon.
 2. The Docker daemon pulled the "hello-world" image from the Docker Hub.
 3. The Docker daemon created a new container from that image which runs the
  executable that produces the output you are currently reading.
 4. The Docker daemon streamed that output to the Docker client, which sent it
  to your terminal.

To try something more ambitious, you can run an Ubuntu container with:
 $ docker run -it ubuntu bash

Share images, automate workflows, and more with a free Docker Hub account:
 https://hub.docker.com

For more examples and ideas, visit:
 https://docs.docker.com/engine/userguide/
设置为自启动:
chkconfig docker on
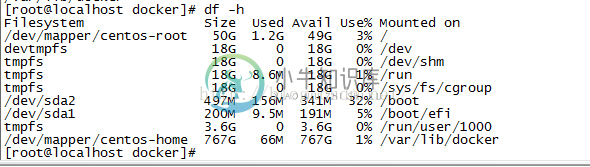
调整docker数据目录:
把一个独立的数据分区设置为docker数据目录,需手工把docker原目录的数据都移到新的存储分区上去,然后以新的存储分区挂载到/var/lib/docker目录下。
service docker stop
拷数据及挂分区:
service docker start
4、创建一个专用的docker group
docker是需要使用root权限运行的,但仍然可以通过创建一个专用的用户组的方式,让一个具备sudo权限的普通用户管理docker服务。
# groupadd docker

# usermod -aG docker bjxtb
退出当前会话,重新登录后使用bjxtb直接管理docker:
$ docker run hello-world
运行一个 Docker 容器:
[root@localhost ~]# docker run -i -t centos /bin/bash
[root@dbf66395436d /]#
我们可以看到,CentOS 容器已经被启动,并且我们得到了 bash 提示符。在 docker 命令中我们使用了 “-i 捕获标准输入输出”和 “-t 分配一个终端或控制台”选项。若要断开与容器的连接,输入 exit。
[root@cd05639b3f5c /]# cat /etc/RedHat-release
CentOSLinux release 7.0.1406(Core)
[root@cd05639b3f5c /]#exit
exit
[root@localhost ~]#
我们还可以搜索基于 Fedora 和 Ubuntu 操作系统的容器。
[root@localhost ~]# docker search ubuntu
[root@localhost ~]# docker search fedora
显示当前正在运行容器的列表

-
本文向大家介绍CentOS7环境下源码安装MySQL5.7的方法,包括了CentOS7环境下源码安装MySQL5.7的方法的使用技巧和注意事项,需要的朋友参考一下 本文实例讲述了CentOS7环境下源码安装MySQL5.7的方法。分享给大家供大家参考,具体如下: 安装依赖包 下载相应源码包 添加mysql用户 解压源码包 编译mysql 编译安装 配置启动 添加可执行权限 配置mysql的配置/e
-
本文向大家介绍windows docker环境设置注意事项,包括了windows docker环境设置注意事项的使用技巧和注意事项,需要的朋友参考一下 windows docker环境设置 1、下载docker-install.exe安装VirtualBox、Git、Boot2Docker for Windows 2、设置环境变量,启动boot2docker Core Linux。 可以直接在Vi
-
本文向大家介绍MongoDB Windows安装服务方法与注意事项,包括了MongoDB Windows安装服务方法与注意事项的使用技巧和注意事项,需要的朋友参考一下 MongoDB Windows安装服务 MongoDB作为一个基于分布式文件存储的数据库,近两年大受追捧。数据灵活的存取方式和高效的处理使得它广泛用于互联网应用。 最近本人开始在Windows 32位平台下研究MongoDB的使用,
-
本文向大家介绍centos7环境下二进制安装包安装 mysql5.6的方法详解,包括了centos7环境下二进制安装包安装 mysql5.6的方法详解的使用技巧和注意事项,需要的朋友参考一下 本文实例讲述了centos7环境下二进制安装包安装 mysql5.6的方法。分享给大家供大家参考,具体如下: centos7 二进制安装包安装 mysql5.6 一、下载mysql5.6二进制安装包 http
-
系统环境需求及注意事项: DedeCMS 居于PHP和MySQL技术开发,可同时使用于Windows、Linux、Unix平台,环境需求如下: 1、Windows 平台: IIS/Apache + PHP4/PHP5 + MySQL4/5 如果在windows环境中使用,建议用DedeCMS提供的DedeAMPZ套件以达到最佳使用性能。 2、Linux/Unix 平台 Apache + PHP4/
-
本文向大家介绍Windows平台下MySQL安装与配置方法与注意事项,包括了Windows平台下MySQL安装与配置方法与注意事项的使用技巧和注意事项,需要的朋友参考一下 2.1、msi安装包 2.1.1、安装 特别要注意的是,安装前要删除原来的my.ini和原来的data目录,改名也行,不然在最后一步会“apply security settings”报个1045错误,原因1,防火墙,原因2,数