Bootstrap Table使用方法解析
bootstrap table是一个非常不错的,基于bootstrap的插件,它扩展和丰富了bootstrap表格的操作,如格式化表格,表格选择器,表格工具栏,分页等等。
最近基于bootstrap开发一个开台发布系统,就开发过程中,使用bootstap table遇到的一些问题及收获记录如下:
开始使用:
需要在你自己的页面中引入以下样式及脚本:
<link rel="stylesheet" href="bootstrap.min.css">
<link rel="stylesheet" href="bootstrap-table.css">

<script src="jquery.min.js"></script>
<script src="bootstrap.min.js"></script>
<script src="bootstrap-table.js"></script>
https://github.com/wenzhixin/bootstrap-table/
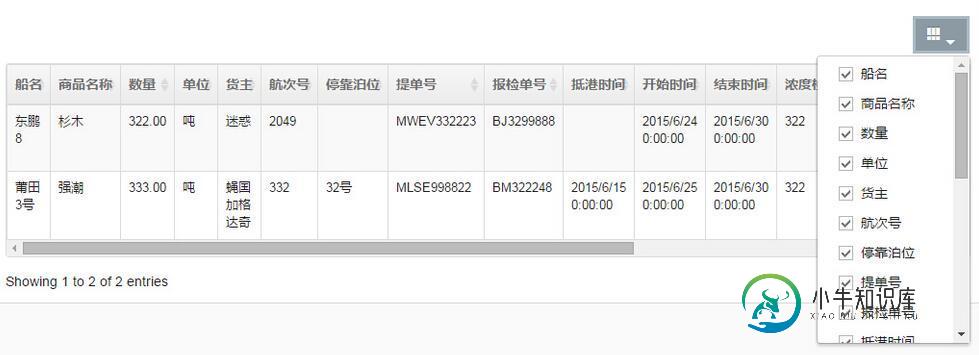
一、Bootstrap table 支持超多列,会自动显示水平滚动条。
我们用bootstrap开发,经常会遇到一个头疼的问题,如果客户要求表格中显示的列较多,无论我们用bootstrap的哪种布局方式,显示效果都不尽人意。Bootstap table很好的协处理了这个问题,使我们能够在不改变原有的布局方式的情况下,很好的处理超多列的问题,而且支持自定义显示列名,效果如下:

使用方式很简单,在一个普通的表格中设置data-toggle="table",就可以在不写JavaScript的情况下启用Bootstrap Table。当然还可以通过脚本的方式触发:
$('#table').bootstrapTable({
 url: 'data.json'
});。
是不是很好使呢,只在我们指定的表格中会带入Bootstrap Table的样式,其它未指定的,不会受影响。
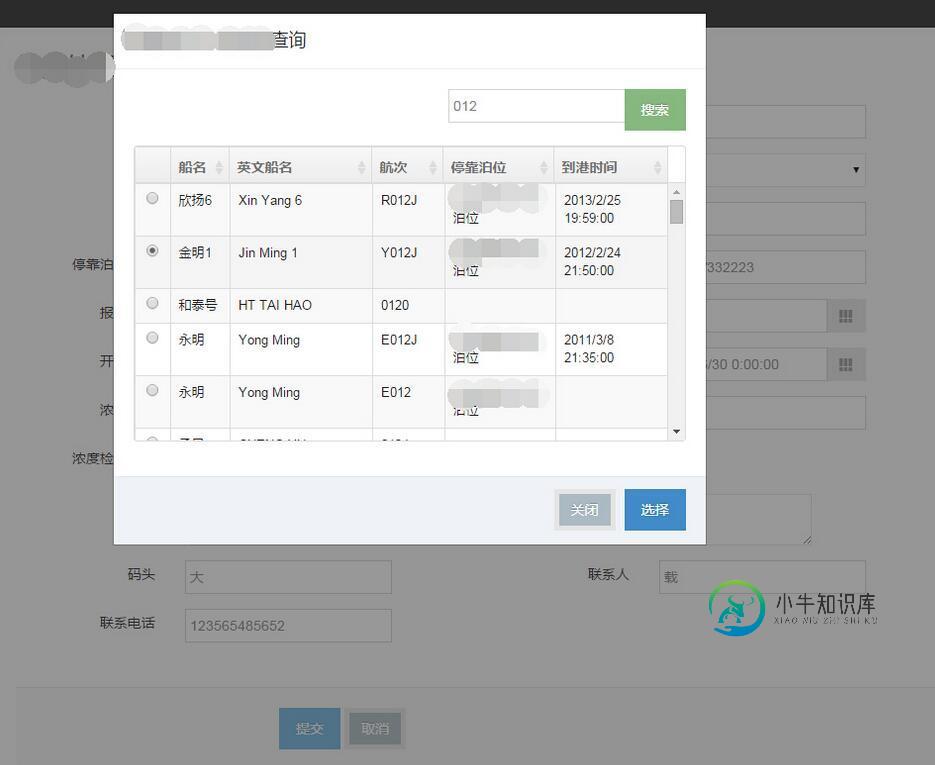
二、结合Bootstrap Modal作弹出表格子页面,并获取当前选中的数据后更新到父页面中:

功能说明:
用户点父页面中的某一输入框,系统会弹出一个查询界面,供用户检索选择相关的数据。
页面布局思路:
首先创建一个Modal分部视图:
<!-- Modal -->
<div class="modal fade" role="dialog" aria-labelledby="gridSystemModalLabel" id="gridSystemModal">
<div class="modal-dialog" role="document">
<div class="modal-content">
<div class="modal-header">
<button type="button" class="close" data-dismiss="modal" aria-label="Close"><span aria-hidden="true">×</span></button>
<h4 class="modal-title" id="gridSystemModalLabel">xxxx查询</h4>
</div>
<div class="modal-body">
<div class="container-fluid" id="fjShipChkList">
@Html.Partial("Modal/FjShipChkList")
</div>
</div>
<div class="modal-footer">
<button type="button" class="btn btn-default" data-dismiss="modal">关闭</button>
<button type="button" class="btn btn-primary">选择</button>
</div>
</div><!-- /.modal-content -->
</div><!-- /.modal-dialog -->
</div><!-- /.modal -->
以及我们要显示业务数据的列表分部视图,并被Modal分部视图调用:
<div class="row table-toolbar">
 <div class="col-md-12">
 <div class="pull-right form-inline">
 <div class="form-group">
 <div class="input-group input-medium">
  <input type="text" class="form-control input-search" placeholder="航次" id="fjShipChkList-keyword" name="keyword" value="" />
  <span class="input-group-btn">
  <button class="btn btn-success btn-search" type="button" id="modal-search">搜索</button>
  </span>
 </div>
 </div>
 </div>
 </div>
</div>

 <table class="table table-striped table-bordered table-hover js-table" data-toggle="table"
 data-url="data1.json" data-height="299" data-click-to-select="true"
 data-select-item-name="radioName" id="table-ShipChk">
 <thead>
 <tr>
 <th data-field="state" data-radio="true"></th>
 <th class="sorting" aria-column="SHIP_NM">船名</th>
 <th class="sorting" aria-column="SHIP_NM_EN">英文船名</th>
 <th class="sorting" aria-column="VOY_ID">航次</th>
 <th class="sorting" aria-column="DOCK_BTH_NM">停靠泊位</th>
 <th class="sorting" aria-column="ARR_DT">到港时间</th>
 </tr>
 </thead>
 <tbody id="body-fjShipChkList">
 @if (Model.GetType() != typeof (QUARANTINE_HANDLE_RESULT))
 {
 int i = 0;
 foreach (VOYAGE_DYNM item in Model.PageList)
 {
 <tr class="odd gradeX">
  <td class="bs-checkbox"><input data-index="@(i++)" name="radioName" type="radio"></td>
  <td>
  @Html.DisplayFor(it => item.SHIP_NM)
  </td>
  <td>
  @Html.DisplayFor(it => item.SHIP_NM_EN)
  </td>
  <td>
  @Html.DisplayFor(it => item.VOY_ID)
  </td>
  <td>
  @Html.DisplayFor(it => item.DOCK_BTH_NM)
  </td>
  <td>
  @Html.DisplayFor(it => item.ARR_DT)
  </td>
 </tr>
 }
 }
 </tbody>
 </table>
在父页面中调用Modal分部视图:
@Html.Partial("Modal/CustomModal")
引入Modal分部视图的位置最好是与父页面中的顶层元素为兄弟节点,避免Modal调用失败。
需要在启动Modal 弹出层的元素上加上:data-toggle="modal" data-target="#gridSystemModal"就可以启动Modal了。点探索时,用ajax从后台取数据,并返回一个分部视图,返回成功后直接替换原有的业务数据分部视图。
好了,说了这么多都和我们的主角没多大关系,现在言归正传,搬出我们的主角。现在Modal登场了,我们会想,怎么让这个弹出页面和我们的父页面交互数据呢?我采用的方式是Bootstrap Table,原因很简单:Bootstrap Table天生就是用来处理bootstrap table的,功能强悍,使用简单。
首先,在我们的业务数据分部视图中,
<table class="table table-striped table-bordered table-hover js-table" data-toggle="table"
 data-url="data1.json" data-height="299" data-click-to-select="true"
 data-select-item-name="radioName" id="table-ShipChk">
 <thead>
 <tr>
 <th data-field="state" data-radio="true"></th>
 <th class="sorting" aria-column="SHIP_NM">船名</th>
 <th class="sorting" aria-column="SHIP_NM_EN">英文船名</th>
 <th class="sorting" aria-column="VOY_ID">航次</th>
 <th class="sorting" aria-column="DOCK_BTH_NM">停靠泊位</th>
 <th class="sorting" aria-column="ARR_DT">到港时间</th>
 </tr>
 </thead>
 <tbody id="body-fjShipChkList">
 @if (Model.GetType() != typeof (QUARANTINE_HANDLE_RESULT))
 {
 int i = 0;
 foreach (VOYAGE_DYNM item in Model.PageList)
 {
 <tr class="odd gradeX">
  <td class="bs-checkbox"><input data-index="@(i++)" name="radioName" type="radio"></td>
  <td>
  @Html.DisplayFor(it => item.SHIP_NM)
  </td>
  <td>
  @Html.DisplayFor(it => item.SHIP_NM_EN)
  </td>
  <td>
  @Html.DisplayFor(it => item.VOY_ID)
  </td>
  <td>
  @Html.DisplayFor(it => item.DOCK_BTH_NM)
  </td>
  <td>
  @Html.DisplayFor(it => item.ARR_DT)
  </td>
 </tr>
 }
 }
 </tbody>
 </table>
加入了:data-url="data1.json" data-height="299" data-click-to-select="true" data-select-item-name="radioName",其中data-select-item-name指明我们的表格是radio方式的,只能选择其中某一行(当然也可以支持多行选择)。然后再按官方文档,上个小菜,一切即将搞定,是该收拾下班了:
$("#gridSystemModal .btn-primary").click(function () {
 var selectRow = $("#table-ShipChk").bootstrapTable('getSelections');

 if (selectRow.length < 1) {
 selectRow = $table.bootstrapTable('getSelections');
 if (selectRow.length < 1){
 alert("请先选择船舶!");
 return;
 }
 }
 $("#SHIP_NAME").val(selectRow[0][1].trim());
 $("#VOYAGE_NO").val(selectRow[0][3].trim());
 $("#SHIP_NM_EN").val(selectRow[0][2].trim());
 $("#DOCK_BTH_NM").val(selectRow[0][4].trim());
 $("#ARR_DT").val(selectRow[0][5].trim());
 $("#gridSystemModal").modal('hide');
 });
But,意外发生了,就算我把那个选择按钮点破了,也选不中我要的数据。Why???为什么,为什么。查官方文档,就是一名$("#table-ShipChk").bootstrapTable('getSelections')搞定的事,为什么在我这就搞不定了,度娘,GG一无所获。用Bootstrap Table的初衷,就是它简单,强大呀,怎么会这样呢,好吧,加班,查查查。。
问题就出在,每次ajax请求数据后,我都是返回一个新的分部视图去替换原有的分部视图,替换后没有把Bootstrap Table启动起来,别人还在睡大觉呢,你怎么‘getSelections'。
好吧,在ajax success中补它一刀:$("#table-ShipChk").bootstrapTable();
好了,Bootstrap Table醒了,我可以下班了。
如果大家还想深入学习,可以点击这里进行学习,再为大家附3个精彩的专题:
Bootstrap学习教程
Bootstrap实战教程
Bootstrap插件使用教程
Bootstrap Table使用教程
以上就是本文的全部内容,希望对大家的学习有所帮助,也希望大家多多支持小牛知识库。
-
本文向大家介绍Android RecyclerView使用方法解析,包括了Android RecyclerView使用方法解析的使用技巧和注意事项,需要的朋友参考一下 1.简介 RecyclerView是一种新的视图组,目标是为任何基于适配器的视图提供相似的渲染方式。它被作为ListView和GridView控件的继承者,在最新的support-V7版本中提供支持。RecyclerView架构
-
本文向大家介绍BootstrapTable请求数据时设置超时(timeout)的方法,包括了BootstrapTable请求数据时设置超时(timeout)的方法的使用技巧和注意事项,需要的朋友参考一下 使用bootstrapTable获取数据时,有时由于网络或者服务器的原因,无法及时获取到数据,页面显示一直处于等待状态。为了改善效果,考虑设置超时,请求发送后超时即显示无数据,过段时间重新发起请求
-
本文向大家介绍FragmentTabHost使用方法详解,包括了FragmentTabHost使用方法详解的使用技巧和注意事项,需要的朋友参考一下 FragmentTabHost是support-v包下提供的用于集成和管理Fragment页面的组件. 今天要实现的效果图如下: 整体结构是MainActivity+5个模块的Fragment. MainActivity的布局如下: 每个tab的布局如
-
本文向大家介绍ToolBar使用方法详解,包括了ToolBar使用方法详解的使用技巧和注意事项,需要的朋友参考一下 ToolBar的出现是为了替换之前的ActionBar的各种不灵活使用方式,相反,ToolBar的使用变得非常灵活,因为它可以让我们自由往里面添加子控件.低版本要使用的话,可以添加support-v7包. 今天要实现的效果如下: 由上图可以看到,toolBar的布局还是相对丰富的.要
-
本文向大家介绍TabLayout使用方法详解,包括了TabLayout使用方法详解的使用技巧和注意事项,需要的朋友参考一下 TabLayout是design库提供的控件,可以方便的使用指示器,功能类似ViewPagerIndicator. 使用非常方便,Android Studio只需要在gradle中引入即可使用 . TabLayout即可以单独使用,也可以配合ViewPager来使用. 先来看
-
本文向大家介绍使用jquery解析XML的方法,包括了使用jquery解析XML的方法的使用技巧和注意事项,需要的朋友参考一下 本文实例讲述了使用jquery解析XML的方法,分享给大家供大家参考之用。具体方法如下: 一、xml文件结构:books.xml 二、页面代码: 运行效果图如下: 感兴趣的读者可以点此本站下载完整代码。 更多关于jquery xml操作相关内容感兴趣的读者可查看本站专题:

