Thinkphp使用Zxing扩展库解析二维码内容图文讲解
一、下载PHP版本的Zxing扩展库
下载地址:https://github.com/khanamiryan/php-qrcode-detector-decoder
二、使用Zxing扩展库
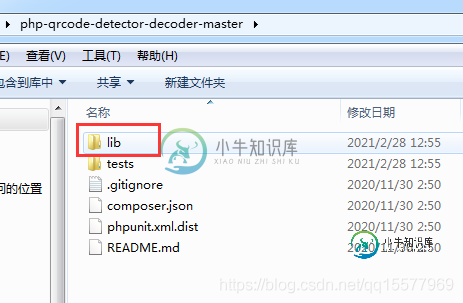
1、文件下载好后,直接解压,结构如下,我们只需要lib这个文件夹

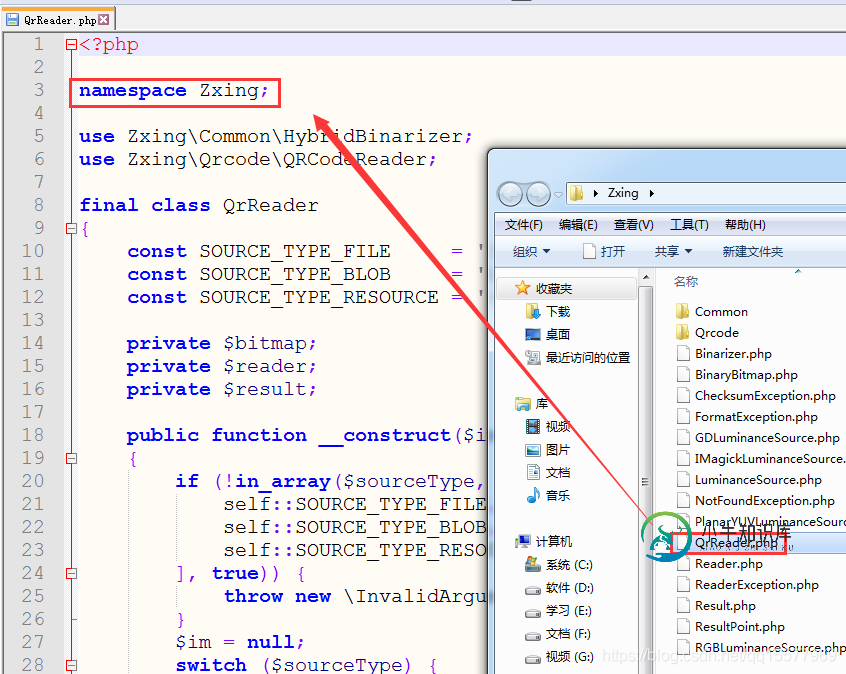
2、将lib文件夹重命名为Zxing,然后打开Zxing目录下的QrReader.php文件,可以发现命名空间是Zxing

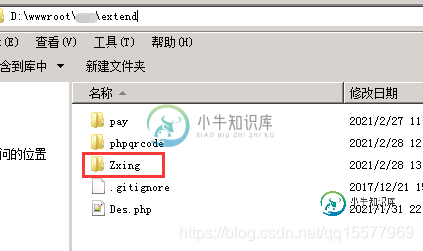
3、接下来就很简单了,把Zxing文件夹放到thnikphp的扩展目录extend里

4、报错 Fatal error:: Allowed memory size of 134217728 bytes exhausted (tried to allocate 40 bytes) in
报错原因:PHP内存不够
解决方法:在调用QrReader前,先用ini_set()方法修改内存限制大小
//修改php内存限制为1024M
ini_set('memory_limit','1024M');
5、报错 Call to undefined function Zxing\Common\fill_array()
解决方法:修改Zxing目录的QrReader.php文件,载入common/customFunctions.php文件,如下:
<?php
namespace Zxing;

use Zxing\Common\HybridBinarizer;
use Zxing\Qrcode\QRCodeReader;
include_once('common/customFunctions.php');

final class QrReader
{
}
QrReader.php完整代码:
<?php
namespace Zxing;

use Zxing\Common\HybridBinarizer;
use Zxing\Qrcode\QRCodeReader;
include_once('common/customFunctions.php');

final class QrReader
{
 const SOURCE_TYPE_FILE  = 'file';
 const SOURCE_TYPE_BLOB  = 'blob';
 const SOURCE_TYPE_RESOURCE = 'resource';

 private $bitmap;
 private $reader;
 private $result;

 public function __construct($imgSource, $sourceType = QrReader::SOURCE_TYPE_FILE, $useImagickIfAvailable = true)
 {
  if (!in_array($sourceType, [
   self::SOURCE_TYPE_FILE,
   self::SOURCE_TYPE_BLOB,
   self::SOURCE_TYPE_RESOURCE,
  ], true)) {
   throw new \InvalidArgumentException('Invalid image source.');
  }
  $im = null;
  switch ($sourceType) {
   case QrReader::SOURCE_TYPE_FILE:
    if ($useImagickIfAvailable && extension_loaded('imagick')) {
     $im = new \Imagick();
     $im->readImage($imgSource);
    } else {
     $image = file_get_contents($imgSource);
     $im = imagecreatefromstring($image);
    }
    break;

   case QrReader::SOURCE_TYPE_BLOB:
    if ($useImagickIfAvailable && extension_loaded('imagick')) {
     $im = new \Imagick();
     $im->readImageBlob($imgSource);
    } else {
     $im = imagecreatefromstring($imgSource);
    }
    break;

   case QrReader::SOURCE_TYPE_RESOURCE:
    $im = $imgSource;
    if ($useImagickIfAvailable && extension_loaded('imagick')) {
     $useImagickIfAvailable = true;
    } else {
     $useImagickIfAvailable = false;
    }
    break;
  }
  if ($useImagickIfAvailable && extension_loaded('imagick')) {
   if (!$im instanceof \Imagick) {
    throw new \InvalidArgumentException('Invalid image source.');
   }
   $width = $im->getImageWidth();
   $height = $im->getImageHeight();
   $source = new IMagickLuminanceSource($im, $width, $height);
  } else {
   if (!is_resource($im)) {
    throw new \InvalidArgumentException('Invalid image source.');
   }
   $width = imagesx($im);
   $height = imagesy($im);
   $source = new GDLuminanceSource($im, $width, $height);
  }
  $histo  = new HybridBinarizer($source);
  $this->bitmap = new BinaryBitmap($histo);
  $this->reader = new QRCodeReader();
 }

 public function decode()
 {
  try {
   $this->result = $this->reader->decode($this->bitmap);
  } catch (NotFoundException $er) {
   $this->result = false;
  } catch (FormatException $er) {
   $this->result = false;
  } catch (ChecksumException $er) {
   $this->result = false;
  }
 }

 public function text()
 {
  $this->decode();

  if (method_exists($this->result, 'toString')) {
   return $this->result->toString();
  }

  return $this->result;
 }

 public function getResult()
 {
  return $this->result;
 }
}
6、在代码里调用
//引用
use Zxing\QrReader;
//调用类库
$qrcode = new QrReader("二维码图片路径");
$content = $qrcode->text();
到此这篇关于Thinkphp使用Zxing扩展库解析二维码内容图文讲解的文章就介绍到这了,更多相关Thinkphp使用Zxing扩展库解析二维码内容内容请搜索小牛知识库以前的文章或继续浏览下面的相关文章希望大家以后多多支持小牛知识库!
-
本文向大家介绍使用python调用zxing库生成二维码图片详解,包括了使用python调用zxing库生成二维码图片详解的使用技巧和注意事项,需要的朋友参考一下 (1)安装Jpype 用Python调用jar包需要安装jpype扩展,在Ubuntu上可以直接使用apt-get安装jpype扩展 (2) 得到zxing jar包 使用zxing第三方库生成二维码图片,关于zxing的介绍可以看其
-
本文向大家介绍使用Zxing实现二维码生成器内嵌图片,包括了使用Zxing实现二维码生成器内嵌图片的使用技巧和注意事项,需要的朋友参考一下 使用Zxing实现二维码生成器内嵌图片,具有一定的参考价值,具体如下: 基本思路是先使用zxing生成的二维码图片,然后读取图片,在其中插入图标,然后整个输出图片。 最近的项目中需要生成二维码,找了几个例子综合下,做出了最后的效果,二维码可以生成图片格式(jp
-
我遵循这篇材料在Android中实现QRCode Scanner。 一步一步地,在我的应用程序中实现以下代码后,我在GingerreadOpenCameron aInterface.java类中收到错误。下面的图像是我面临的错误。 错误显示为: 以下是清单文件: 下面这个问题有人能帮我吗?
-
本文向大家介绍详解ZXing-core生成二维码的方法并解析,包括了详解ZXing-core生成二维码的方法并解析的使用技巧和注意事项,需要的朋友参考一下 二维码无处不在,扫一扫有礼品哦,现在二维码这么流行,想必大家不是很清楚二维码是怎么生成的吧,现在小编通过给大家分享本文帮助大家学习二维码生成的方法。 其实主要是利用goggle发布的jar来使用的此功能。 1、二维码的生成 将Zxing-cor
-
本文向大家介绍Thinkphp 框架扩展之类库扩展操作详解,包括了Thinkphp 框架扩展之类库扩展操作详解的使用技巧和注意事项,需要的朋友参考一下 本文实例讲述了Thinkphp 框架扩展之类库扩展操作。分享给大家供大家参考,具体如下: 类库扩展 ThinkPHP的类库主要包括公共类库和应用类库,都是基于命名空间进行定义和扩展的。只要按照规范定义,都可以实现自动加载。 公共类库 公共类库通常是
-
好的,我在FOP 1.1中使用条形码4j-2.1和zxing-0.1.2生成QR码时遇到了问题。通过添加<code>,我目前有一个FOP 1.0实现正常工作 barcode4j条形码工作,无论是否设置了首选渲染器,在barcode2j-2.1中已修复。 我有所有必要的依赖关系: < Li > fop-zxing-0 . 1 . 2-jar-with-dependencies . jar < Li

