SpringBoot异步任务使用方法详解
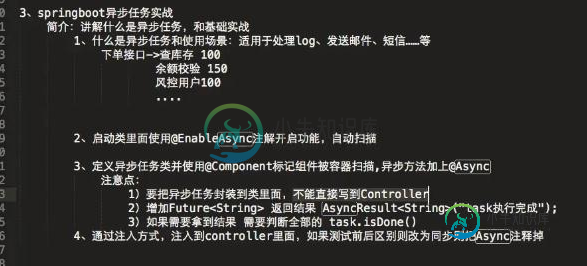
步骤,如图所示:

1.添加异步任务业务类
package top.ytheng.demo.task;

import java.util.concurrent.Future;

import org.springframework.scheduling.annotation.Async;
import org.springframework.scheduling.annotation.AsyncResult;
import org.springframework.stereotype.Component;

//异步任务业务类
@Component
//标记此类是异步类,也可在方法中标记
//不加,则类里面的方法为同步执行
@Async
public class AsyncTask {

  public void task1() throws InterruptedException {
    long begin = System.currentTimeMillis();
    Thread.sleep(1000);
    long end = System.currentTimeMillis();
    System.out.println("任务1耗时:" + (end - begin));
  }

  public void task2() throws InterruptedException {
    long begin = System.currentTimeMillis();
    Thread.sleep(2000);
    long end = System.currentTimeMillis();
    System.out.println("任务2耗时:" + (end - begin));
  }

  public void task3() throws InterruptedException {
    long begin = System.currentTimeMillis();
    Thread.sleep(3000);
    long end = System.currentTimeMillis();
    System.out.println("任务3耗时:" + (end - begin));
  }

  //测试拿到返回结果
  public Future<String> task4() throws InterruptedException {
    long begin = System.currentTimeMillis();
    Thread.sleep(1000);
    long end = System.currentTimeMillis();
    System.out.println("任务4耗时:" + (end - begin));
    return new AsyncResult<String>("任务4");
  }

  public Future<String> task5() throws InterruptedException {
    long begin = System.currentTimeMillis();
    Thread.sleep(2000);
    long end = System.currentTimeMillis();
    System.out.println("任务5耗时:" + (end - begin));
    return new AsyncResult<String>("任务5");
  }

  public Future<String> task6() throws InterruptedException {
    long begin = System.currentTimeMillis();
    Thread.sleep(3000);
    long end = System.currentTimeMillis();
    System.out.println("任务6耗时:" + (end - begin));
    return new AsyncResult<String>("任务6");
  }
}
2.添加测试控制器
package top.ytheng.demo.controller;

import java.util.concurrent.ExecutionException;
import java.util.concurrent.Future;

import org.springframework.beans.factory.annotation.Autowired;
import org.springframework.web.bind.annotation.GetMapping;
import org.springframework.web.bind.annotation.RequestMapping;
import org.springframework.web.bind.annotation.RestController;

import top.ytheng.demo.task.AsyncTask;

@RestController
@RequestMapping("api/v1/async")
public class TaskController {

  @Autowired
  private AsyncTask asyncTask;

  @GetMapping("/test")
  public Object test() throws InterruptedException, ExecutionException {
    long begin = System.currentTimeMillis();
    //asyncTask.task1();
    //asyncTask.task2();
    //asyncTask.task3();
    Future<String> result1 = asyncTask.task4();
    Future<String> result2 = asyncTask.task5();
    Future<String> result3 = asyncTask.task6();
    System.out.println("返回结果:" + result1.get() + "," + result2.get() + "," + result3.get());
    for(;;) {
      if(result1.isDone() && result2.isDone() && result3.isDone()) {
        break;
      }
    }
    long end = System.currentTimeMillis();
    long total = end - begin;
    System.out.println("总耗时:" + total);
    return "总耗时:" + total;
  }
}
3.添加启动类
package top.ytheng.demo;

import org.mybatis.spring.annotation.MapperScan;
import org.springframework.scheduling.annotation.EnableAsync;
import org.springframework.scheduling.annotation.EnableScheduling;

import org.springframework.boot.autoconfigure.SpringBootApplication;
import org.springframework.boot.web.servlet.ServletComponentScan;

@SpringBootApplication //等于下面3个
//@SpringBootConfiguration
//@EnableAutoConfiguration
//@ComponentScan
//拦截器用到
@ServletComponentScan
//MyBatis用到
@MapperScan("top.ytheng.demo.mapper")
//定时使用(开启定时任务)
@EnableScheduling
//开启异步任务
@EnableAsync
public class DemoApplication {

  public static void main(String[] args) {
    SpringApplication.run(DemoApplication.class, args);
  }
}
4.右键项目Run As启动,访问url
http://localhost:8080/api/v1/async/test
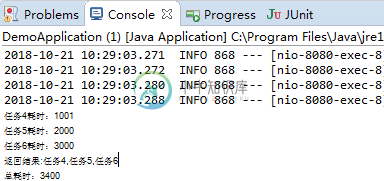
结果:

以上就是本文的全部内容,希望对大家的学习有所帮助,也希望大家多多支持小牛知识库。
-
我想调用一个方法,从一个AsyncWork,从另一个类,我正在尝试这个 但我得到错误“。你能帮助我吗? 我的扩展活动:
-
8.2 使用异步任务 注意:本节所介绍的功能要求 vim 编译包括 +job 特性。 8.2.1 简单任务体验 前文说到,Vim 的异步任务主要是针对外部命令的。那我们就先以最简单最常见的系统命 令 ls 为例,其功能是列出当前目录下的文件,若在 Windows 操作系统下或可用 dir 命令代替。 首先请在 shell 中进入一个非空目录,便于实践,并在 shell 中执行如下命令: $ ls
-
我正在尝试使用以下代码: 是我在Android应用程序中使用的OAuth2Client的一部分。我得到这个错误: 我会提供一些帮助。 谢谢
-
本文向大家介绍Android的异步任务AsyncTask详解,包括了Android的异步任务AsyncTask详解的使用技巧和注意事项,需要的朋友参考一下 AsyncTask,顾名思义,异步任务。说到异步,最简单的理解就是不同步。再复杂一点理解,就得举例子了。 假设我要去火车站买票,刚到火车站我突然发现我忘了带身份证。怎么办?怎么办! 想办法,想办法!我想我应该找个在学校的同学帮我送过来,因为我不
-
本文向大家介绍SpringBoot 实现定时任务的方法详解,包括了SpringBoot 实现定时任务的方法详解的使用技巧和注意事项,需要的朋友参考一下 一、定时任务实现的几种方式: Timer 这是java自带的java.util.Timer类,这个类允许你调度一个java.util.TimerTask任务。使用这种方式可以让你的程序按照某一个频度执行,但不能在指定时间运行。一般用的较少。 Sch
-
本文向大家介绍SpringBoot开启异步调用方法,包括了SpringBoot开启异步调用方法的使用技巧和注意事项,需要的朋友参考一下 异步调用无需等待,方法相当于子线程,后台执行,主线程执行完成,子线程开始执行。 SpringBoot 开启异步执行仅需两步: 方法上加 @Async main 方法 开启 @EnableAsync controller 执行结果 可以看到 controller 先

