
iOS开发中TableView类似QQ分组的折叠与展开效果

类似QQ分组的样子,实现tableView的折叠与展开。其实要做这个效果我先想到的是在tableView中再嵌套多个tableView,这个想法实现起来就有点难了。
所以还是换个思路,把tableView的HeaderView用上了。给headerView加上手势,轻松解决折叠展开的问题。
直接上代码吧。
@property (nonatomic, strong) UITableView *myTableView;
@property (nonatomic, strong) NSMutableArray *listArray;  // 数据源
@property (nonatomic, strong) NSMutableArray *titlesArray;  // 分组的名称
@property (nonatomic, strong) NSMutableDictionary *openSectionDict; // 记录哪个组展开
- (void)viewDidLoad {
 [super viewDidLoad];
 // 初始化tableView
 _myTableView = [[UITableView alloc] initWithFrame:self.view.frame style:UITableViewStyleGrouped];
 self.myTableView.delegate = self;
 self.myTableView.dataSource = self;
 [self.view addSubview:_myTableView];
 self.openSectionDict = [[NSMutableDictionary alloc] init]; // 初始化字典
 [self setUpData];
}
// 给数据源赋值
- (void)setUpData {
 self.listArray = [NSMutableArray new];
 self.titlesArray = [NSMutableArray new];
 for (int i = 0; i < 5; i++) {  // 5个section
  [self.titlesArray addObject:[NSString stringWithFormat:@"section %d", i]];
  NSMutableArray *array = [NSMutableArray new];
  for (int i = 0; i < 4; i++) { // 每个section有4个row
   [array addObject:[NSString stringWithFormat:@"row %d", i]];
  }
  [self.listArray addObject:array];
 }
}
// 实现tableView的代理方法
#pragma mark - tableView dataSource
- (NSInteger)numberOfSectionsInTableView:(UITableView *)tableView {
 return 5;
}
- (NSInteger)tableView:(UITableView *)tableView numberOfRowsInSection:(NSInteger)section {
 if ([[self.openSectionDict valueForKey:[NSString stringWithFormat:@"%ld", section]] integerValue] == 0) { //根据记录的展开状态设置row的数量
  return 0;
 } else {
  return 4;
 }
}
- (UITableViewCell *)tableView:(UITableView *)tableView cellForRowAtIndexPath:(NSIndexPath *)indexPath {
 UITableViewCell *cell = [tableView dequeueReusableCellWithIdentifier:@"CELL_ID"];
 if (!cell) {
  cell = [[UITableViewCell alloc] initWithStyle:UITableViewCellStyleSubtitle reuseIdentifier:@"CELL_ID"];
  cell.textLabel.text = [NSString stringWithFormat:@"row %ld", indexPath.row];
 }
 return cell;
}
#pragma mark - tableView delegate
- (CGFloat)tableView:(UITableView *)tableView heightForRowAtIndexPath:(NSIndexPath *)indexPath {
 return 45;
}
- (CGFloat)tableView:(UITableView *)tableView heightForHeaderInSection:(NSInteger)section {
 return 40;
}
- (UIView *)tableView:(UITableView *)tableView viewForHeaderInSection:(NSInteger)section {
 UIView *view = [[UIView alloc] initWithFrame:CGRectMake(0, 0, tableView.bounds.size.width, 40)];
 view.backgroundColor = [UIColor whiteColor];
 view.tag = KTAG + section;
 UILabel *label = [[UILabel alloc] initWithFrame:CGRectMake(20, 0, view.bounds.size.width, view.bounds.size.height)];
 label.text = self.titlesArray[section];
 [view addSubview:label];
 if ([[self.openSectionDict valueForKey:[NSString stringWithFormat:@"%ld", section]] integerValue] == 0) {
  UIImageView *imageView = [[UIImageView alloc] initWithFrame:CGRectMake(10, (view.bounds.size.height - 10) / 2, 7, 10)];
  imageView.image = [UIImage imageNamed:@"Triangle_right_gray"]; // 三角形小图片
  [view addSubview:imageView];
 } else {
  UIImageView *imageView = [[UIImageView alloc] initWithFrame:CGRectMake(10, (view.bounds.size.height - 7) / 2, 10, 7)];
  imageView.image = [UIImage imageNamed:@"Triangle_down_gray"];
  [view addSubview:imageView];
 }
 UITapGestureRecognizer *tap = [[UITapGestureRecognizer alloc] initWithTarget:self action:@selector(collegeTaped:)];
 [view addGestureRecognizer:tap];
 return view;
}
- (CGFloat)tableView:(UITableView *)tableView heightForFooterInSection:(NSInteger)section {
 return 0.1;
}
#pragma mark - sectionHeader clicked
- (void)collegeTaped:(UITapGestureRecognizer *)sender {
 NSString *key = [NSString stringWithFormat:@"%ld", sender.view.tag - KTAG];
 // 给展开标识赋值
 if ([[self.openSectionDict objectForKey:key] integerValue] == 0) {
  [self.openSectionDict setObject:@"1" forKey:key];
 } else {
  [self.openSectionDict setObject:@"0" forKey:key];
 }
 NSUInteger index = sender.view.tag;
 NSIndexSet *set = [NSIndexSet indexSetWithIndex:index - KTAG];
 [self.myTableView reloadSections:set withRowAnimation:UITableViewRowAnimationFade];
}
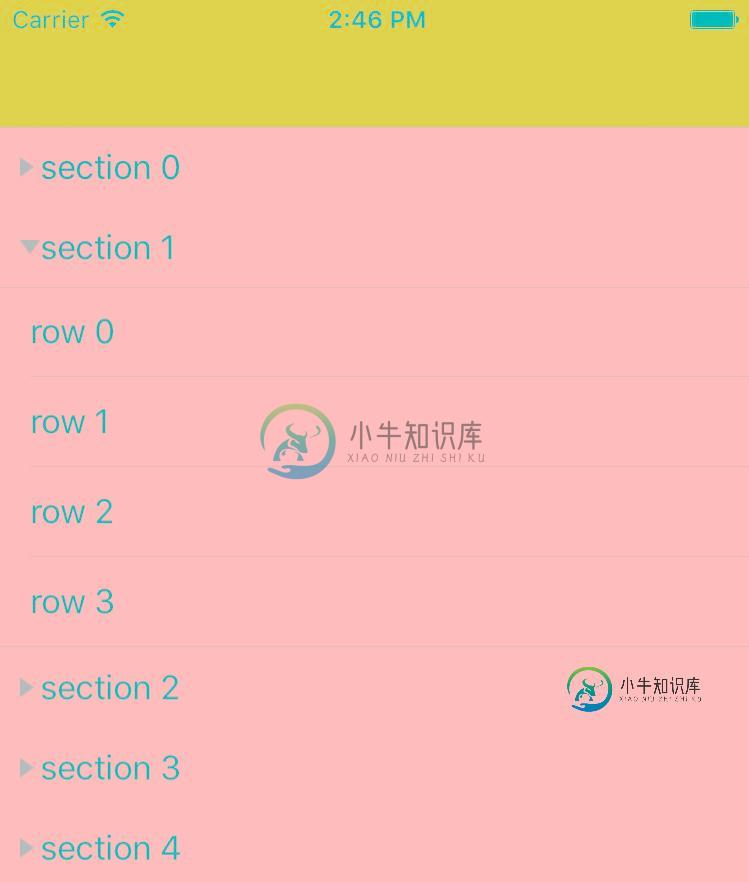
最后的效果:
以上所述是小编给大家介绍的iOS开发中TableView类似QQ分组的折叠与展开效果,希望对大家有所帮助,如果大家有任何疑问请给我留言,小编会及时回复大家的。在此也非常感谢大家对小牛知识库网站的支持!
-
问题内容: 我能够展开和折叠单元格,但我想在UITableViewCell内调用函数(展开和折叠)以更改按钮标题。 问题答案: 如果你想在细胞获得更大的身体,那么,你有你的店,在使用: 然后,当您想在didSelectRow中展开一个时: 编辑 这将使单元动画自己变大,您不需要单元中额外的动画块。 编辑2
-
本文向大家介绍jQuery实现折叠、展开的菜单组效果代码,包括了jQuery实现折叠、展开的菜单组效果代码的使用技巧和注意事项,需要的朋友参考一下 本文实例讲述了jQuery实现折叠、展开的菜单组效果代码。分享给大家供大家参考。具体如下: 这是一款jQuery实现的漂亮的竖向折叠菜单组,初次运行的时候请刷新一下页面,让jQ载入,这款菜单应用广泛,可用到后台左侧,网站前台也可以用,发现自腾讯微博开放
-
我有一个带有多个视图保持器的RecyclerView适配器。每个ViewHolder都有一个标题TextView和一个嵌套的RecyclerView,工作正常。但我想实现一个扩展/折叠函数,这样嵌套的RecyclerView就可以隐藏,直到单击标题为止。我使用此方法RecyclerView展开/折叠项目。它可以工作,但当我单击标题以展开嵌套的RecyleView时,recyclerview不会填充
-
问题内容: 我已经使用延迟加载实现了一棵树。1级节点是在创建树时创建的,而子节点只有在用户扩展任何特定节点时才创建。 数据来自数据库,我们向数据库发出查询,以填充子节点。实现TreeExpansionListener并使用treeExpanded方法的重写实现。扩展时,我删除所选节点的所有子节点,进行数据库查询,并将记录作为子节点添加到所选节点。在将任何节点添加到树之前,将虚拟子节点添加到该节点。
-
本文向大家介绍Java在Excel中创建多级分组、折叠或展开分组的实现,包括了Java在Excel中创建多级分组、折叠或展开分组的实现的使用技巧和注意事项,需要的朋友参考一下 本文介绍通过Java程序在Excel创建分组的方法,可对行或列分组进行分组并设置明细数据是否展开或折叠。设置数据分组并展开或折叠时,可通过以下方法: 方法一: 通过方法sheet.groupByRows(int firstR
-
展开或折叠代码 操作步骤: 菜单栏:Code —> Folding —> Expand 快捷键: Mac: command + “+” Windows\/Linux: Ctrl + "+" 展开或折叠代码 操作步骤: 菜单栏:Code —> Folding —> Collapse 快捷键: Mac: command + “-” Windows\/Linux: Ctrl + "-" 展开或折叠当前代